

In this technical blog post, we’ll walk you through how to install Snowpark using the Linux version, more specifically, the Ubuntu 20.04 x86-64 version of IntelliJ with version 2021.1.1. It should be noted that this installation process is similar on other operating systems. In particular, once IntelliJ is installed, the process should be identical to this one.
For those unfamiliar with IntelliJ, it’s a Java IDE that supports multiple programming languages as well as operating systems (OS).
(Please refer to the installation guide for more instructions on other OS)
IntelliJ supports different ways to install the IDE. This includes the following:
- Download the .tar.gz file
- Use Toolbox App
- Command Line / Terminal
On Linux, the straightforward way is the use of a Terminal, which is a standard tool on Linux and comes preinstalled on most of your favorite Linux distros.
To start, open the terminal either via Ctrl+Alt+T keyboard shortcut or from the application menu on your left panel. Type “Terminal” in the search field.

Once the terminal is open, copy this command into your terminal and press enter.
sudo snap install intellij-idea-community --classic
It will install the community edition as a snap package. You will be asked to enter your password. The install may take some time depending on your internet speed so go ahead and pour yourself a cup of coffee.

Once the installation is complete, click on the application menu from your left panel. Type “IntelliJ” in the search field. You should see the IntelliJ IDEA icon.

The next step is to set up Scala Development on your IntelliJ. Follow these steps to install all the dependencies:
For the JVM used with Scala version 2.12.x, Java 11 is the recommended version. Before installing Java, let’s make sure you have the Java 11 JDK
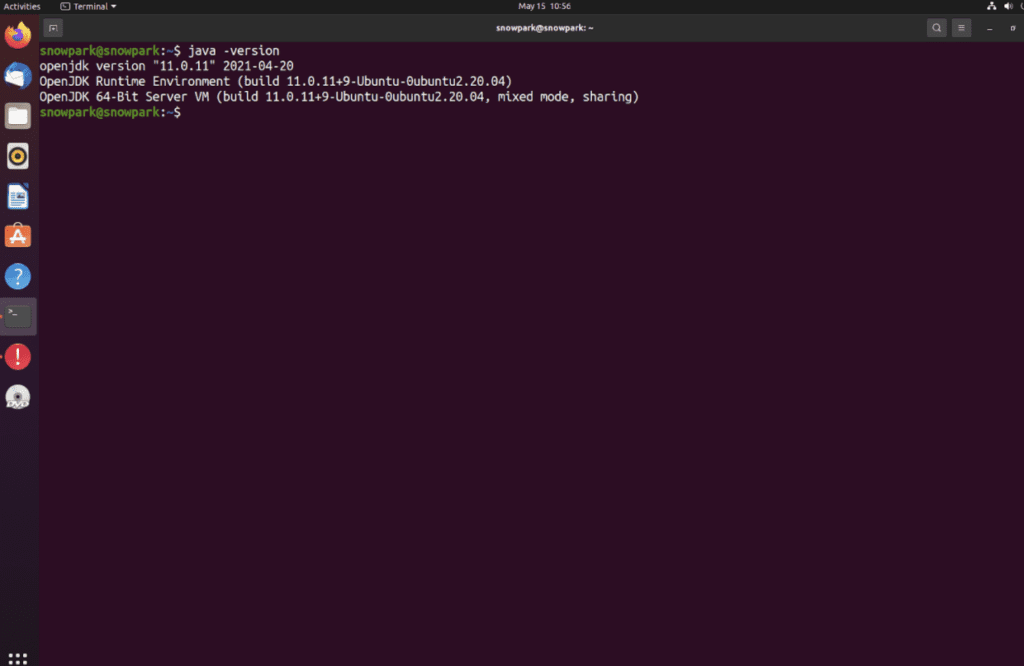
Run java -version on the command line and make sure you see java 11.
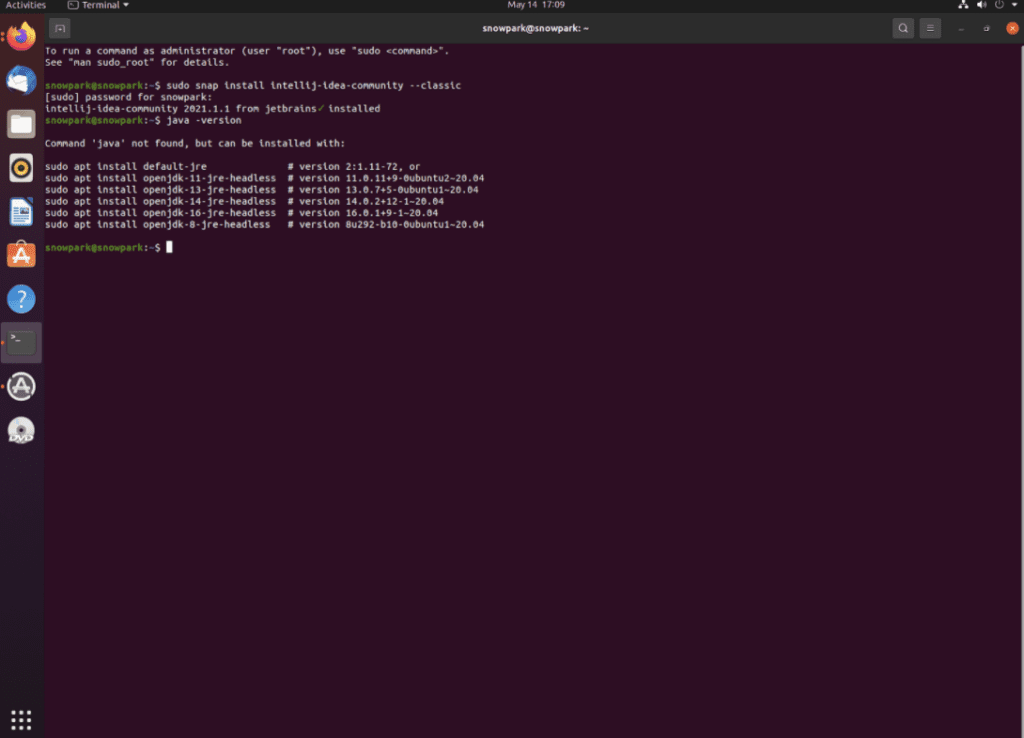
In our case, java wasn’t installed, Fortunately, Ubuntu provides command-line options to install different versions of java open source. You can choose to install version 11:
$ sudo apt install openjdk-11-jre-headless
However, we are going to install the Oracle Java version 11, which is recommended by Snowpark.
In case you have a version already installed, but the wrong one. In the Figure below, the openJDK is installed but we need the Oracle Java version 11.
Luckily Linux has a handy tool that we can use to change the default Java version. To get a list of installed Java versions, run the command:
$ update-java-alternatives --list
Note, we have two versions installed on our Ubuntu. The OpenJDK and Oracle.

Once you have a list of Java version, set a default one by running the command:
$ sudo update-alternatives --config java
Note the start on your left option on the Java 11 OpenJDK. To change the version, type selection number. In our case, we select option 2 and press enter.

Check the Java version.

In case you need to download the Oracle version, then you can download the Java SE 11 Development kit from here. It is recommended by Snowflake to install the Oracle version.
We need “Linux x64 Compressed Archive” “jdk-11.0.11_linux-x64_bin.tar.gz”. You will be asked to register an account with Oracle and accept the license agreement.

Once the download is complete, open your Terminal and change the directory to the location where you want to install the JDK, then move the .tar.gz archive file to the current directory.

Install the software-properties-common package, which adds the add-apt-repository:
$ sudo apt install software-properties-common
Then use the add-apt-repository command to add the repo to your list of package sources:
$ sudo add-apt-repository ppa:linuxuprising/java
You’ll see this message:
					Output
Oracle Java 11 (LTS) and 12 installer for Ubuntu, Linux Mint and Debian.

Java binaries are not hosted in this PPA due to licensing. The packages in this PPA download and install Oracle Java 11, so a working Internet connection is required.

The packages in this PPA are based on the WebUpd8 Oracle Java PPA packages: https://launchpad.net/~webupd8team/+archive/ubuntu/java

Created for users of https://www.linuxuprising.com/

Installation instructions (with some tips), feedback, suggestions, bug reports etc.:

. . .

Press [ENTER] to continue or ctrl-c to cancel adding it
Press ENTER to continue the installation. You may see a message about no valid OpenPGP data found, but you can safely ignore this.
Update your package list to make the new software available for installation:
$ sudo apt update
The installer will look for the Oracle JDK you downloaded in /var/cache/oracle-jdk11-installer-local. Create this directory and move the Oracle JDK archive there:
					$ sudo mkdir -p /var/cache/oracle-jdk11-installer-local/
$ sudo cp jdk-11.0.7_linux-x64_bin.tar.gz /var/cache/oracle-jdk11-installer-local/
Finally, install the package with this command:
$ sudo apt install oracle-java11-installer-local
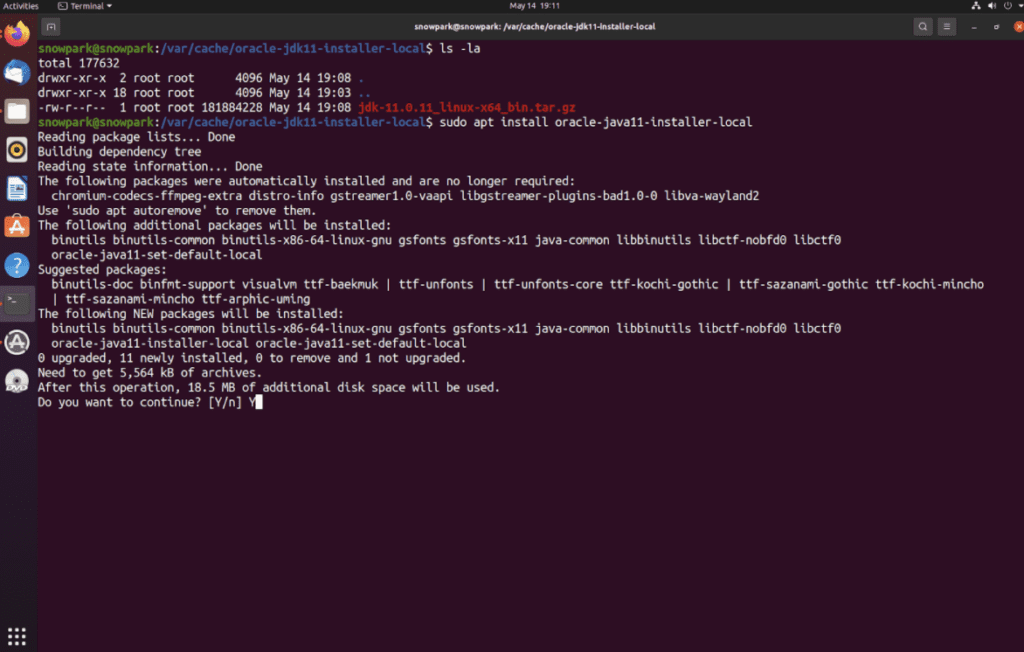
The installer will first ask you to accept the Oracle license agreement. Accept the agreement, then the installer will extract the Java package and install it.

Select “yes” and the install will start.

To check the version of Java running, use the command:

Then, after starting up IntelliJ, you can download and install the Scala plugin by following the instructions on how to install IntelliJ plugins (search for “Scala” in the plugins menu.)
From the left menu click on the plugins option:

Use the Marketplace tab to browse and install plugins from the JetBrains Plugin Repository or a custom plugin repository. Use the Install tab to install the plugin and then restart IDE.

How to Create a New Scala Project in IntelliJ IDEA
Now that we have IntelliJ, Java, and Scala plugin installed, we can move to create a new Scala project in IntelliJ IDEA
Choose New Project:
In the list on the left, select Scala, and on the right, select IDEA:

Click Next and then fill in the details for your new project.

From above, Figure Scala SDK is empty which means we don’t have Scala SDK installed. We can install the Scala SDK by clicking on the Create buttons >> Download button >> Choose Scala version (in our case 2.12.11) >> click ok button.

IntelliJ IDEA downloads the SDK with the required Scala version.

Now that the Scala SDK is installed we can click on the Finish button to create the new project.

Configuring the IntelliJ IDEA Project for Snowpark
You have two options to configure the project:
- Using the Snowpark library and its dependencies in to your project
- Using the Snowpark Library in a Maven Project
Using the Snowpark Library and its Dependencies in to your Project
- Download the Snowpark library and dependencies from here.
- Choose File >> Project Structure.
- Under Project Settings, choose Libraries.
- Click the + button to add a new project library, and choose Java.

Browse to the directory where you extracted the contents of the TAR/ZIP archive file that you downloaded earlier. Select the lib directory.

Click the + button to add a new project library, and choose Java.
Browse to the directory where you extracted the contents of the TAR/ZIP archive file that you downloaded earlier. Select the snowpark-<version>.jar file.

Click OK, and then click Apply.

Using the Snowpark Library in a Maven Project
To integrate the Snowpark library into a project that uses a Maven build, add the library as a dependency.
- In the pom.xml file for your project, make the following changes.
- Add the repository into the repositories tag: “<repositories> … </repositories>”
- Add the Snowpark Library into the dependencies tag: “<dependencies> … </dependencies>”

From your Maven Lifecycle tab. Do clean and then compile or whatever your project requires.

Verifying Your IntelliJ IDEA Project Configuration
To verify you have configured your project to use Snowpark, run a simple example of Snowpark code.
In the Project tool window on the left, expand your project, and select the src folder. Right-click on the folder, and choose New >> Scala class.
In the Create New Scala Class dialog box, enter the name “Main”, select Object, and press the Enter key. In the Main.scala file, replace the contents with code.
Replace the with values that you use to connect to Snowflake.
					import com.snowflake.snowpark._
import com.snowflake.snowpark.functions._

object Main {
  def main(args: Array[String]): Unit = {
    // Replace the <placeholders> below.
    val configs = Map(
      "URL" -> "https://<account>.snowflakecomputing.com:443",
      "USER" -> "<user name>",
      "PASSWORD" -> "<password to the database>",
      "ROLE" -> "<role name>",
      "WAREHOUSE" -> "<warehouse name>",
      "DB" -> "<database name>",
      "SCHEMA" -> "<schema name>"
    )
    val session = Session.builder.configs(configs).create

    session.sql("show tables").show()
  }
}
Click the green arrow next to the Object line, and choose Run Main to run the example.

If all is good, you should see a table with all your databases that exist on your Snowflake.
					[main]  INFO (Logging.scala:22) - Closing stderr and redirecting to stdout
[main]  INFO (Logging.scala:22) - Done closing stderr and redirecting to stdout
[main]  INFO (Logging.scala:22) -
----------SNOW-----------
SnowflakePlan[show tables]
-------------------------

---------------------------------------------------------------------------------------------------------------------------------------------------------------------------------------------------------------------------
|"created_on"             |"name"      |"database_name"  |"schema_name"  |"kind"  |"comment"  |"cluster_by"  |"rows"  |"bytes"  |"owner"  |"retention_time"  |"automatic_clustering"  |"change_tracking"  |"is_external"  |
---------------------------------------------------------------------------------------------------------------------------------------------------------------------------------------------------------------------------
|2021-05-06 13:19:28.397  |UBER_TABLE  |USER_CISAKSSON   |UBER_SCHEMA    |TABLE   |           |              |652435  |3811840  |PUBLIC   |1                 |OFF                     |OFF                |N              |
---------------------------------------------------------------------------------------------------------------------------------------------------------------------------------------------------------------------------
Our sincere goal is that this technical blog makes it easier to install Snowpark in Linux. For more how-to guides, articles, and videos of Snowpark, be sure to visit our blog or contact us directly.


