

Whether you are setting up an On-Premise Gateway to provide authentication for an on-premise data source to the cloud or for cloud to cloud connections (such as connecting to the Snowflake Data Cloud), using Virtual Machines (VM) to house your gateways is generally considered best practice for security purposes.
In this blog, I am going to walk you through how to set up an On-Premises gateway on an Azure VM and some of the best practices associated with the process.
What is an On-Premises Gateway?
An on-premises gateway is a link between two data sources, generally from an on-premises data source to the cloud, that allows for a secure transfer of data between the two. The gateway itself is a Microsoft program that you download and configure based upon your desired connection that is maintained by a select group of gateway admins. These gateways will provide secure connections for all of the data sources you choose to connect through the gateways in your reporting environment.
Although you can host gateways on your local desktop machine, it is preferable to host them on Virtual Machines for a couple of reasons.
The first reason is that whatever VM you select will most likely be a more powerful machine than your desktop, which means that it will be able to handle the loads of queries better.
The second reason is that the safety of the gateway does not depend on a single piece of physical hardware that could be lost or destroyed.
Lastly, if the owner of the gateway were to leave the company, you would have to set it up all over again on a different machine. With a VM, you can simply transfer credentials or better yet, maintain governance with a service account.
How to Set Up your Gateways on a Virtual Machine
Now that we’ve talked about what a gateway is and why we need to set them up, let’s walk through the steps to set them up. First, we’ll need to go to our Azure Portal and select Virtual machines from the services list. If you haven’t selected your VMs yet, make sure to read our post on how to select the right VM for your deployment.

Now you should be able to see all of the virtual machines that you have procured in Azure.

Next, you’ll need to make sure that your VM is running. If it is not, make sure to press the Start button below. Once your VM is running, press the Connect drop-down and select RDP and then click Download RDP File.

Open the file and follow the prompts to log in to the VM. If you are doing this for testing, you can log in as your normal user account if you have access. If you are wanting to use this for enterprise deployment, you will want to use a service account to log in to the VM so that you can maintain continuity of the gateway regardless of changes in staffing.
Once you have logged in, make sure to open an internet browser and go to PowerBI.com. Then click on the download icon and select Data Gateway.

You should be prompted to visit Power BI Gateway where you choose whether you’re going to download using the Standard or Personal mode. For almost all enterprise deployments, you are going to want to choose the Standard mode at this point. If you are only working individually, then you can use Personal mode, but most use cases we see have some element of collaboration, hence our suggestion of Standard mode.

Once you have downloaded the gateway with the appropriate mode to your VM, open the program. You should see the popup below. Make sure to select the appropriate area to install the gateway. If you are using a VM, ensure that you are using the right drive that has all of the memory.

Once you’ve successfully installed the gateway to the appropriate machine and drive, now you’ll need to sign into the gateway using your service account. You should choose Register a New Gateway and then enter your new gateway name. Now your gateway should be ready for use.

Let’s go to Power BI Service to complete the gateway setup. Go to the gear icon in the top right and select Manage Gateways. First, make sure that you are able to see the gateway set up in the On-premises data gateways view.

Once you’re sure you can see the Gateway in Power BI Service, click on Manage Users at the top to identify who else will be your Gateway admins. You can either manage this via individual contributors or as we would suggest, by Azure AD Group.

Next, to add a data source that utilizes a gateway, go to the Data Sources view and then the top left and select + New. Then under Gateway Cluster Name find the name of the gateway that you just set up.

Make sure to identify the Server and Warehouse that you are using if you are setting up a Snowflake data source. For the Authentication Method, select OAuth2 if you’re setting up with SSO.
Double-check that the right credentials are entered for the Authentication box by selecting Edit Credentials.
Note: These credentials should be those of your Service Account. These credentials will stay embedded in this gateway and will be used to authenticate against your datasource. The users of the gateway will just need to authenticate to the gateway, which we will show you in a few moments. This will make sure that the gateway will stay connected to the dataset and will not break if an admin were to leave the company or move roles.
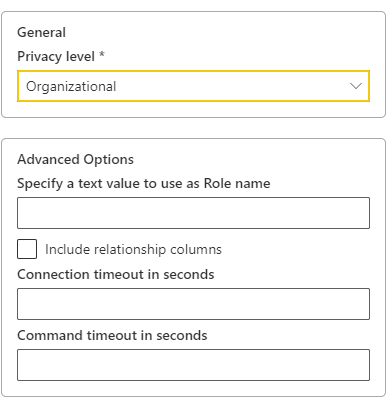
Moving down the menu, select the Use SSO via Azure AD for DirectQueries if you are wanting to enable that functionality. Finally, select Organizational for your enterprise set up in the Privacy Level box. Since there are multiple roles that you can use in Snowflake, if you do not specify a Role then it will default to the user’s default role.
We’re almost there!
Now that you can see the gateway and you’ve set up the appropriate data sources, the last thing is to make sure that all desired users have access to the gateway. You can do that by selecting a data connection and then selecting Manage Users at the top of the screen.
You can then enter in the user or user group that you want to have access to the data source – just make sure they have the appropriate intended level of access.

You have now successfully set up your data gateway, now let’s make sure that your reports are utilizing the gateways appropriately!
Setting up Gateway with the Data Source
Once you have published your report and model to Power BI Service, go to the data model and select the Schedule Refresh button so that you can see the settings for the dataset. Go down to Gateway Connection and toggle the Use an On-Premise or VNet data gateway selector on.
Make sure that the Gateway maps to the data source that you set up in the Manage Gateways portal. See below for an example.

Once you see the green checkmark in the Status section, your data source should be ready for a refresh from Power BI Service. The best way to test this is to go to the data set and click the Refresh Now button.
Closing
Understanding what role On-premises gateways play in a Power BI deployment, whether linking on-premises to the cloud or securing cloud-to-cloud data, is a huge part of the deployment process. Deploying Power BI can get complicated, so hopefully, our blog post was helpful not just in how to set up the gateways, but in helping you understand the why behind gateways.
Thank you for reading our blog! If you are getting ready to implement or thinking about implementing Power BI Premium Capacity please let our experienced team of Power Platform experts know so that we can help guide you through the process.


