

You’re gathering JSON data from different APIs and storing it in places like AWS S3, Azure ADLS Gen2, or Google Bucket. Then, you can connect these storage locations to the Snowflake Data Cloud using integration objects and use the JSON entities as Snowflake external tables.
This data might have sensitive customer info, patient health records, or employee data. Now, you may be concerned about keeping this sensitive data secure before using it or sharing it through Snowflake’s external tables.
There’s a problem with Snowflake’s external tables. You can’t set up a data masking rule for the VALUE column right when you make the table using CREATE EXTERNAL TABLE. DDL statement.
You have to do it later with an ALTER command. And if you want to apply a masking policy to a variant column, it’s a bit more complicated, especially with nested JSON data.
In this blog, we will explore the difficulties of implementing Dynamic Data Masking for external virtual columns when working with simple and nested JSON data files. We’ll also discover how to govern your organization’s and your customers’ sensitive and private information on a large scale.
Challenges of Masking JSON Data in an External Table
Let’s assume we are storing the following customer data in JSON format that has some PII information like credit card number, address, phone number, social security number, driver’s license number, etc.
The customer JSON data has nested elements as shown below:
					{
  "customer_id": "12345",
  "first_name": "John",
  "last_name": "Doe",
  "contact_info": {
    "address": {
      "street": "123 Main St",
      "city": "Anytown",
      "state": "CA",
      "postal_code": "12345"
    },
    "phone_number": "555-123-4567"
  },
  "personal_info": {
    "social_security_number": "123-45-6789",
    "driver_license": "DL-ABC-12345",
    "date_of_birth": "1980-01-15"
  }
}
To access the data stored in the external stage from Snowflake, we have two options. The first approach, we can directly query the stage location using the $ notation. The second approach involves creating an external table that includes mapping to the external stage location and specifying file format properties, as illustrated in Figure 1 and Figure 2 respectively.
Method-1: Query Named Stage Directly
					-- accessing staged JSON data directly using $ notation
select
	t.$1:customer_id::number,
	t.$1:first_name::text,
	t.$1:last_name::text,
	...
	...
	t.$1:personal_info.social_security_number::text

from
	@my_db.my_sch.my_stg_location
    (file_format => 'my_db.my_sch.my_json_file_format') t;
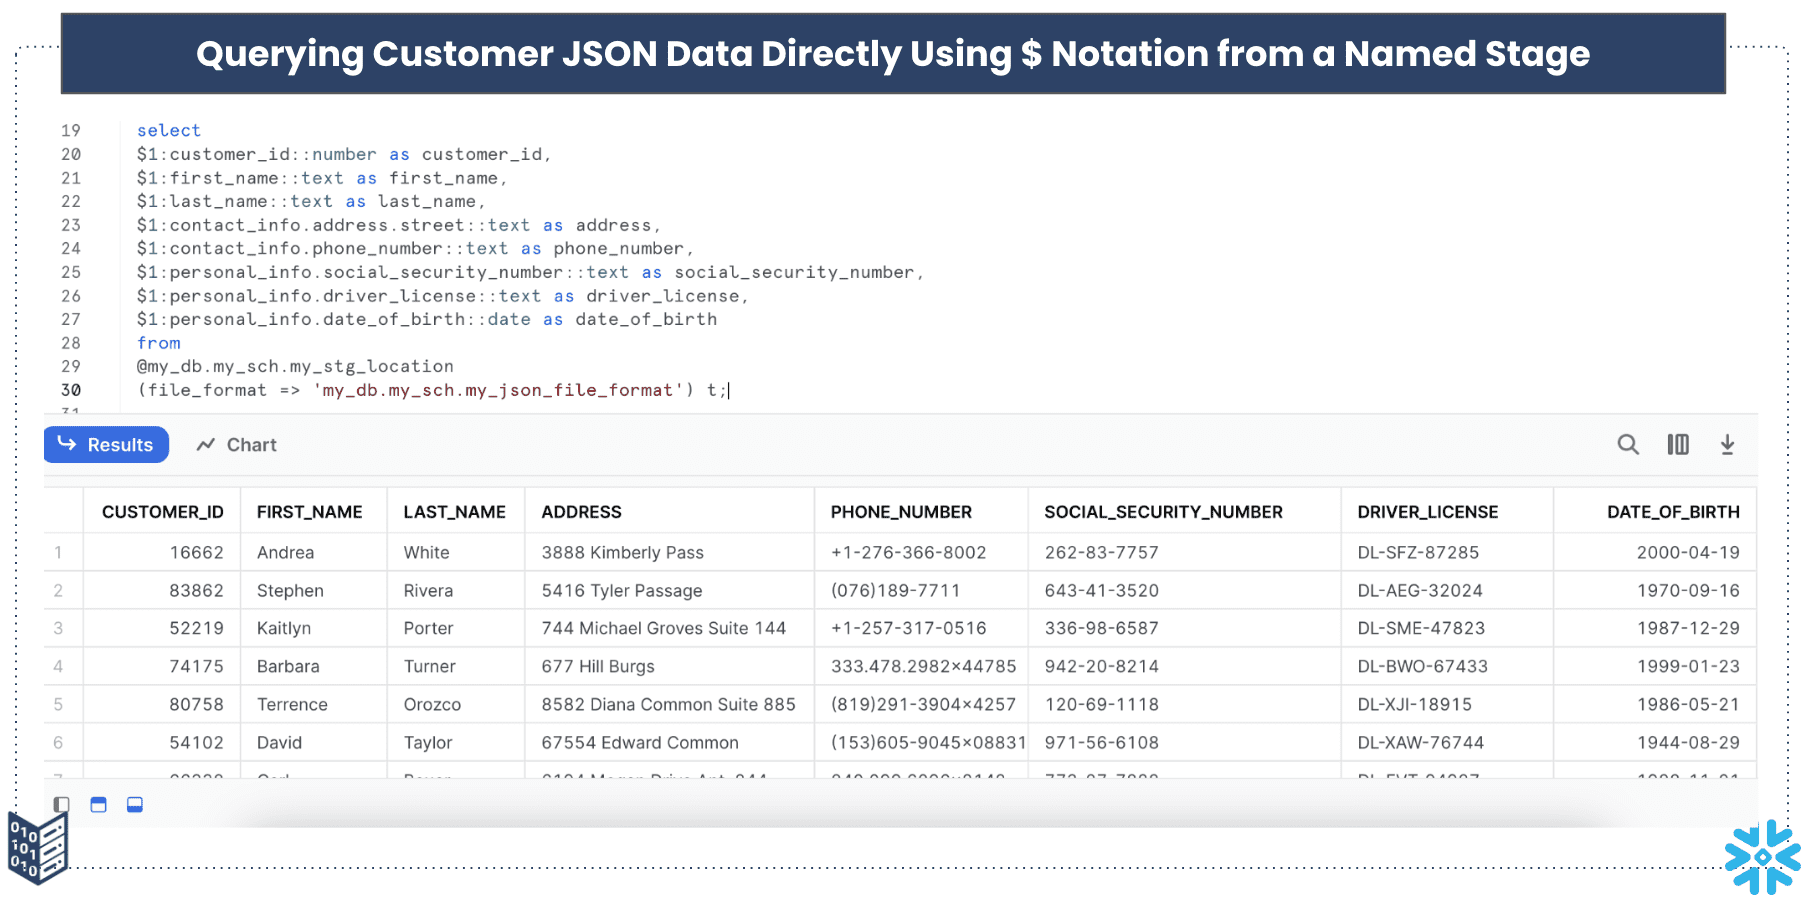
The drawback of method-1 is that we cannot apply any masking policies, which means the data remains unprotected from unauthorized users. Therefore, it is crucial to prevent unintended access to the stage location by setting up a robust RBAC (Role-Based Access Control) policy.
This policy ensures that no role can directly access the external named stage, and access to the stage data is only permitted through the external table.
Method-2- Query Defined External Table
					-- external table ddl statement
CREATE OR REPLACE EXTERNAL TABLE my_db.my_sch.customer_ext (
    json_src variant as (value),
    customer_id number as (value:customer_id::number),
    first_name text as (value:first_name::text),
    last_name text as (value:last_name::text),
    ....
    ....
    social_security_number text as (value:personal_info.social_security_number::text)
)
LOCATION=@my_db.my_sch.my_stg_location
FILE_FORMAT=my_db.my_sch.my_json_file_format;
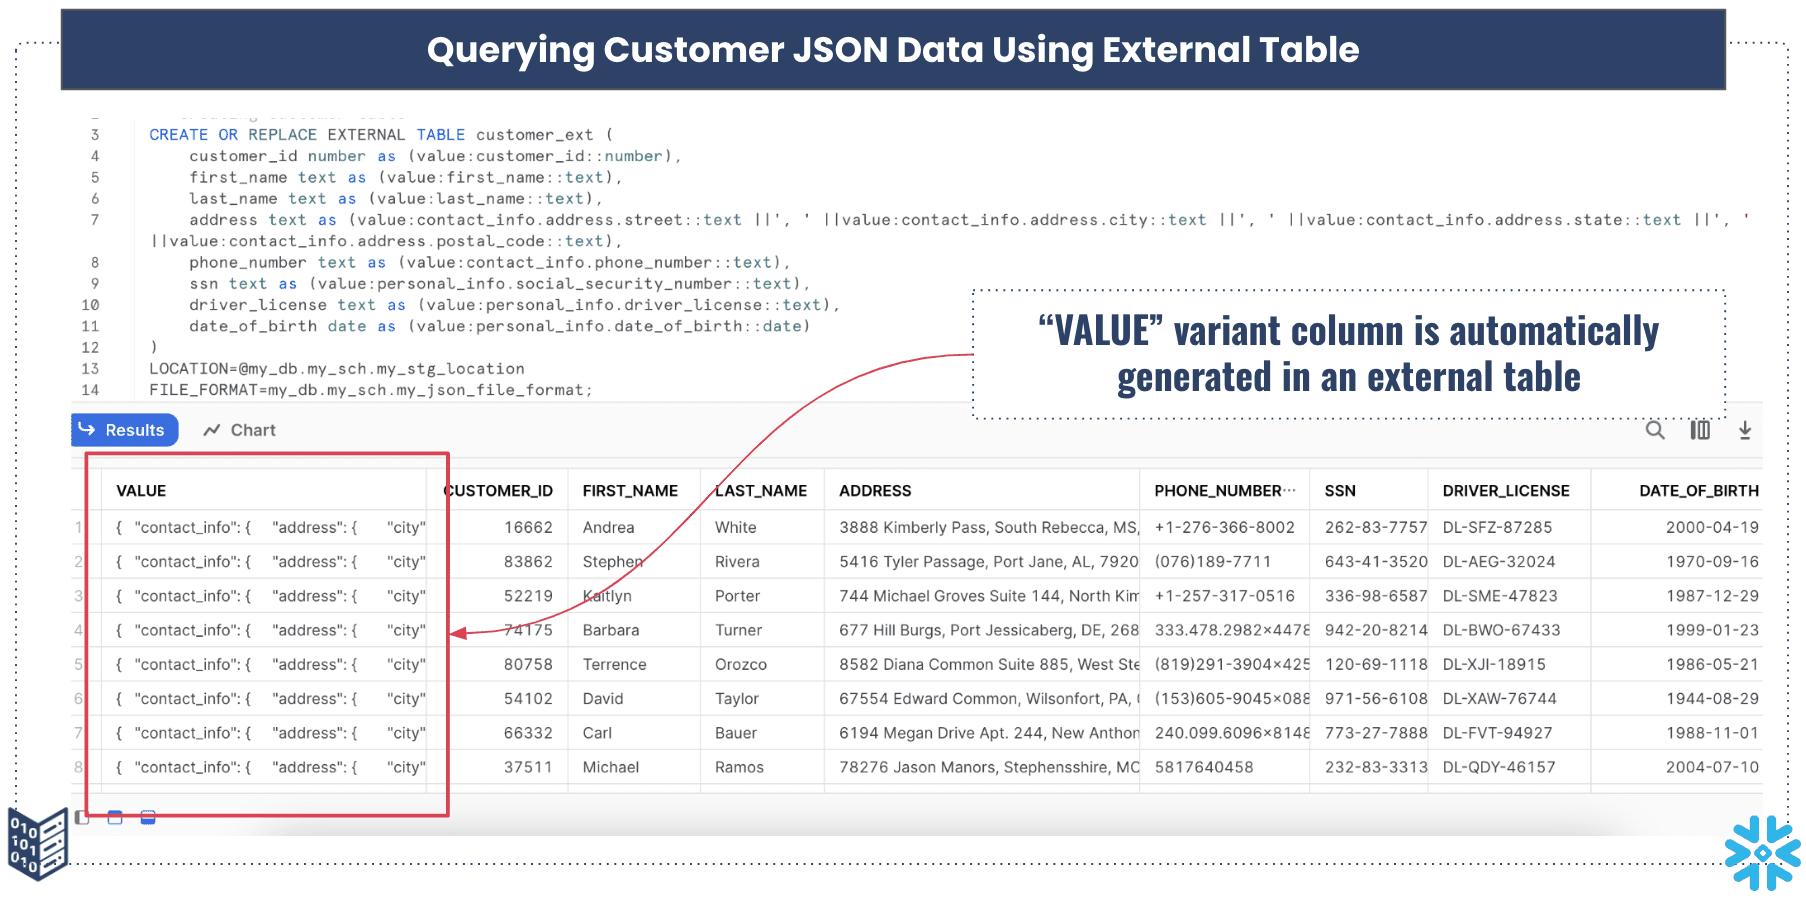
When we opt for method 2, which involves granting users access to the JSON data through an external table, it becomes essential to protect the customer’s sensitive PII information.
To achieve this, it’s standard procedure to establish masking policies for each specific PII column and link them accordingly. Alternatively, this can also be accomplished through a tagging approach, but it’s worth noting that this method presents its own set of challenges.
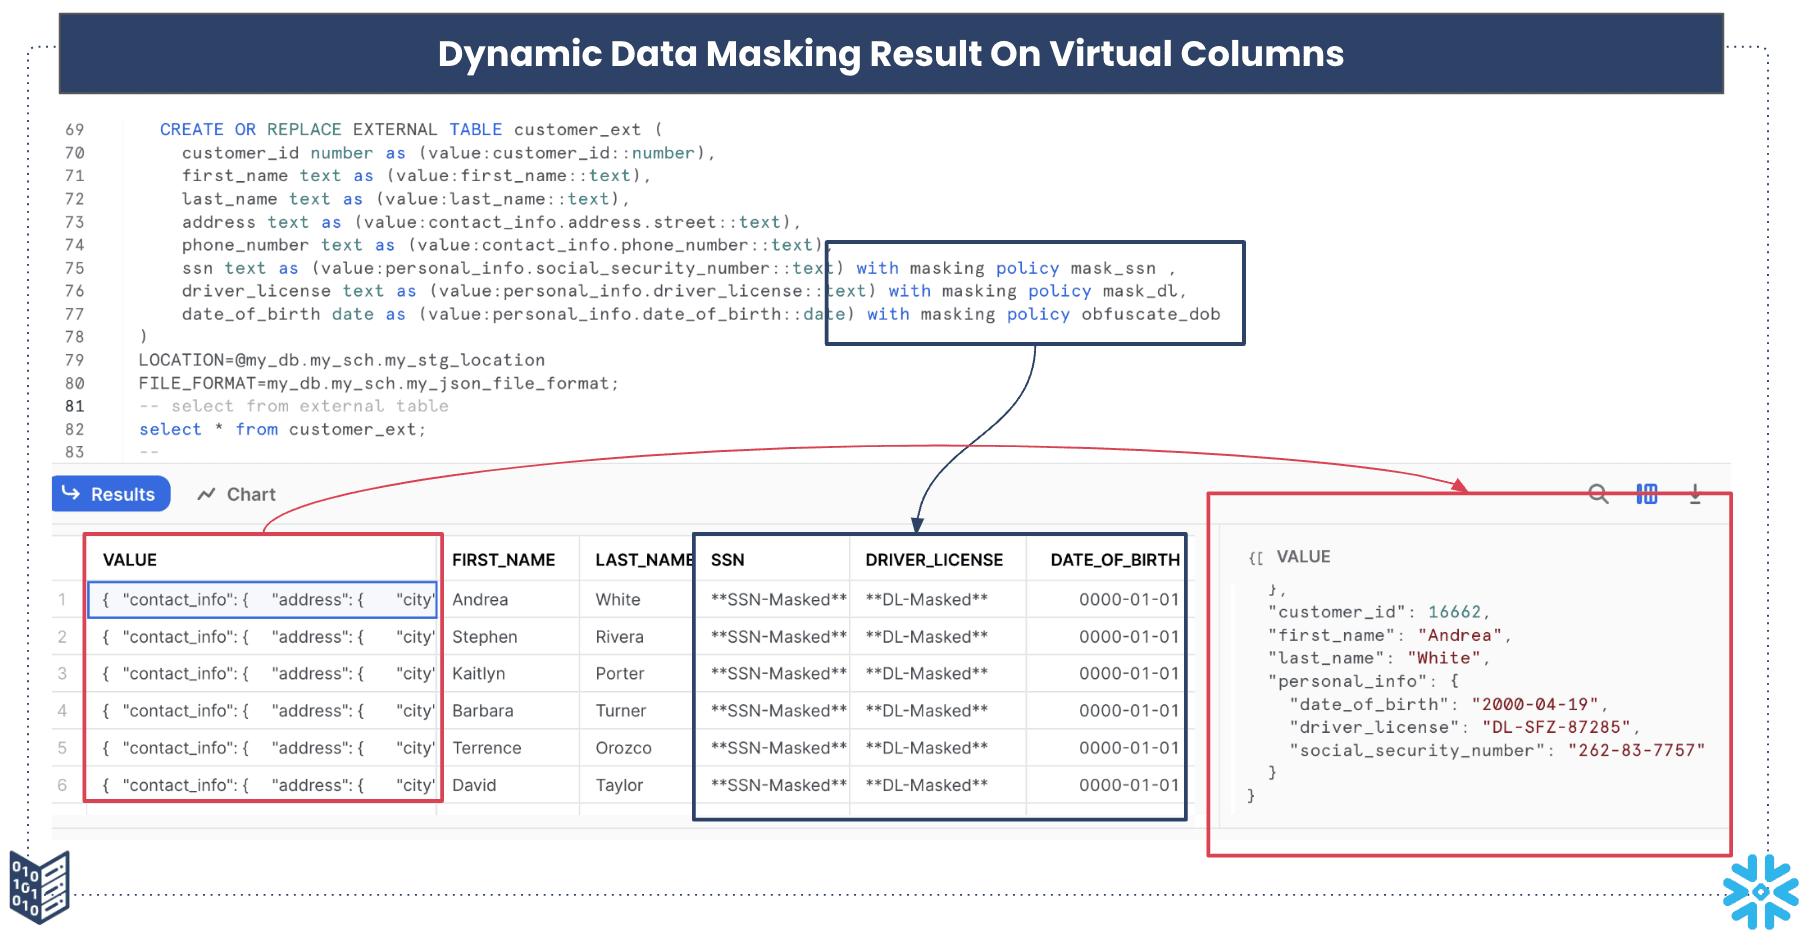
Suppose we’ve applied masking policies to three fields: SSN, driving license, and date of birth columns. Below is the DDL (Data Definition Language) for the external table.
					-- DDL statement for creating customer external table
CREATE OR REPLACE EXTERNAL TABLE customer_ext (
    customer_id number as (value:customer_id::number),
    first_name text as (value:first_name::text),
    last_name text as (value:last_name::text),
    address text as (value:contact_info.address.street::text),
    phone_number text as (value:contact_info.phone_number::text),
    ssn text as (value:personal_info.social_security_number::text) with masking policy mask_ssn ,
    driver_license text as (value:personal_info.driver_license::text) with masking policy mask_dl,
    date_of_birth date as (value:personal_info.date_of_birth::date) with masking policy obfuscate_dob
)
LOCATION=@my_db.my_sch.my_stg_location
FILE_FORMAT=my_db.my_sch.my_json_file_format;
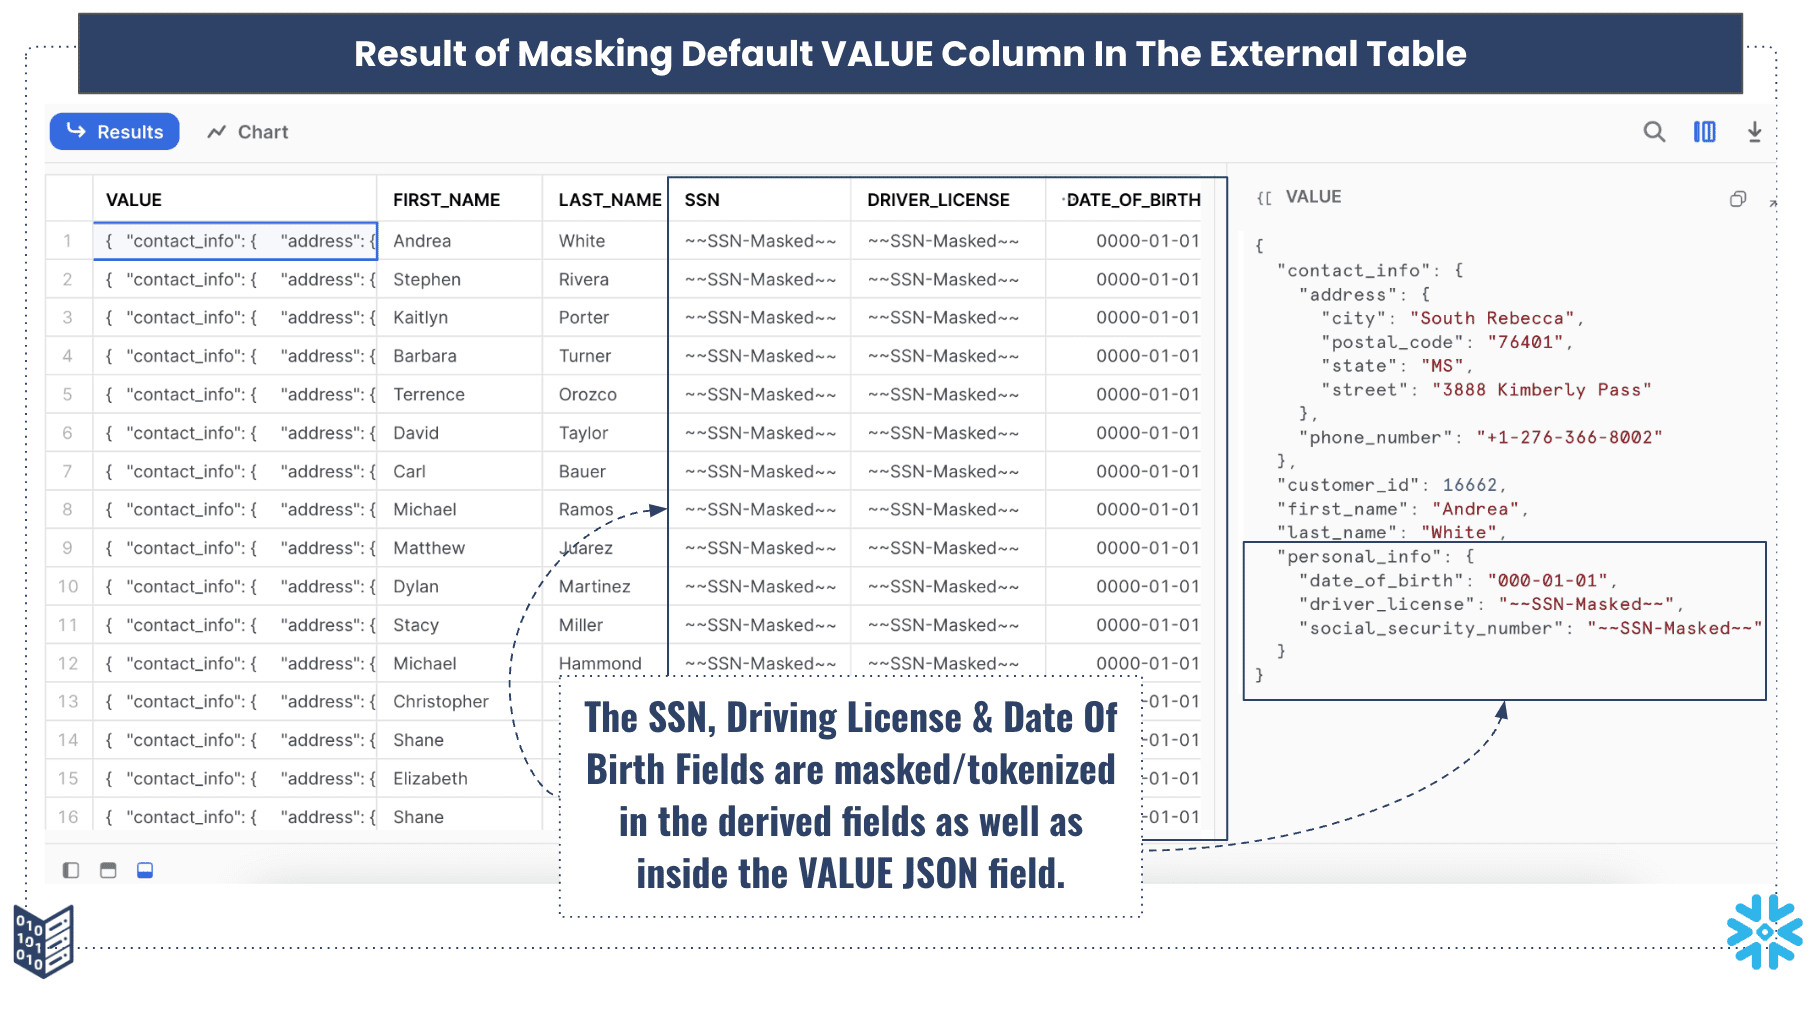
Upon executing a SELECT query on this table, the individual virtual columns with masking policies will indeed display masked or obfuscated data. However, the default non-virtual column VALUE will still show the unmasked or unobfuscated data to the end user, which is not the intended behavior.
You can refer to Figure 3 to observe the outcome of the SELECT SQL statement on the customer external table.
Solution To The Challenge
Let’s delve deeper and find a solution to protect our default value column, eliminating the need to create individual masking policies for each virtual column.
In the following section, we are going to discuss three different methods to solve the data masking problem for external table:
Okay – Create a View
Better – Create Masking UDFs for Specific Variant Formats
Best – Create Masking UDF with Recursive Key Search
Method-1: Create A View
Before proceeding, let’s examine a typical approach to tackling this issue, which involves creating a view on top of the external table. This view allows all data consumers to access it and applies masking, as demonstrated below:
					create or replace view my_db.my_sch.customer_vw
(
    customer_id,
    first_name,
    Last_name,
    ...
    ...
    social_security_number with masking policy ssn_mask
)
as
    select
        json_src:customer_id::number as customer_id,
	    json_src:first_name::text as first_name,
	    json_src:last_name::text as last_name,
        ...
        ...
	    json_src:personal_info.social_security_number::text  as social_security_number
    from my_db.my_sch.customer_ext;
However, the drawback of this approach is that for each external table, you need to create a separate view object. If you have numerous JSON entities, this leads to lots of objects, increasing the effort required for object maintenance and impacting the overall cost of ownership in your Snowflake data platform.
Method-2: Create Masking UDFs for Specific Variant Formats
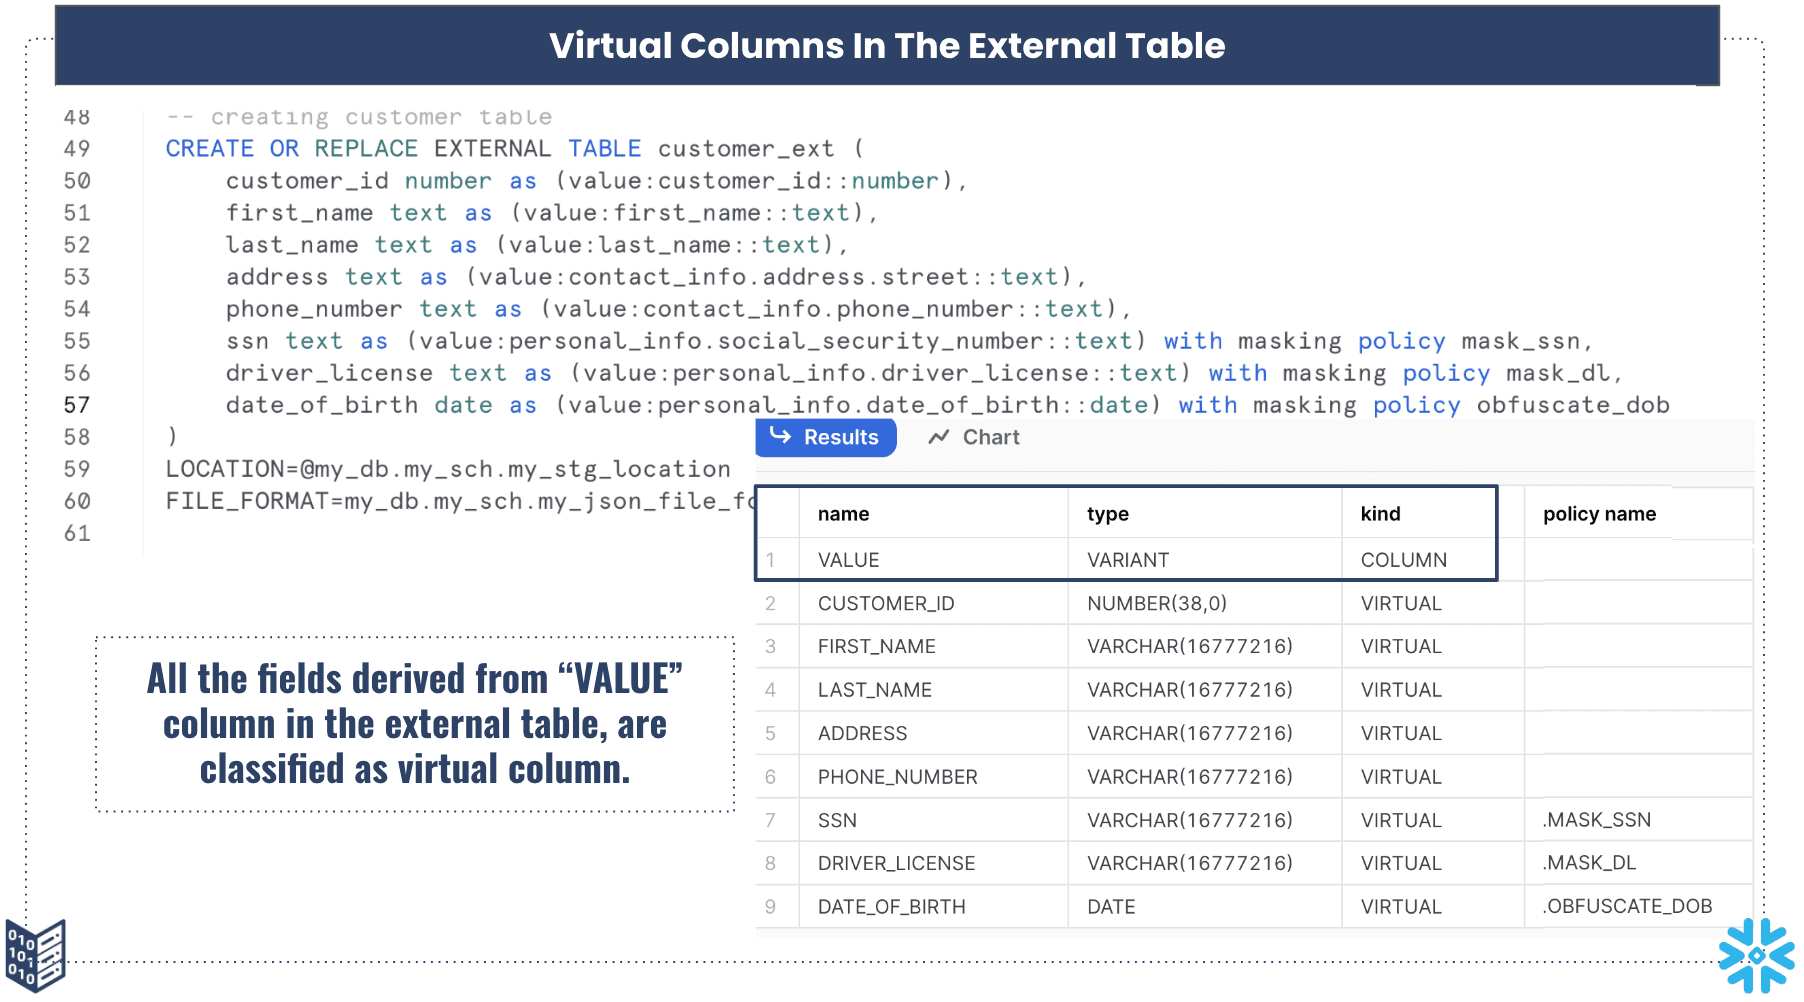
The default VALUE column in any Snowflake external table is of variant data type and in our example, it is a nested JSON data that holds customer information including PII fields. So, let’s mask the variant data itself and see if all other data elements get marked automatically or not.
During the description of an external table, the default VALUE column is displayed as a non-virtual column, and all other columns derived from the VALUE column are shown as virtual columns, as depicted in Figure 4.
Notably, the external table’s DDL statement doesn’t include any VALUE column, yet it still appears when describing the external table. This poses a challenge because a masking policy cannot be applied during the external table’s creation.
Snowflake suggests executing an ALTER command on the external table and applying the policy to the VALUE column. By doing so, we can mask the variant data type and safeguard our sensitive information.
To mask a variant column, a custom function (User Defined Function) must be created. This function takes an input of the variant data type and returns a variant data type after applying masking or obfuscation, as demonstrated in the JavaScript-based UDF below.
The function searches for the personal_info element and, upon a match, replaces the sub-elements such as social security number, driver’s license, and date of birth with masked or obfuscated text.
Once this function is set up, you can create a masking policy and apply it to relevant roles where masking is required. Finally, the policy can be associated with the VALUE column by executing an ALTER statement.
					-- Step-1 Creating a customer function
CREATE OR REPLACE FUNCTION my_udf(v variant)
  RETURNS variant
  LANGUAGE JAVASCRIPT
  AS
  $$
    if ("personal_info" in V) {
        V["personal_info"]["social_security_number"] = "~~SSN-Masked~~";
        V["personal_info"]["driver_license"] = "~~DL-Masked~~";
        V["personal_info"]["date_of_birth"] = "0000-01-01";
    }
    return V;
  $$;

-- Step-2 creating a masking policy
CREATE OR  REPLACE MASKING POLICY mask_value_column as (val VARIANT ) RETURN VARIANT ->
    CASE
      WHEN current_role() IN ('ANALYST') THEN val
      else my_udf(val)
    END;

-- Set the making policy to the value column by running alter statement
ALTER TABLE customer_ext MODIFY COLUMN VALUE set MASKING POLICY mask_value_column;
Once it is implemented, and when you examine your table, it will appear as depicted below.
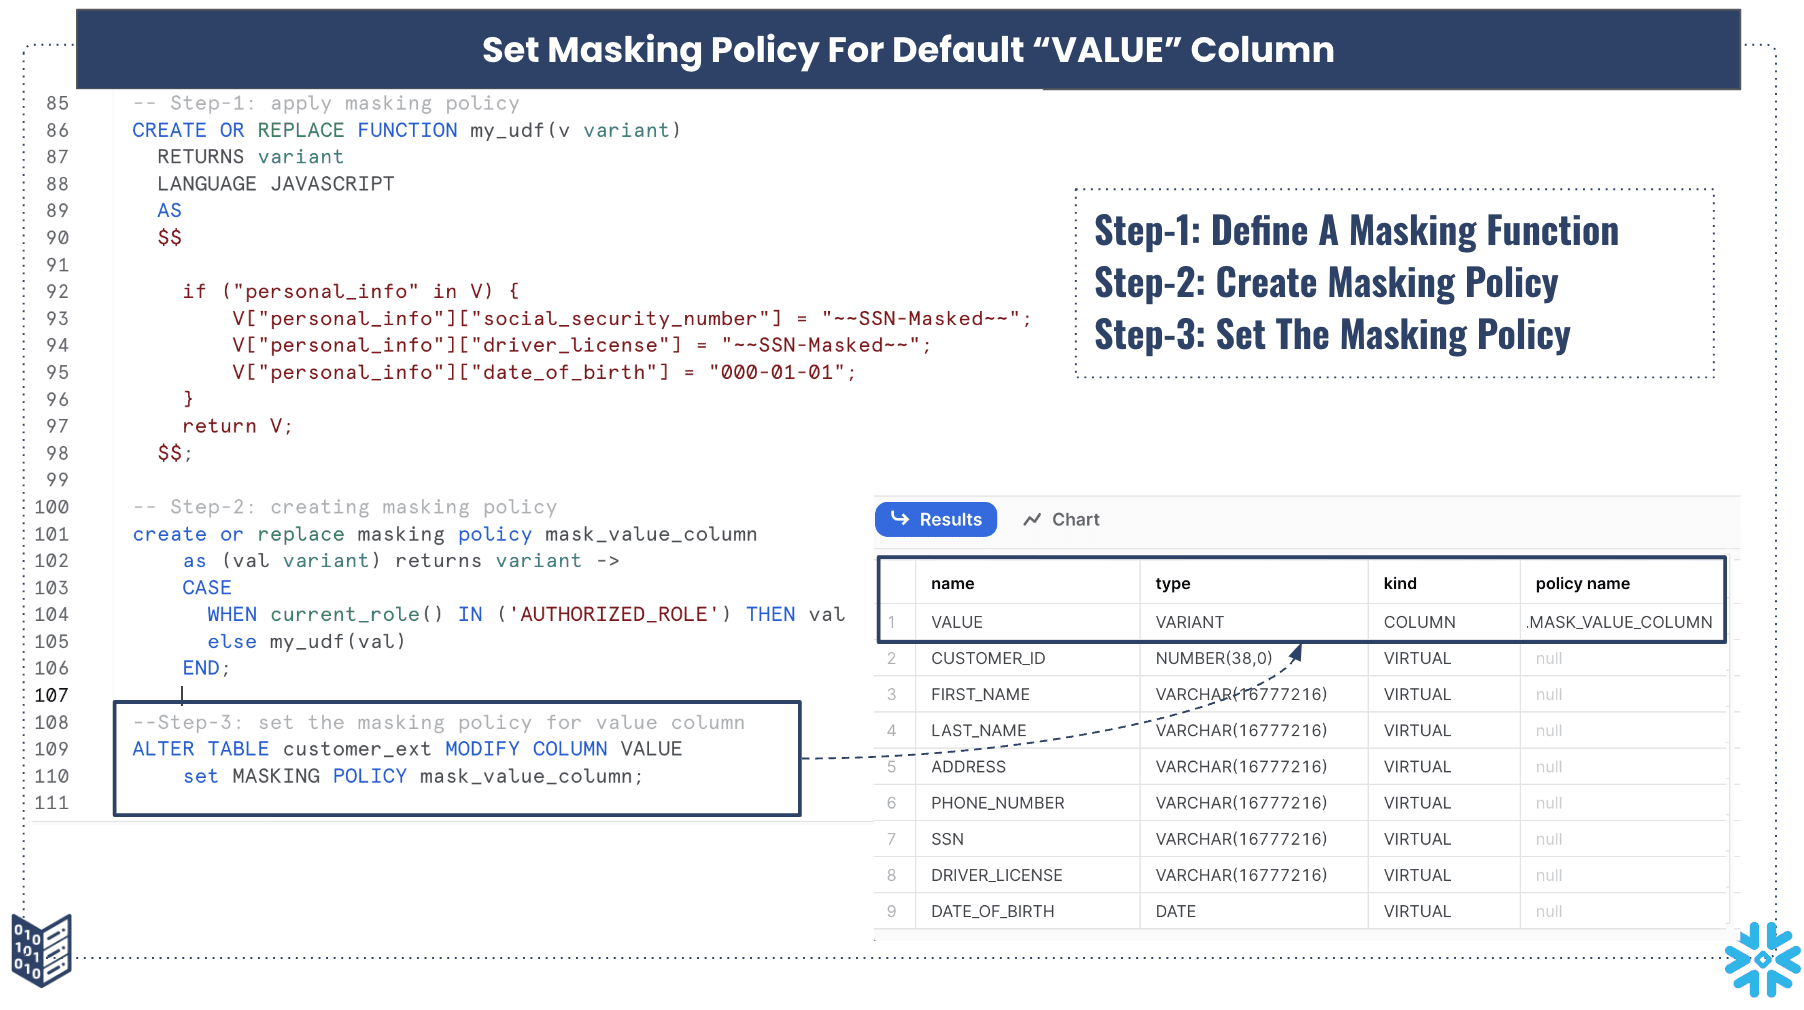
Once the masking policy is applied to the VALUE column, the other derived columns are automatically masked, eliminating the need for any additional masking.
To guarantee the protection of your customer’s sensitive information, here are the recommended actions:
Develop a user-defined masking function capable of handling variant data types. This function should enforce masking rules on various PII fields and ultimately produce a masked variant value.
Create a policy object that invokes this masking function, ensuring consistent data privacy.
Apply the masking policy to the
VALUEcolumn using anALTERstatement, strengthening the security of confidential data.Grant usage access to the external table exclusively to the intended roles within your data platform.
Be very careful to stop unauthorized access to the named stage. Unauthorized roles might misuse
$notation to get to the stage and look at the JSON data.Remove all permissions from the stage location for roles that should not have access to unmasked data. This will prevent the named stage data from being accessible using the
$notation.
When you query the customer table, both the VALUE column and its derived columns will implement the masking policy before showing the data.
This approach works well when you have a small number of JSON entities and your data governance needs are relatively simple. However, as you add more JSON entities to your data platform and the complexity of the JSON data increases, it becomes necessary to write a substantial amount of code to ensure that the appropriate masking rules are applied across all JSON entities. In the next section, we’ll explore whether we can automate this process to a greater extent in order to reduce, if not entirely eliminate, the manual effort required.
Limitation of Data Classification Table Function
Tagging is a feature in Snowflake, represented as a schema-level object. It empowers a data governance team to mark and label PII and sensitive information, followed by associating a policy object to safeguard these fields. The combination of tagging and policy objects enables a data governance team to work efficiently at scale, eliminating the need to create policies for each individual field.
Want to learn more about tags and their benefits?
Read more about it in this blog!

Snowflake offers a table function that takes the table name as an input parameter and generates a JSON output for classification purposes. When you use the EXTRACT_SEMANTIC_CATEGORIES function with a specific table like customer_ext, it analyzes the columns within that external table and provides a list of potential categories along with their corresponding likelihoods as shown in Figure-7.
These likelihoods indicate the probability of a column containing personal data, based on categories like privacy or sensitivity. Additionally, Snowflake provides a system-level procedure called ASSOCIATE_SEMANTIC_CATEGORY_TAGS, when used in conjunction with EXTRACT_SEMANTIC_CATEGORIES, can automatically assign tags to your columns, as demonstrated below in Figure-7 & Figure-8.
					-- Step-1 Execute EXTRACT_SEMANTIC_CATEGORIES
SELECT
    f.key::varchar as column_name,
    f.value:"recommendation":"privacy_category"::varchar as privacy_category,
    f.value:"recommendation":"semantic_category"::varchar as semantic_category,
    f.value:"recommendation":"confidence"::varchar as confidence,
    f.value:"recommendation":"coverage"::number(10,2) as coverage,
    f.value:"details"::variant as details,
    f.value:"alternates"::variant as alternates
  FROM
  TABLE(FLATTEN(EXTRACT_SEMANTIC_CATEGORIES('customer_ext')::VARIANT)) AS f;

-- Step-2 Execute ASSOCIATE_SEMANTIC_CATEGORY_TAGS
CALL ASSOCIATE_SEMANTIC_CATEGORY_TAGS(
   'customer_ext',
    EXTRACT_SEMANTIC_CATEGORIES('customer_ext')
);
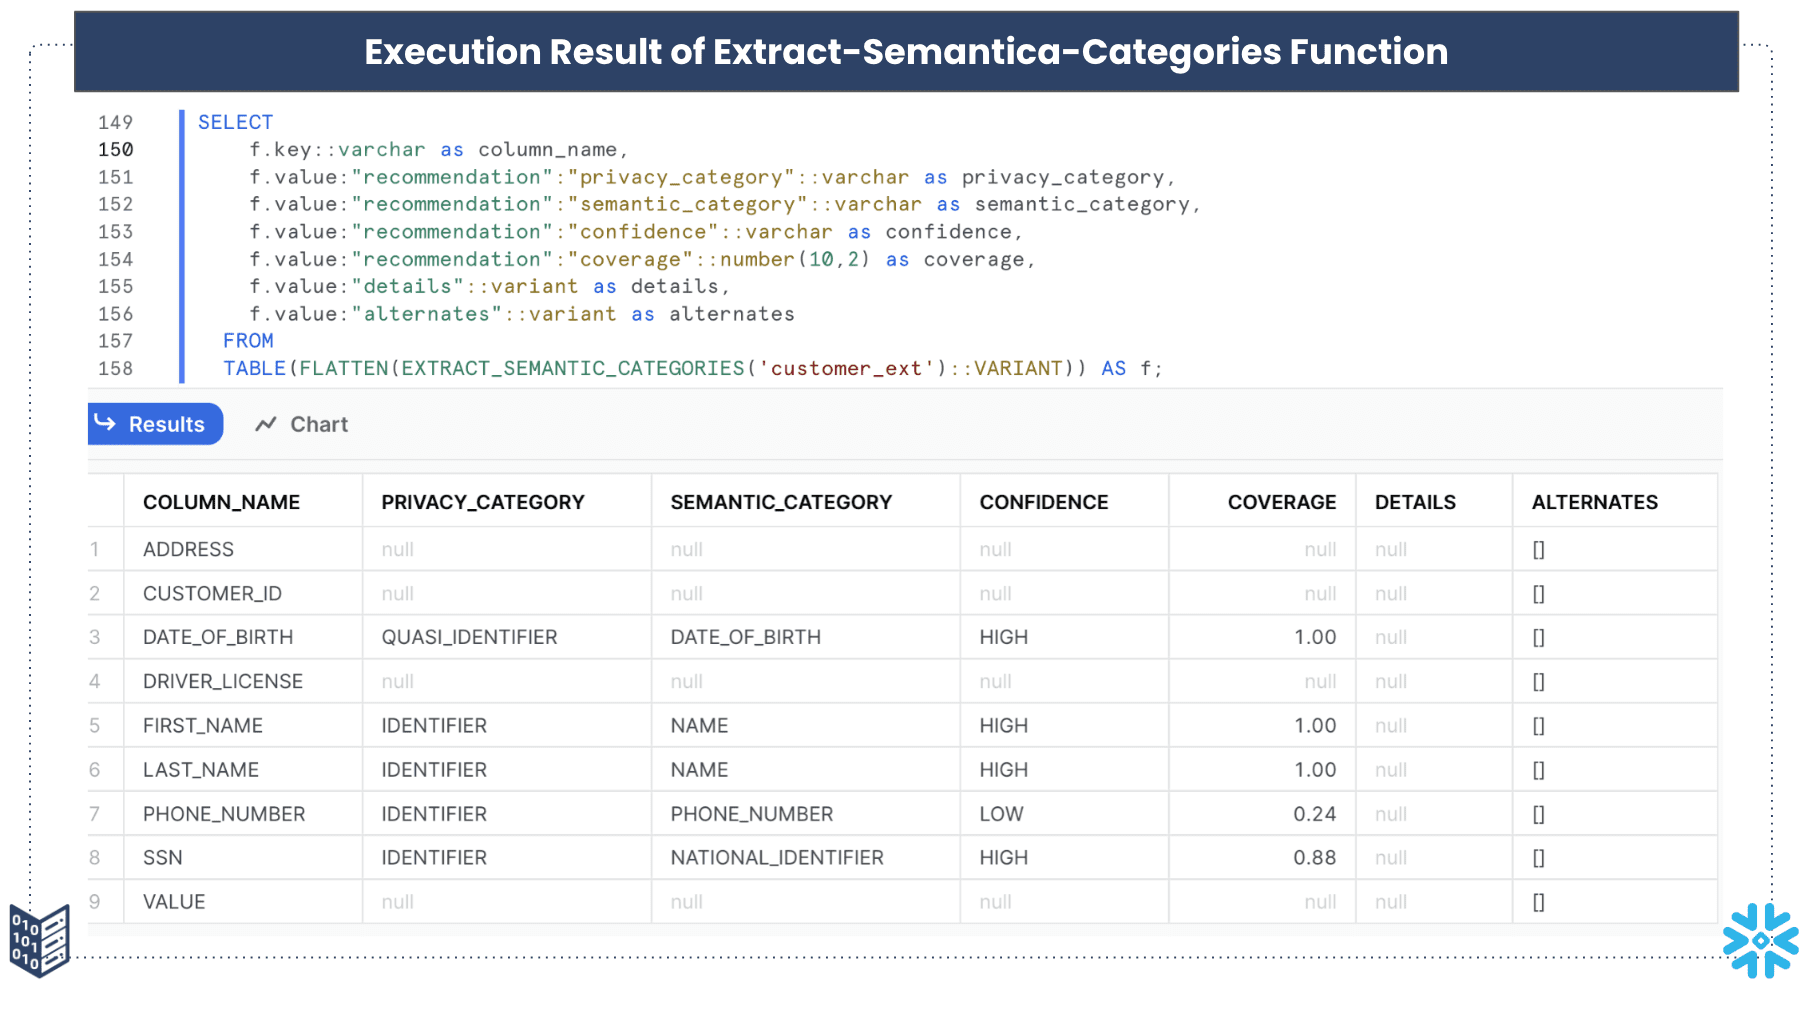
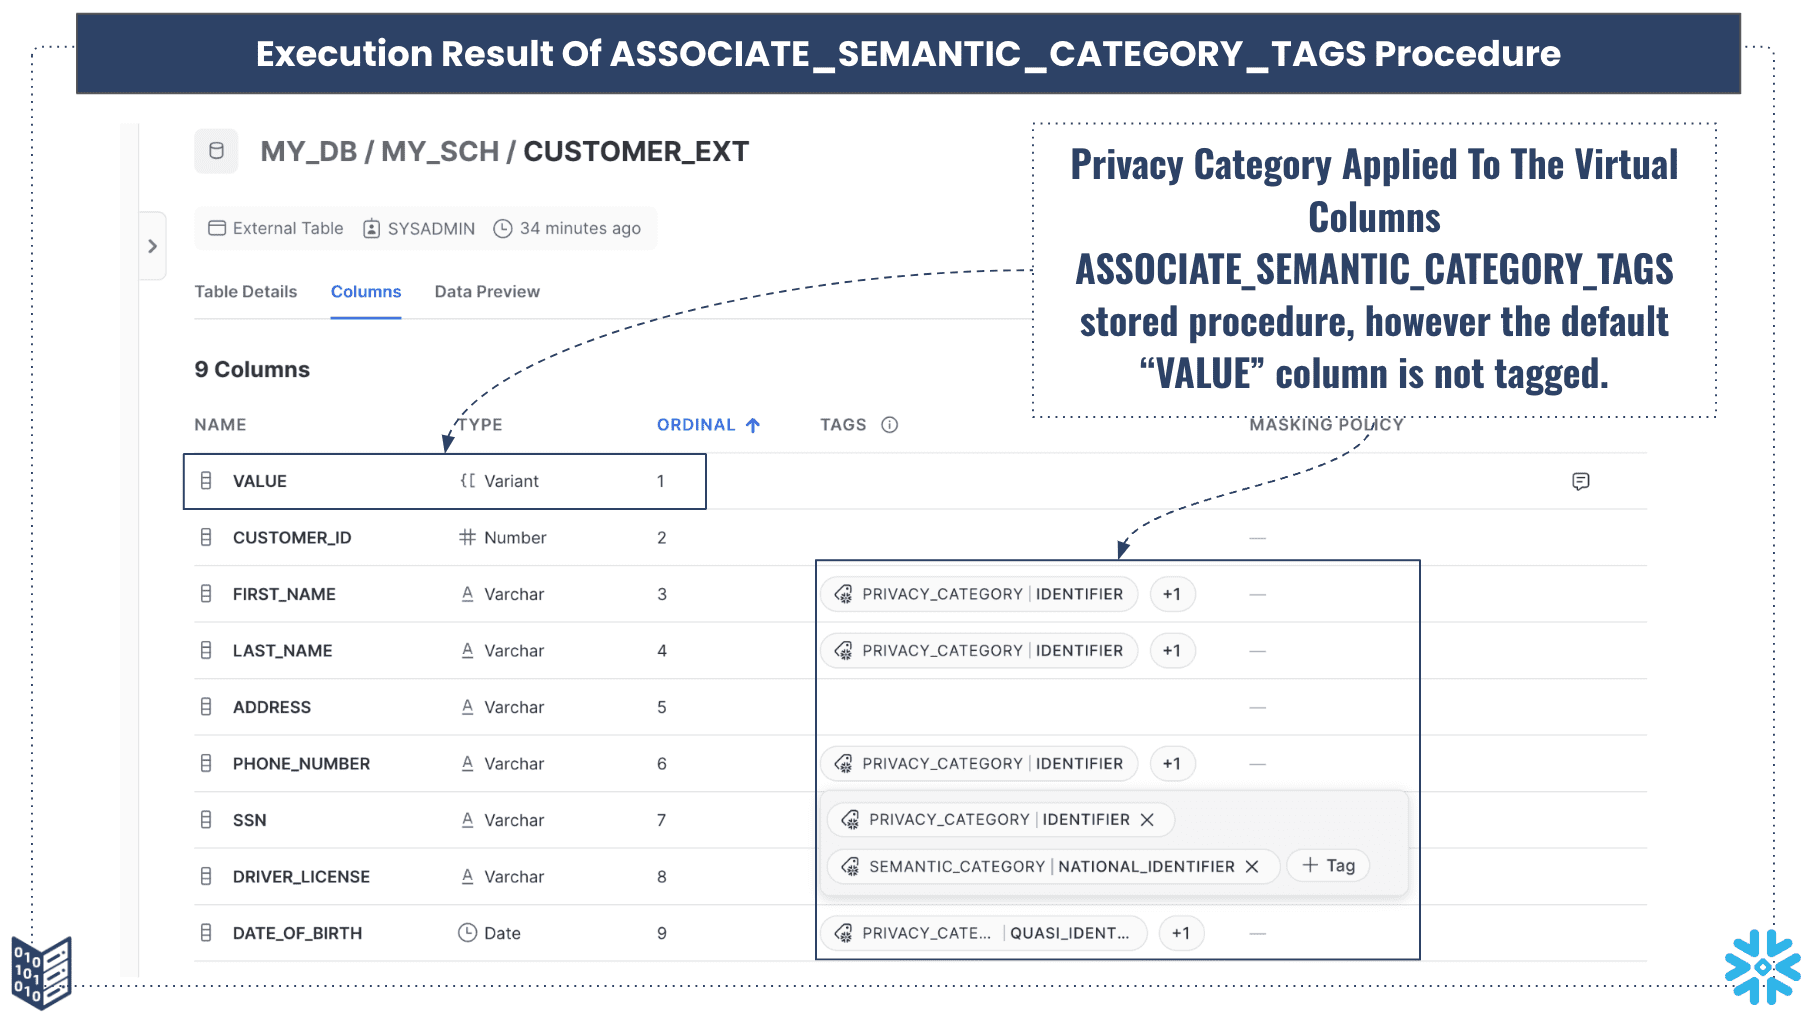
Nonetheless, there is a drawback to this method—the table function does not inspect the default VALUE column within the external table. Although it assists in categorizing other derived columns, there’s still a potential risk of revealing unmasked data to unintended users and roles.
Therefore, even if you apply a masking policy to different tags, as illustrated in Figure 7, your data governance goals may not be fully realized unless attention is given to the default VALUE column.
Method-3: Create Masking UDF with Recursive Key Search
We’ve encountered various challenges in achieving our data masking goals for external tables. Each approach has its limitations, especially when dealing with numerous JSON entities within your data platform. To address this issue and reduce manual work, we’re merging the capabilities of the Data Classification table function and replacing our JavaScript-based user-defined masking function with a Python-based one. This hybrid approach will significantly streamline the process of applying masking to a large volume of JSON entities in our data platform.
Here are the necessary actions to follow:
Set up your external table.
Execute the data classification table function to generate a list of entities with varying privacy categories.
Review the list based on the classification and make adjustments as necessary.
Develop a Python UDF that utilizes the list from the previous step. Implement a recursive function to examine all JSON elements matching those in the list and apply masking.
Return the JSON variant column containing masked or tokenized data.
After validating the external table data, grant USAGE permissions to the intended roles.
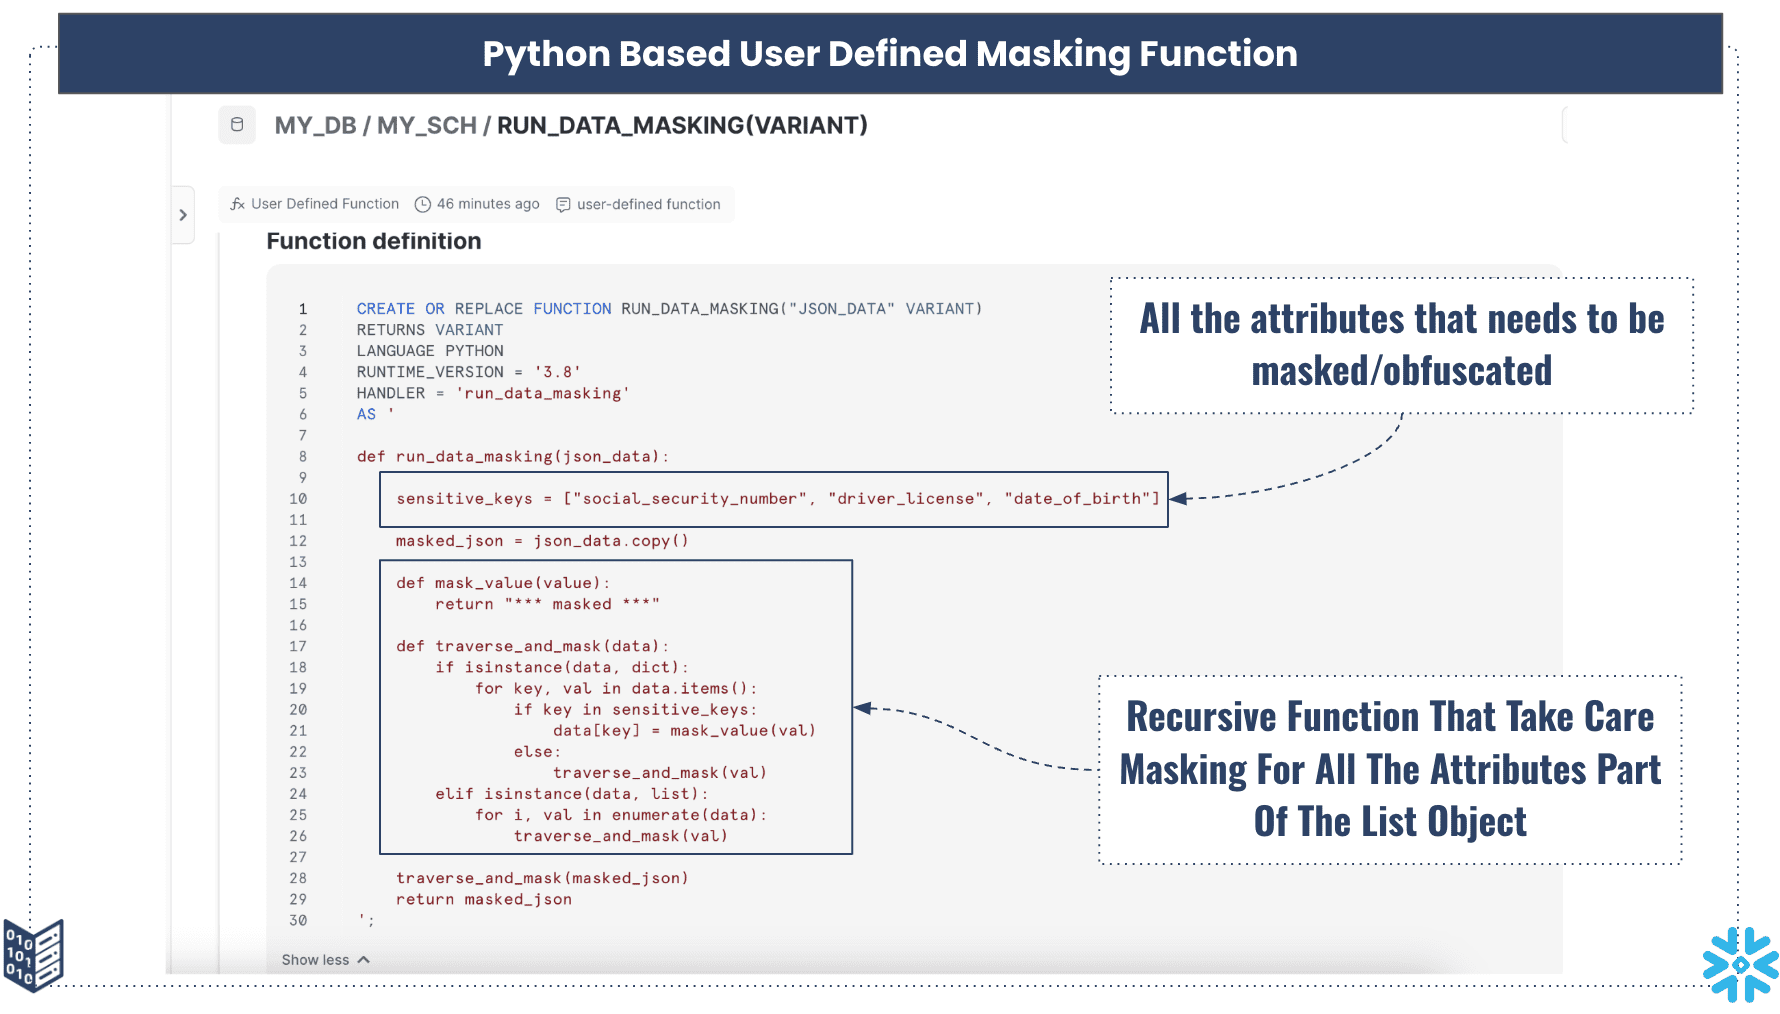
Here is the Python script that has a recursive function and it takes a list variable of elements that need to be either masked or obfuscated. The recursion logic ensures that all attributes, be it at the root level or nth level, in JSON data is evaluated and masked/obfuscated.
					create or replace function run_data_masking(json_data variant)
returns variant
language python
runtime_version = '3.8'
handler = 'run_data_masking'
as
$$
def run_data_masking(json_data):

    sensitive_keys = ["social_security_number", "driver_license", "date_of_birth"]

    masked_json = json_data.copy()

    def mask_value(value):
        return "*** masked ***"

    def traverse_and_mask(data):
        if isinstance(data, dict):
            for key, val in data.items():
                if key in sensitive_keys:
                    data[key] = mask_value(val)
                else:
                    traverse_and_mask(val)
        elif isinstance(data, list):
            for i, val in enumerate(data):
                traverse_and_mask(val)

    traverse_and_mask(masked_json)
    return masked_json
$$;
After creating this Python-based UDF, it will appear as depicted in Figure-8. If you have additional requirements, you can include a packages attribute to import extra Python libraries, enhancing your masking or obfuscation capabilities.
Next, create a masking rule and use the Python UDF for roles without authorization.
					-- Step-2: creating masking policy
create or replace masking policy mask_value_column_python
    as (val variant) returns variant ->
    CASE
      WHEN current_role() IN ('AUTHORIZED_ROLE') THEN val
      else run_data_masking(val)
    END;
Lastly, apply the policy to the VALUE column by using the ALTER statement, as demonstrated below.
					 --Step-3: set the masking policy for value column
ALTER TABLE customer_ext MODIFY COLUMN VALUE
    set MASKING POLICY mask_value_column_python;
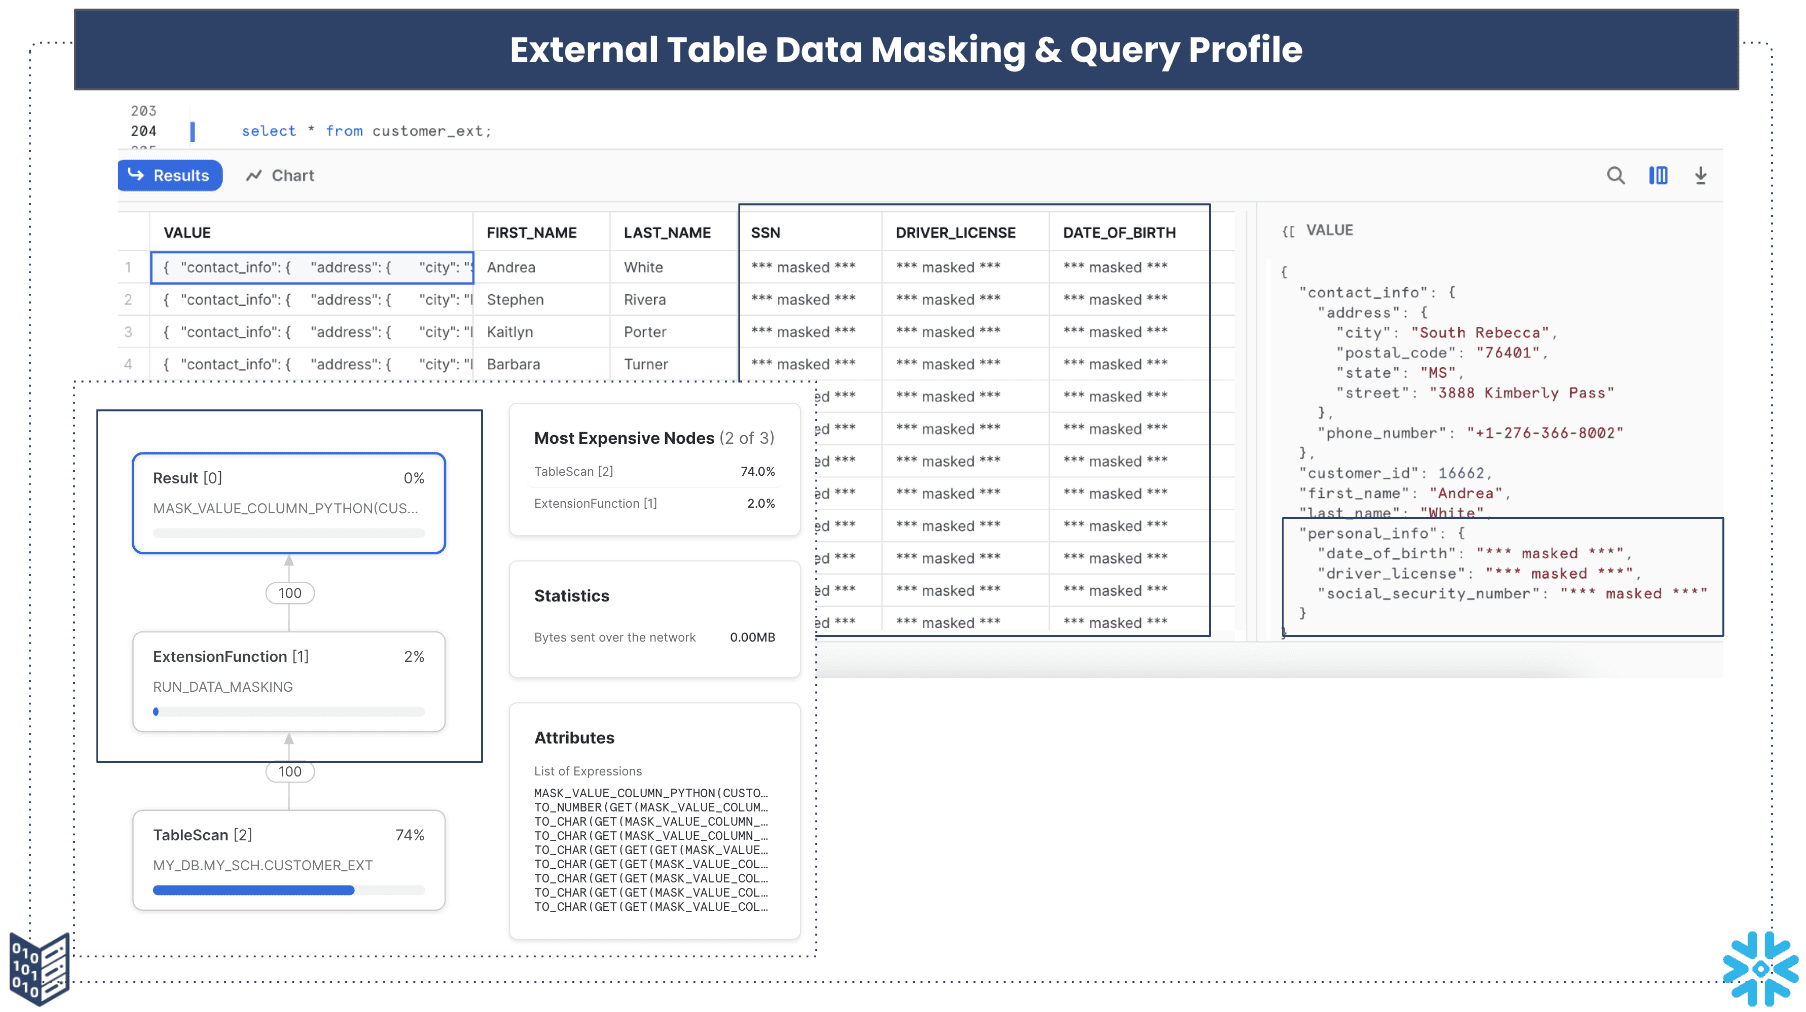
When we run a SELECT statement, both the VALUE column and all the columns that should be masked appear masked, as shown in Figure-9. Since the Python UDF operates on a list containing the names of attributes to be masked, it can be applied to any number of external tables. By simply repeating the ALTER statement, you can apply masking to numerous JSON entities.
In the end, when you execute a query on the customer external table with a masking policy that triggers a Python-based masking function, both the VALUE column and the derived columns will display masked fields to the user. You can refer to Figure 10, which illustrates the query results along with the steps in the query profile, including the Python function.
Conclusion
Applying Dynamic Data Masking and data governance to an external table requires careful planning and thoughtful design to protect sensitive customer data from unintended exposure. By harnessing Snowflake’s data classification feature and Python-based UDF, you can significantly ease the development process.
Additionally, Snowflake’s tag and policy-based methodology, coupled with role-based access control (RBAC), empowers you to safeguard sensitive data from users with elevated privileges.
If you’re interested in leveraging Snowflake’s tagging and policy-based approach to implement Dynamic Data Masking on an external table, the data experts at phData are ready to help turn this into a reality.
Don’t hesitate to contact us today for further information!


