Over 20 years ago, as a high-performance data warehouse, Netezza was one of the pioneers in managing and analyzing large amounts of data. But since then, the volume and speed at which data is ingested has grown exponentially.
This has been made possible by the advent of cloud computing along with modern data analytics. The Snowflake Data Cloud has developed a modern cloud data platform that automatically and instantly scales storage and compute in a way not possible with Netezza (whether in its current state or in the cloud) by separating compute from storage.
In this blog, we’ll take you through the steps of completing a successful migration from Netezza to Snowflake as well as cover some tips from previous experience along the way.
Preparing for the Migration
Thoroughly preparing for the migration before beginning the work will ensure a much more smooth transition.
The following is a checklist that should be completed before migration begins:
- Create a list of databases in Netezza that need to be migrated
- Create a list of database objects in Netezza that need to be migrated
- Create a list of processes and tools that populate and pull data from Netezza
- Create a list of current security roles, users and permissions
- Create a list of Snowflake accounts that need to be created or already exist
- Document the frequency of security provisioning processes
- Create a current architecture diagram
- Create a list of current processes to migrate with no changes
- Create a list of current processes to migrate that need reengineering
- Create a list of current processes to migrate that need to be fixed
- Create a draft of deliverables for the migration
- Create a planned architecture diagram
- Create a planned information architecture
- Determine migration strategy (Bulk transfer versus a staged migration)
- Create a list of new tools that will be introduced in the migration
- Create a list of current tools that will no longer be used post migration
- Create a list of development environments needed for the migration
- Create a list of deployment processes used for migration
- Create a list of prioritized data sets to migrate first
- Identify and document process dependencies for data sets
- Create a list of migration team members and their roles
- Identify a migration deadline
- Create a list of expectations by the business for the migration deadline
- Document the budget allocated for the migration
With the checklist complete, you are ready to begin your migration from Netezza to Snowflake!
How to Migrate From Netezza to Snowflake
To successfully migrate your data warehouse from Netezza to Snowflake, develop and follow a plan that includes the following steps.
Step 1: Create the Information Architecture
A good starting point for your migration is to implement the information architecture including accounts, databases, schema, roles, and users. This will provide a good foundation for the rest of the migration.
Snowflake’s Role Based Access Control (RBAC) provides a significant amount of control and flexibility over Netezza’s user-based access control, but it does have a learning curve to implement the first time. Creating a role hierarchy will take the most time of this step.
A best practice with RBAC is to create an access role for each database object and virtual warehouse, and a functional role for each function (ex. Data Analyst) within your organization. Then the access roles can be assigned to the functional roles, and the functional roles assigned to users.
For more information on RBAC, see Snowflake’s documentation here.
Step 2: Implement Authentication Method
Once the information architecture is created, an authentication method will have to be chosen and deployed. Snowflake offers several authentication techniques:
- Basic
- Basic authentication is the default for Snowflake. It is also the least secure as it only requires a username and password
- Federated Authentication/SSO
- Federated authentication enables your users to connect to Snowflake using secure SSO (single sign-on). With SSO enabled, your users authenticate through an external, SAML 2.0-compliant identity provider (IdP).
- This authentication works with on premises providers such as ADFS and cloud providers such as Azure AD and Google Suite
- Key Pair
- Snowflake supports using key pair authentication for enhanced authentication security as an alternative to basic authentication
- Snowflake also supports rotating public keys in an effort to allow compliance with more robust security and governance postures
- Oath
- Snowflake supports the OAuth 2.0 protocol for authentication and authorization.
- OAuth is an open-standard protocol that allows supported clients authorized access to Snowflake without sharing or storing user login credentials.
- This can be used for applications such as Tableau, Looker, and Alation
- Multi-Factor Authentication (MFA) (optional)
- Snowflake supports multi-factor authentication (i.e. MFA) to provide increased login security for users connecting to Snowflake. MFA support is provided as an integrated Snowflake feature, powered by the Duo Security service, which is managed completely by Snowflake.
- MFA is enabled on a per-user basis; however, at this time, users are not automatically enrolled in MFA. To use MFA, users must enroll themselves.
- At a minimum, Snowflake strongly recommends that all users with the ACCOUNTADMIN role be required to use MFA.
Step 3: Implement Security Features
In Snowflake, all data at rest is always encrypted and encrypted with TLS in transit. Snowflake also decrypts data when data is transformed or operated on in a table, and then re-encrypts the data when the transformations and operations are complete.
However, if your organization requires further security measures, then they should be implemented before any data is moved to Snowflake.
By default, Snowflake allows users to connect to the service from any computer or device IP address. A security administrator (or higher) can create a network policy to allow or deny access to a single IP address or a list of addresses.
Alternatively, depending on the cloud provider you choose when creating your Snowflake account, you can implement AWS Privatelink or Azure Private Link. Either of these options will provide a direct connection between your organization and Snowflake without having to traverse the public internet.
Step 4: Move the Data Model
With the security implemented, we can begin to move the data model. If your Netezza DDL scripts are contained within a version control system, these can be used in Snowflake with some modifications.
If you don’t have current DDL scripts, you will need to extract the Netezza metadata to generate these scripts using a Netezza utility such as nzdumpschema or NZ_DDL.
These scripts can then be edited to remove code for features and options not needed in Snowflake, such as distribution keys. Some of the data types used in Netezza will not be compatible with Snowflake. These will have to be replaced within the scripts with the Snowflake equivalent.
Here are the most common Netezza data types converted to Snowflake:
Netezza | Snowflake |
| BOOLEAN | BOOLEAN |
| CHAR | CHAR |
| VARCHAR | VARCHAR |
| NCHAR | CHAR |
| NVARCHAR | VARCHAR |
| DATE | DATE |
| TIMESTAMP | TIMESTAMP |
| TIME | TIME |
| TIME WITH TIME ZONE | TIMESTAMP_TZ |
| NUMBERIC(p,s) | NUMERIC |
| REAL | REAL (FLOAT) |
| DOUBLE PRECISION | DOUBLE PRECISION (FLOAT) |
| INTEGER | INTEGER |
| BYTEINT | BYTEINT |
| SMALLINT | SMALLINT |
| BIGINT | BIGINT |

Step 5: Move the Existing Data Set
After your database objects are created in Snowflake, the next step is to move the historical data to Snowflake. This can be done in one of three ways:
- Using a third-party migration tool
- With an ETL tool
- Through a manual process
Consider how much data you need to move when choosing a process.
For tens of terabytes up to a few petabytes, a best practice is to extract all the data to files and move it with a service such as AWS Snowball or Azure Data Box. For more data than that, AWS Snowmobile or Azure Data Box are more appropriate.
To move the data manually, you will need to extract the data for each table to one or more delimited flat files in text format using Netezza External Tables or NZ_UNLOAD. These files would then be uploaded using the PUT command into a cloud storage staging bucket, either external or internal.
To optimize Snowflake’s parallel bulk loading, the files should have a file size of around 250 MB compressed, but no more than 1 GB. Once in a staging bucket, the files can be loaded into their tables using the COPY command in Snowflake.
Step 6: Migrate Queries and BI Tools
Thankfully, since Snowflake uses ANSI-compliant SQL, most of your existing queries, views, and stored procedures will execute on Snowflake without requiring changes. However, Netezza does use some specific extensions so there are a few constructs to watch for:
Netezza | Snowflake |
AGE(’10-01-2001′, ’07-20-2005′) | DATEDIFF(day, ‘2001-10-01’, ‘2005-07-20’) |
NOW() | CURRENT_TIMESTAMP() |
STRPOS(‘string’, ‘str’) | POSITION(‘str’, ‘string’) |
CURRENT_PATH() | SUBSTR(CURRENT_SCHEMAS(), 3, LENGTH(CURRENT_SCHEMAS()) – 4) as CURRENT_PATH |
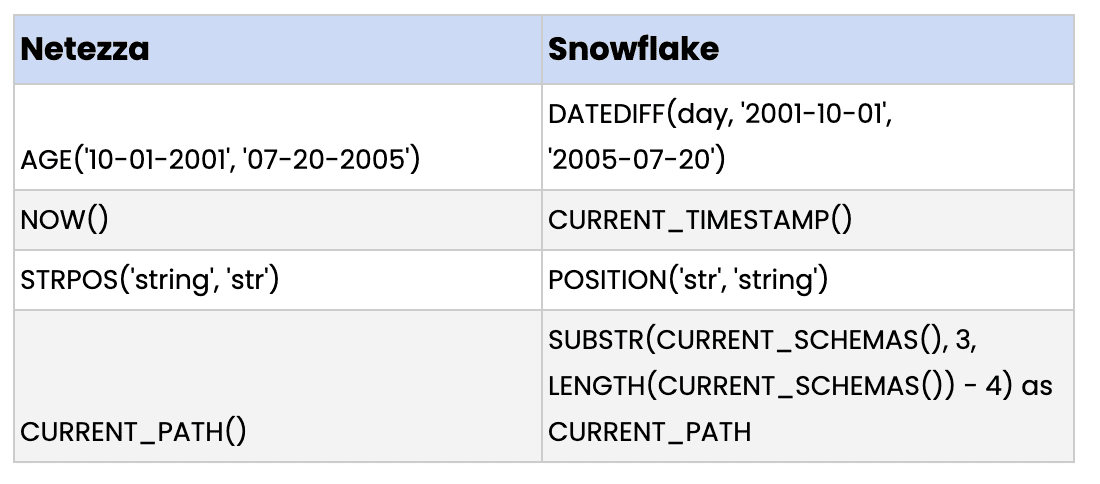
Migrating BI tools simply involves changing their connections from Netezza to Snowflake. This should not be difficult since Snowflake supports standard ODBC and JDBC connections. Native connectors for Snowflake are available for many of the mainstream BI tools, allowing for a seamless connection.
Step 7: Migrate the Data Pipeline and ETL Processes
Although Snowflake is optimized for an Extract Load and Transforms (ELT) approach, Snowflake supports many traditional ETL and data integration solutions. Because of this, a basic approach of simply pointing your existing pipelines to Snowflake is best to make the migration process as simple as possible.
The pipelines should run in both Snowflake and Netezza during the initial migration. This will allow easy validation by enabling a quick comparison between the two systems.
For pipelines that require reengineering, this would be a good time to modernize them to an ELT approach. Take advantage of Snowflake native tools such as Snowpipe which can load data continuously as it arrives in your cloud storage. You can also begin to use modern ELT tools such as Fivetran for replication and Data Build Tool (dbt) for transformations.
Step 8: Cutting Over from Netezza to Snowflake
Now that you migrated your data model, your data, your loads, and your reporting to Snowflake, the last step is the final cutover from Netezza to Snowflake. Here are the recommended steps for a successful cutover:
- Execute a historic, one-time load to move all the existing data
- Set up ongoing, incremental loads to collect new data
- Communicate the cutover to all Netezza users, so they know what’s changing and what to expect
- Ensure all development code is checked in and backed up
- Point production BI reports to pull data from Snowflake
- Turn off the data pipeline and access to Netezza for the affected users and BI tools
How the phData Toolkit is Your Secret Weapon to Netezza Migrations
phData, a leader in data engineering consulting and the 2022 Snowflake Partner of the Year, has created a Toolkit of software to make migrations painless. These are made available for free to anyone engaged in a project with phData.
Listed below are a few different components of the phData Toolkit and how they can help your team with a migration.
Project Administration
Project Administration (AKA Tram) is a tool designed to automate the information infrastructure process within Snowflake including creating databases, schemas, users, and roles. Tram not only outputs the SQL scripts required to create these objects but is connected directly to your Snowflake account to run the scripts.
Tram streamlines the onboarding processes for your users, projects, and applications. It also makes sure that they are provisioned in a repeatable manner compliant with your organization’s information architecture. Utilizing Tram for your provisioning ensures you can:
- Provision Faster: Tram makes scaling Snowflake to thousands of users a breeze. The ability to automatically onboard users, provision roles, add users to roles, and provision information architecture speeds up user onboarding and maintenance processes.
- Provision Safer: Automating the process of onboarding database objects eliminates manual work — and therefore error — while helping to ensure you’re doing it all in a controlled, governed, and consistent way, using a standard information architecture.
- Provision Cheaper: Eliminating work means saving your employees valuable time — and it’s available for free to all phData customers. Plus, getting your teams onboarded faster means retiring your legacy platform all the sooner.
SQL Translation
SQL Translation (AKA SQL Morph) instantly translates SQL statements from one language to another, eliminating a usually time-consuming error-prone, and highly manual process. It is set up to be used with a variety of SQL flavors including Netezza’s brand of SQL.
It can translate DDL, DML, and even stored procedures (into Snowflake Javascript or SnowSQL procedures). Its simple web interface allows you to paste your current SQL statement into a text box and with the press of a button translate it to be used in Snowflake.
A command line tool is also available to automate the process. Leveraging SQL Morph for your SQL statement translation will allow you to:
- Save Time: Automated translation can instantly convert hundreds or thousands of SQL statements instead of taking weeks or months of manual work. No waiting on humans is required.
- Be More Accurate: Manual translation is tedious and can be error-prone. Automating the translation process means queries are translated correctly every time, even for the most complex and challenging translations.
- Reduce Costs: With SQL code conversion out of the way, you can spend time and resources on other efforts.
Data Source Automation
Data Source is a multipurpose tool that collects, compares, analyzes, and acts on data source metadata and profile metrics. For the purpose of this migration, its best use case would be in validating the data that has been migrated.
It can be used to perform a data profile on tables in both Netezza and Snowflake to ensure the profile metrics are the same to validate that the migration of that table was successful. This low code/no code solution can scale to massive platforms to be run on all your tables at once.
Find out more about the phData Toolkit here.
Tips and Tricks From Customer Use Cases at phData
At phData we have performed many Netezza to Snowflake migrations. Through these projects, we have found many of the “gotchas” along the way that have slowed progress.
Most of these caveats were found during the historical data migration step as Netezza’s proprietary nature came heavily into play.
The best tip we can provide is to utilize replication software (such as Fivetran) to migrate the historical data. One particular client asked us to create a migration software of our own in Python to reduce costs. This proved to be challenging and enlightening at the same time.
If your organization chooses to go this route, here are some of the tips/caveats of extracting data directly from Netezza to be inserted into Snowflake:
- Netezza allows empty strings within a not nullable field. When copying into Snowflake tables from a staging bucket, Snowflake automatically assumes empty fields as NULL, which will lead to an error in this scenario. In the Snowflake file format used to ingest the file into the table, change the setting EMPTY_FIELD_AS_NULL to FALSE. This will prevent that error from happening.
- Netezza will also output actual NULL values to an external table as ‘NULL’. Snowflake will pick these out and convert them to actual NULL if the NULL_IF value of the file format is set to (‘NULL’). This will cause another issue, however, if the string “null” is present in a field that is not nullable as Snowflake will now interpret that as NULL and throw an error. There are two workarounds for this. The first would be to remove the NOT NULL constraint from the field on Snowflake and then run a statement to convert the NULL values back to the string “null” after ingestion. The second is to change the null value that is used by Netezza when creating an external table to an arbitrary value that will NEVER be used in any field. This same value would then be used in the NULL_IF option of the file format in Snowflake, changing it back to NULL.
- Netezza uses an internal proprietary encoding when creating external tables. If the table in Netezza has a field with either data type NVARCHAR or NCHAR, then the Snowflake file format needs to have the ENCODING options set to UTF8. However, if either data type VARCHAR or CHAR is used in a table, then ENCODING needs to be set to ISO88591. If your Netezza data warehouse has a mix of these two types of tables, then two file formats will need to be used for ingestion.
- Netezza provides an option to compress the data as it creates external tables, but unfortunately it compresses the data in a proprietary format that is not compatible with Snowflake. For external table files larger than 1GB, they will need to be output uncompressed and then compressed by a third-party compression before moving to Snowflake.
Conclusion
Modernizing your data platform is essential in the ever-changing landscape of data analytics. Netezza was once at the forefront of data warehousing, but it’s time for organizations to move to a cloud-based, auto-scaling modern data warehousing tool such as Snowflake. And by following the steps provided a migration of this caliber is attainable.
Looking for help with your migration to Snowflake?
The experts at phData can help! From Data Engineering projects to Cloud-Migrations, phData helps organizations make more data-driven decisions. Reach out today to learn more!
.


