

The modern data stack has grown tremendously as various technologies enter the landscape to solve unique and difficult challenges. While there are a plethora of tools available to perform: Data Integration, Orchestration, Event Tracking, AI/ML, BI, or even Reverse ETL, we see dbt is the leader of the pack when it comes to the transformation layer for any cloud data warehouse, especially in the Snowflake Data Cloud.
Thanks to dbt’s ease of use and the way it integrates with Snowflake, it makes the Transformation step of ETL/ELT extremely approachable even for those who aren’t super tech savvy.
In this blog, we’ll cover how to get started with dbt and how to connect it to Snowflake using both the cloud integration and CLI.
As a bonus, we’ll even cover some best practices to set up on Snowflake before connecting with dbt.
What is dbt?
dbt is a data build tool and it provides a way to build modular SQL that can be reused throughout your data pipeline allowing you to adhere to the Don’t Repeat Yourself (DRY) principles while providing version control and automation.
Version control within the data field has always been difficult to accomplish and maintain, especially as source systems change architectures or add new fields. With the automation and version control that dbt provides, you can easily move between versions of data models (making it easy to revert problematic changes, fix them, and then redeploy) and see changes automatically deployed and tested through a testing environment, allowing you to deploy to a production environment with peace of mind.
Also, if that wasn’t enough, the documentation that dbt can provide to show a DAG (Directed Acyclic Graph) of your source data into the final modeled version as well as the git-like markup for additional context will make anyone excited. This allows new hires to understand just how the data flows and the context of the sort of changes performed within each step of the modeling process.
Snowflake Best Practices for dbt
Before we do anything with dbt, we want to start by making sure we are following some of the best practices in Snowflake. There are a few things we want to set up before we get started with dbt.
First, we highly recommend setting up your credentials to use a key-pair (we will cover the other configs as well). Second, it is recommended to create both a group and warehouse for dbt to use. The reason for this is that the dbt group will have the necessary rights to create and read the various objects. The reason for the warehouse is so that your dbt transformations are isolated (compute and memory) and expectations around for performance can be monitored and delivered.
Finally, if you plan to set up automation, you may want to create a dbt service account. You should do this to avoid having the automation tied to an employee’s account, in case they depart. The service account will not get removed when someone has left, killing your automation.
If you want to dive into further Snowflake best practices you should check out our Getting Started with Snowflake guide.
dbt Cloud Setup
Setting up your project within dbt cloud is very easy thanks to only a few steps. The first step is to create the project, specify the database connection, and then tie it to a repository. Once that’s done, we can go to our users profile and set the configuration.
To start, you want to click the hamburger button in the top left hand corner of the cloud interface, and then go to your account settings. That will by default take you to your projects, where you can update or create a new project.
We’ll begin by clicking the ‘create a new project’ button. You’ll start by being asked to specify a name for your project. For now, let’s call this project coffee_shop. Next you’ll be asked to set up your database connection, here we will pick Snowflake and we will be presented with a place to specify what you want to call the connection as well as the connection information. It will look like this:

In your account, you will specify the Snowflake account which is the two letter + 5 number identifier you have for your account. Then you will specify the role, database, and warehouse that you want to use as the default.
Once you have specified this information, you can input your development credentials. There is an auth method drop down that you can use to specify if you want to use Username/Password or a Key Pair. Again, we recommend you use a key pair.
Once you’ve entered your information, you can tell dbt to test your connection. After it has been tested successfully, you can continue and specify the git repository to store all of your code in. With these actions completed, you are ready to begin modeling with dbt using their cloud environment.
dbt Command Line Interface (CLI) Setup
A couple of things need to be performed before we can start working with dbt from the CLI. The first and most important step is to install dbt. It can be installed using Homebrew, pip, using the dbt Docker image, or installing it from source.
After installing dbt core, you’ll have to install the type of adapter to use, and we’ll be using the Snowflake adapter (dbt also supports: Postgres, Redshift, BigQuery, and Apache Spark). You’ll also want to create yourself a git repo to store your dbt code. Once you have these things in place, we can begin.
When using dbt from the command line, you will start by initializing the project using the dbt init command. While working through the dbt init command, you will be presented with the different options to properly configure your dbt connection.
However,if you find you need to update/change your dbt profiles, you do this by going to your home directory and into the .dbt folder. In most cases, this is within the ~/.dbt/profiles.yml. Once you’ve found this file, you can update your connection configuration. The reason dbt puts the files here is so you don’t accidentally check in your data warehouse credentials into your preferred version control system.
If you need to create a user/password authentication, you can update your profiles.yml file to specify all your connection information including username, password, account info, the warehouse, role database, schema, and threads. Doing this will result in a profiles.yml file that looks like this:

Remember to use the special dbt role and warehouse that you created earlier. To set up your dbt profile to use a public/private key pair, you just have to specify the path to your private key as well as the passphrase if you encrypted your key. You’ll see your profiles.yml changed to look like this:

The other option is to configure SSO, and this can be configured by either specifying the external browser for sign in or a valid Okta URL. Your profiles.yml will end up looking like this:

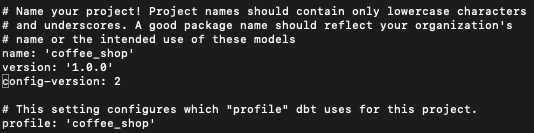
Now all you have to do is make sure that within your dbt_project.yml (which will be in your initialized repo) is pointing towards the profile you created. While walking through the dbt init, this should be filled out by default.
But if not, or if you decided to change the name of the profile, go into your dbt project and make sure that the profile is set to the name of the profile within your profiles.yml. In the examples above, we named the profile coffee_shop, so that’s how we want to reference our profile. This does imply that your profiles.yml can have multiple profiles with various targets.
Here’s an example with my profile in my dbt_project.yml set to my profile:
Now that we have our connection created in our profiles.yml file and the profile specified within our dbt_project.yml, we can begin writing our various models and performing dbt runs. If you want to verify your connection before starting, use the debug flag with dbt to get debug information to help troubleshoot any connection issues you may have.
Closing
As you can see, getting dbt set up and configured to connect to Snowflake is very easy and straightforward. All you have to do is configure your profile and then point your dbt_project to the profile that you want it to use. Regardless if you’re doing this with dbt cloud or the CLI, getting your dbt configured and connected is a breeze.
Need help getting started with Snowflake or dbt? Our team of data experts are happy to assist. Reach out today!
FAQs
No, you can accomplish this within the same profile. Just create a different target and when you perform any dbt build or dbt run, just append –target to specify the different environments you want to run into. You can use this to specify a test and production environment all within one profile.
You can configure this within your dbt_project.yml file. You can set up a folder structure that helps you easily set the target schemas and databases for all of the models within that folder. You can even go so far as to set a jinja ternary within your dbt_project.yml file to automatically change the database/schema you want the models created in based on the target environment.


