

In a perfect scenario, everything a data analyst would need to answer business users’ questions would live in cleaned, curated, and modeled tables in a data warehouse. The analyst could connect to the data warehouse and start developing reports.
In reality, to create a comprehensive and holistic view of your business, the analyst will likely need to go beyond the data warehouse and integrate data from several different, often disparate, sources.
Power BI provides the ability to connect various sources and systems, from Salesforce to SAP to Excel files and even Snowflake Data Cloud. Right now, there are nearly 180 native connectors available in Power BI and an ODBC connector to work with sources that do not have their own dedicated connector.
Now imagine a scenario where you’ve built out a report using a data source, an Excel file, but now that data is available within your data warehouse. You want to switch to the new data source, which uses a different connector. Still, you don’t want to have to recreate all the work you’ve already done to transform data with Power Query steps or rebuild visualizations you’ve created. While switching data sources isn’t as easy as a click of a button, it is doable with some minor edits in the M Code in Power Query.
In this blog, we’ll cover what M Code is and how to use it to change a data source in Power BI without affecting your downstream work.
What is M Code?
M is the formula language behind the scenes of Power Query. With each data transformation you set up using the graphical user interface of the Power Query editor, a new line of M is written. Let’s look at a quick example where I’ve loaded a CSV containing information about Waffle House locations.
You can find the M script by clicking “Advanced Editor” within Power Query on the Home ribbon, which is displayed in the screenshot below.

Comparing the transformation steps on the left to the generated code on the right, we can see that each applied step corresponds to a code section.

Editing the M Code to Change Data Sources
Let’s take our hypothetical scenario a step further. You’ve built a beautiful Waffle House report, but you have a problem; you’re manually maintaining the CSV of restaurant locations, and it’s taking a lot of your time.
Your data engineering team comes to you and says they’ve built a process to scrape restaurant locations and that they’ve placed a new table that is structured just like your CSV file in a new Snowflake table within a database called “American_Institutions” and a schema named “FINE_DINING.”
You want to start using the new table, but you don’t want to have to rebuild all the visuals and measures you’ve built in your report. We can accomplish this with three steps:
Create a query for the new data source so we can extract the relevant pieces of M code
Edit the M code for the query that feeds all of our measures and visuals so that it points to our new data source
Delete the query from Step 1
Please note that this process is much easier if the schema for the old and new data sources are the same.
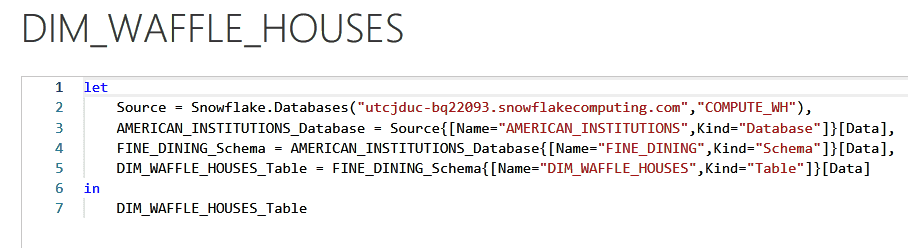
In our first step, we’ll click “Get Data” within Power BI and go through the steps to connect to our new data source using the native Snowflake connector. After connecting, we’ll view the M code.
We can see in the example below that lines 2-5 will be relevant as they point to the source and then navigate to the correct Snowflake table, so we’ll copy and paste those into a text editor to have on hand.
We will now open up the M code for the query we want to update. We can see that line 2 refers to a location on our local computer. We can also see that line 3 is no longer relevant, as we don’t need to promote headers when our source is a database.

We will delete those lines and replace them with the ones we copy-pasted in the prior step.
Finally, we need to make a small edit to make sure the “Changed Type” step references the output of the prior applied step.

We can now clean up my report and delete the DIM_WAFFLE_HOUSES query we had created solely to generate the source code.
Closing
Switching between data sources that use different connectors in Power BI isn’t quite as easy as just clicking a button, but knowing how to access and edit the M code makes it possible.
Following the process above and breaking down what each line of code is doing, we can now switch between any connector we want without breaking the downstream transformations, measures, and visualizations we previously worked to build.
Please contact our team of Power BI experts if you need further assistance and support during your Power BI data source transition.
FAQs
If you only need to change the path to a CSV or Excel file, you don’t need to edit M code. Within the Power Query editor, just click “Data Source Settings.” It’s located between “Enter Data” and “Manage Parameters.” You can also make the change within the Power Query editor by clicking the gear icon to the right of “Source” in the applied steps.
Alternatively, you can make the change without entering the Power Query editor by clicking File -> Options and Settings -> Data source settings.
If you want to switch between different environments without switching connectors, you can achieve that by parameterizing data sources, as detailed in this phData blog.


