Using pre-production data during the development process of building a Power BI dashboard is considered a best practice. Doing so avoids straining your production data environment and reserves those resources for dashboards that are actually being used by end-users.
When you’re ready to publish the dashboard, changing these data sources to a production environment can be extremely tedious, especially if there are a lot of queries. Thankfully, you can create a parameter that makes this task easy.
Parameters allow for lots of possibilities, especially when it comes to optimizing tasks like data source migration.
In this blog, we will walk through how to use parameters in Power Query to help you more easily switch the data sources your Power BI dashboard is using.
What can a Parameter for your Data Source Accomplish?
As we called out in the introduction, creating a parameter for your data source allows you to quickly change which source each of the queries in your Power BI data model is using. This can be especially helpful if you’re not leveraging Power BI Deployment Pipelines to help automate this process.
One scenario where we recommend using this technique is when teams use pre-production (development or test) data while development is still taking place and before publishing the dashboard to the end users. Let’s say you had 10 different queries in your data model and were using “dev” data during the development process.
Instead of manually going into each one of those queries and changing the data source to the “prod” environment, you can create a parameter that gets applied to each query that allows you to switch between the two data sources.
How to Setup Data Source Parameters in Power BI
In the example below, you can see that there are 10 queries in the data model. Let’s now walk through how you can switch the data source in each query using a parameter. From the home screen, click the “Manager Parameters” dropdown and select “New Parameter.”

Now, enter the name you want to give your Parameter, such as “Server,” and then change the suggested values to “List of values.” Once the “List of values” is selected, define the data sources (in this example, we’re using “server”) in the table.
For example, if you connect to “Prod-east…”, enter the entire server name into the list of values to indicate which servers you are going to change between. For this example, “Dev” and “Prod” are only there to represent the different servers you should be adding to your list. Also, select what value you want your default to be, as well as what the current value is.
After clicking the green “OK” button, you will notice that the parameter has been added to the list of queries on the right in Power Query.

*Note that the type has to be text as Power BI Service will not allow you to modify parameters that have a type of “any.”
After you have completed the previous step, repeat the same steps to create a parameter for “Database” to represent the different databases you would like to connect to. In this example, the database names are generalized again.

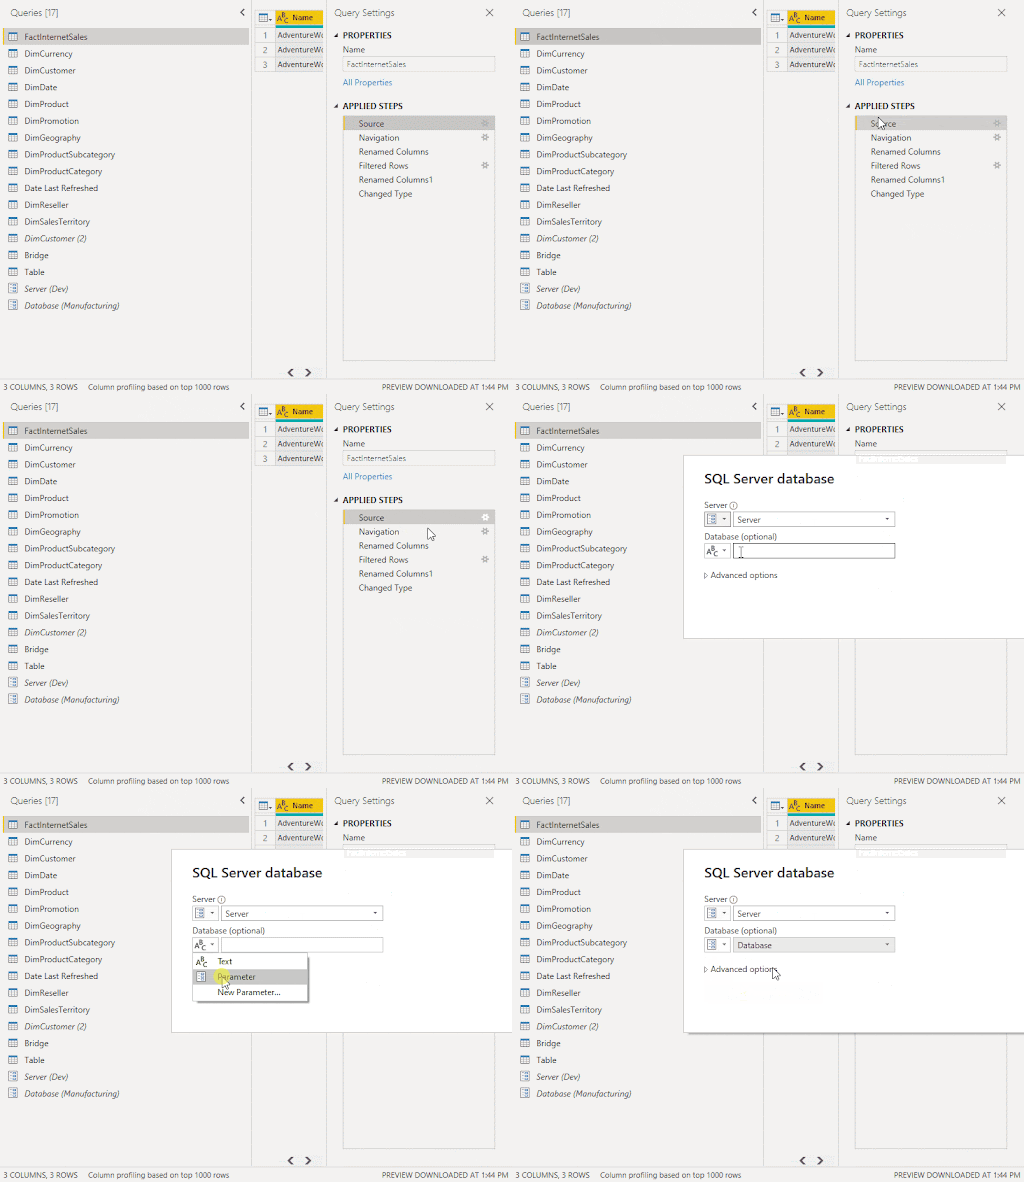
Now, you’re ready to add the parameters to your queries. Select your first query and then click on the “⚙️” and change your icon next to the “Source” step. Change the Server and Database to your previously defined parameters accordingly. Repeat this process for all of your queries that you would like to have under the parameters.

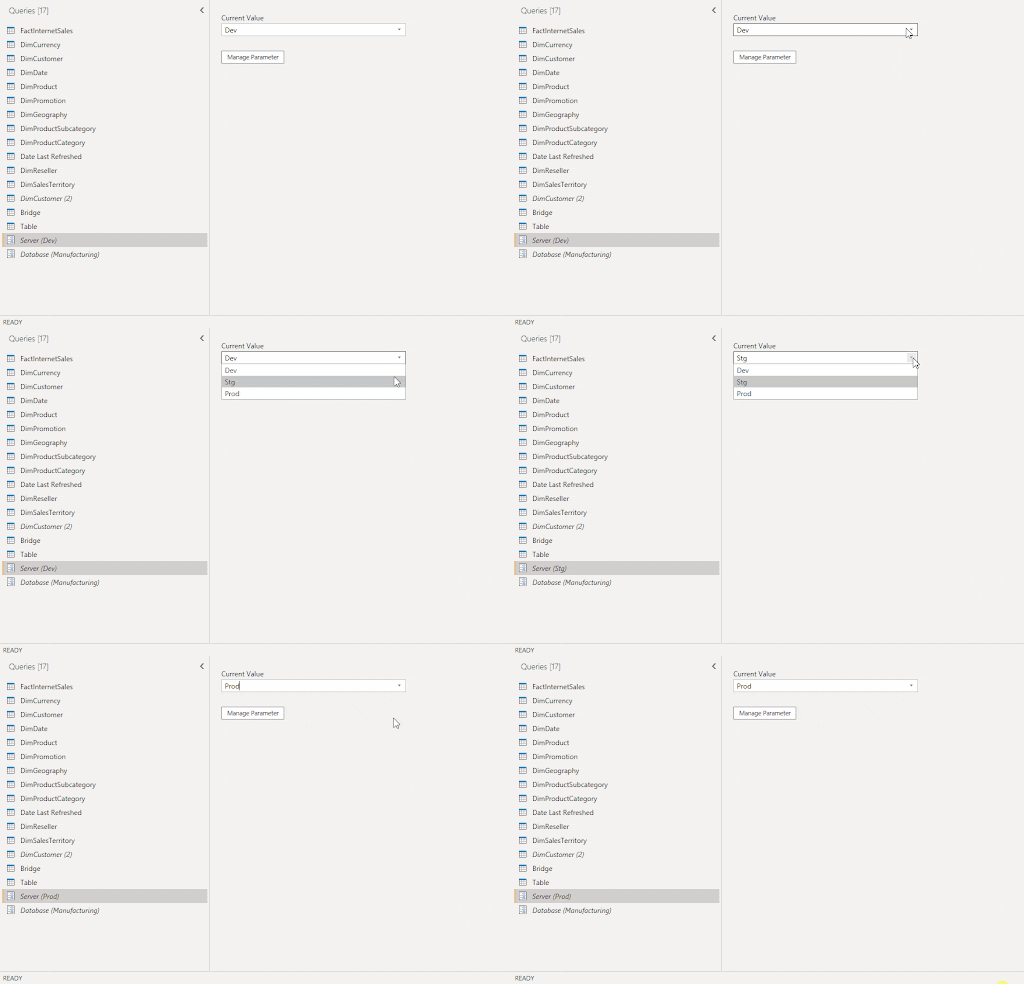
After all of them are swapped over, you can simply toggle the parameter to change all of the sources for your queries instead of having to adjust them every single time it’s required manually.


After the reports have been published to Power BI Workspaces, you can change the parameters on the service as well, which allows you to swap between sources without needing to republish the dataset.
To do so, go into the settings of the dataset, scroll down to the “Parameters” section, and then type in your desired value. Click the “Apply” button and then make sure to refresh your dataset to bring in the data from the respective data source that you selected with the parameter.
Closing
By allowing you to easily change the sources in your queries within the Power BI Service or with the click of a button as opposed to manually switching multiple sources over, parameterizing your data sources can lead to a more efficient development experience.
Have more Power BI questions? Our team of Power BI experts is here to help!


