

The term “feature store” is often used when architecting the ideal Machine Learning platform. The industry’s push toward implementing feature stores makes the offering sound like a necessity for organizations that have yet to do so, a magic black box that can do all things feature-related.
If you’re on the outside looking in, you may be asking,
“Are feature stores magical?” or “When I implement a feature store, will features magically appear for me to use?”
The answer to both questions is no.
A feature store can be extremely beneficial, but to make proper use of a feature store, you first need features. Managed feature platform offerings like Tecton have feature computation capabilities. However, if you are more interested in using a feature store, you need an engineering solution to calculate features and hydrate your feature store.
This blog will walk through how to build your own feature platform with batch feature engineering pipelines using Airflow and dbt on the Snowflake Data Cloud.
Constructing Feature Engineering Pipelines
Setting up a feature store is only a few steps. After setup, your feature store knows where to pull features, but how do you go about updating your features? This is where feature engineering pipelines come in. Feature engineering pipelines are solely responsible for calculating features and hydrating your feature store.
Setup
The demo is available in this repo. Make sure you clone the repo onto your machine to follow along.
Creating an end-to-end feature platform with an offline data store, online data store, feature store, and feature pipeline requires a bit of initial setup.
Follow the setup steps (1 – 9) in the README to:
Create a Snowflake account and populate it with data
Create a virtual environment and set environment variables
Install the necessary CLI and packages in your environment
Setup connection parameters to Snowflake
Creating Features
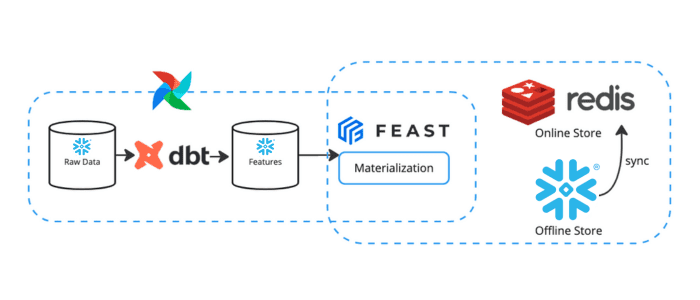
Feature engineering can be accomplished with dbt, an essential tool in the modern data stack. Using dbt to transform data into features allows engineers to take advantage of the expressibility of SQL without worrying about data lineage.
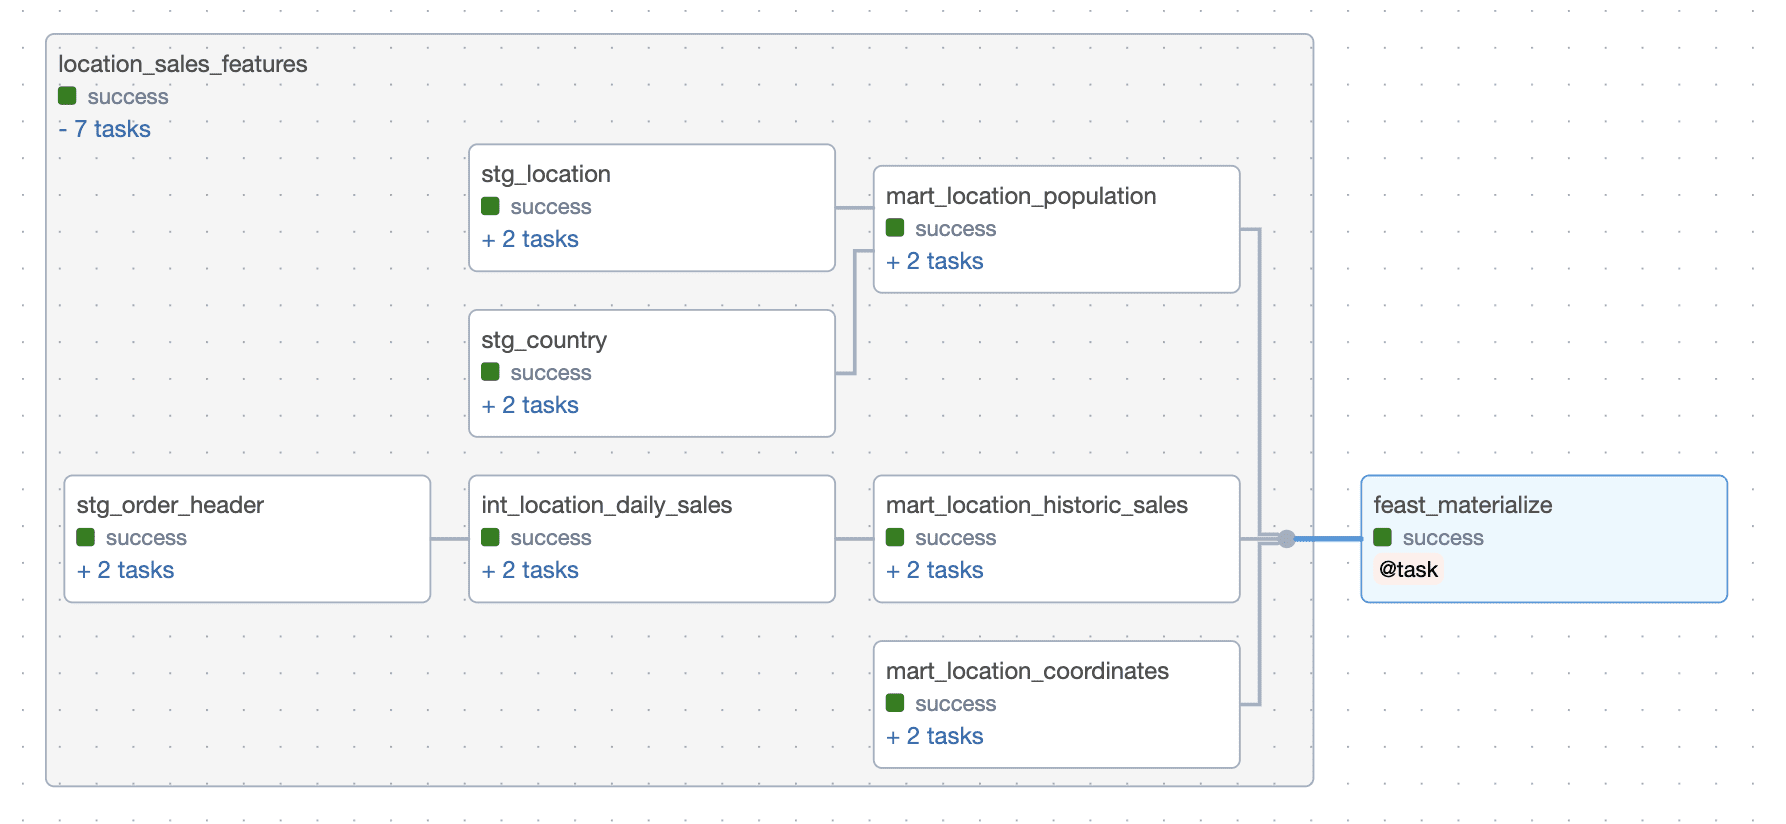
Inside the repo, if you navigate to the folder location airflow/dags/dbt/dbt_tasty_bytes, you will find a dbt project with three data mart models containing features:
mart_location_coordinates, with longitude and latitude as features
mart_location_population, with city_population as a feature
mart_location_sales, with business_date, month, day_of_week, daily_sales, avg_previous_day_sales, and avg_l10_day_sales as features
In addition, you will see that all three tables have location_id as a column and timestamp as a column. For this demo, location_id is the entity we have features for; this is the column we will tell our feature store to identify as the entity. The timestamp column is needed for the point-in-time feature retrieval functionality of feature stores.
Navigate to the dbt_tasty_bytes folder location in the terminal and run the command dbt run to create the data models in Snowflake, our offline feature store.
Creating the Feature Store
This demo uses Feast as the feature store, Snowflake as the offline store, and Redis as the online store.
Navigate to the folder location feature_store/feature_repo where there are four Python files:
data_soures.py, where the Snowflake source tables are defined. A new source is defined for each Snowflake table.
entities.py, where entities are defined. Entities are domain objects that you have features for (i.e. locations).
features.py, where feature views are defined. A feature view is essentially a view on top of a data source where you specify the entity the source has features for and which columns to use as features.
feature_services.py, where feature services are defined, a layer on top of feature views. This additional layer allows feature views to be combined and reused in multiple feature services. The suggested pattern is one feature service per machine learning model.
Feast uses a registry to keep a central catalog of the feature objects defined in the Python files. Before deploying our feature store, we will spin up a Postgres Database and Redis to act as the registry and online store, respectively. These services can be spun up with the command docker-compose -f docker-compose-feast.yml up --detach.
After the containers have spun up, navigate to the feature_repo folder in the terminal and run the command feast apply to update the feature store registry and deploy infrastructure (functions) to Snowflake.
Creating a Feature Engineering Pipeline
At this point, features have been calculated by dbt and materialized in Snowflake. The feature store has been created and knows which data sources contain features.
But what if new raw data arrives? Now, we are on to the step where we create a batch feature engineering pipeline that computes features regularly to update our offline data store and syncs the newest feature values to the online data store.
Navigate to the file airflow/dags/location_sales_feature_pipeline.py. For this demo, the pipeline only has two high-level steps: a task group to run the dbt project and a materialization task that syncs the online store with the newly updated feature values from the offline store.
Running a dbt project with a task group, the functionality provided by the cosmos package, provides visibility in the lineage and progress of a run. Before cosmos, you would have to use a BashOperator to run the command dbt run which does not have visibility and requires an entire dbt project re-run if individual models fail.
Navigate to the airflow folder in the terminal and spin up Astronomer using the command astro dev start. Go to localhost:8080 in your browser to see the Airflow UI, log in with ‘admin’ as the username and password, and trigger the pipeline.
After the pipeline has completed running, the feature store is in a state where the offline store contains the history of feature values, and the online store contains the most recent feature values.
Team members can pull features from the offline store for model training and batch inference, and applications can pull features from the online store for real-time feature serving.
Conclusion
In this blog/demo, we explored how to create batch feature engineering pipelines with Airflow and dbt on Snowflake using Feast as the feature store. Whether you use Feast or another feature store offering, the concepts are still applicable.
A feature stores has the potential to streamline an organization’s machine learning operations around features, freeing up data scientists’ and engineers’ time. If you are interested in feature stores and would like to get the most value out of a feature store implementation, reach out to our Machine Learning team at phData for help!


