

There have been a ton of game changing features released by Tableau in 2020, so this post will be the first in a series of blog posts dedicated to exploring some of the newly released features and how to utilize them. This post will cover Dynamic Parameters. I knew this was going to be a huge release because of the number of client projects I had worked on where we repeatedly said, “That solution would totally be possible if we had Dynamic Parameters.” Enough talking about how cool they are, let’s dig into this awesome feature of Tableau!
What Is a Parameter?
In order to understand Dynamic Parameters, you need to first understand what a parameter is. A parameter is generally defined as a placeholder for another value, text, or date that is not fixed and can be changed.
When creating a parameter you must first define the scope of values that you are allowing within your parameter. If your parameter is numeric, you can allow a range of values, a few particular values, or maybe you allow your placeholder to contain any number out there.

If your parameter is a string, you are able to define a list of values that you are able to put within your placeholder, or you can allow any text string to be used as your placeholder.

You are also able to add Dates as values within your parameter. Especially in this case, it is helpful to add values from a preexisting field within your data so that you know you’re capturing all of the values. In a use case where you might have specific dates you are going to be looking at, don’t use this feature and just add in those specific dates.

How to Use a Parameter
There are tons of different ways to use a parameter, but in most cases parameters are used to evaluate a calculation in the chosen context.
If your parameter contains strings for the different region names from your [Region] field and you want to evaluate profit by region, you can create a calculated field with the parameter in it like below:
					// Region Profit =
IF [Region] = [Region Parameter] THEN [Profit] END
You can also create parameters that are meant to be used as filters for your dashboard. Say we have revenue, expense, and profit values for every row in our data set and we want to only see the lines where [Profit] is above a certain value, we can create a parameter that will be our placeholder for whatever value we want our profit field to be subject to.
In this instance, I created a parameter that allowed any value to be input and used in our placeholder. The current value of this value is 1,000 as see below.

I then create a field that evaluates whether or not the [Profit] field is greater than the value in the [Profit Parameter] that we just created, or in this instance – 1,000. Tableau will automatically return a TRUE or FALSE value when evaluating this calculation at the row level in your data. Because of this, when you drag this field to your filter pane you will have the option to select TRUE or FALSE, so select TRUE. This now keeps all of the rows in your data that have a [Profit] value greater than 1,000.

Another common use case when using parameters is using different string values to switch the measure fields that you’re using in a calculated field. By choosing a different value from your parameter list, you then show the measure associated with that string. First create the list of measures you want to be able to select in your parameter like below.
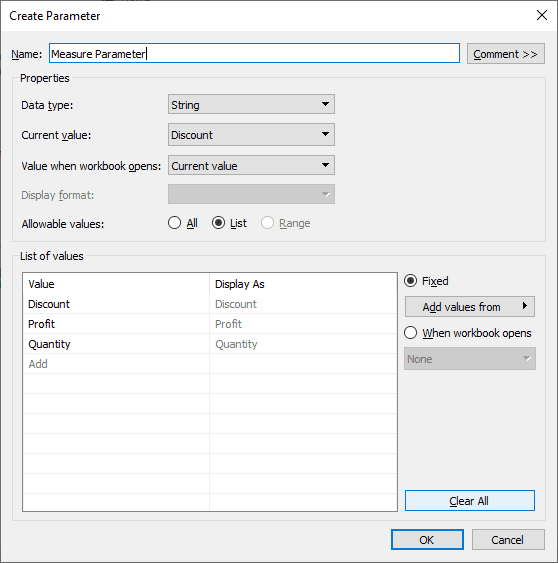
Next, create a calculated field that references the parameter you just created and using the WHEN and THEN statements you cite your criteria. If the string in my parameter contains the text value ‘Profit’ then return the [Profit] measure.
					// Measure Parameter  =
CASE [Measure Parameter]
WHEN 'Profit' THEN [Profit]
WHEN 'Discount' THEN [Discount]
WHEN 'Quantity' THEN [Quantity]
END
These are just a couple of examples as there are tons of other great use cases for parameters.
Okay Cool, But What's a Dynamic Parameter?
As you saw in the the last example of how to create a parameter, you can populate the values using a field from your data. And as you saw with our example of using the parameter as a filter, you want to be able to choose from every value in your data set field that you’re filtering. This is where dynamic parameter come in.
If you’re using a parameter and you want to make sure that the values it contains update appropriately when they appear in your data set you need to make sure that you’re using a dynamic parameter. To do this, right click on your parameter and select Edit. On the right hand side you’ll see a newly added feature that allows you to populate a parameter upon opening a workbook. Use the drop down to select which field you want to update, in this case it’s our Region field.

Although in this use case, a developer would probably already know all of the regions within the list and have been able to populate them manually. Something to watch in that instance is if the data comes in with an error and instead of being EAST region it’s EATS region. This row of data would not be accounted for properly in your output as the filter would be excluding this value. If you used Dynamic Parameters then this misspelled region would show up in your Parameter drop down list!
The last, but maybe most important, part of creating this Dynamic Parameter is the ability to choose what value is portrayed when the workbook opens. You can either choose Current Value by default (which is shown in the line right above it), or you can select a field within your workbook. In this next section I am going to show you a few use cases on how to use this feature and why it’s so important.
Why All the Hype? The Answer is Dates.
Nothing I’ve shown you thus far seems to justify all the hype and celebration of this new feature, but that’s because I haven’t explained how this changes the game for filters and calculations using Dates.
One of the easier ways to use dates to filter down your data is to use them in parameter form. Using an IF [Date] = [Date Parameter] THEN [VALUE] formatting to your data allows you to avoid the complex situations where you need to use LOD calculations and In/Out of Content filters to get the right data to show. Before Dynamic Parameters, the only dates you had at your disposal were the dates in your data set when you created the parameter.
Now that you are able to update your parameters automatically as well as choose what date value you want to show in your parameter upon opening, you can now use these dates in your filter calculations. Here are a few ways you can choose what date to show by default. We are going to start with the scenario that we want to create a filter to select an individual date and see that date’s data. The field that we would use is below.
					// Date Filter  =
[Order Date]>=[Order Date Parameter]
Let’s examine a few different ways to populate the Value when workbook opens field. Since you need to choose a field to populate this, here are a few ideas on fields that you could make that you can fill this field with.
The formula below is taking the maximum order date for all dates within the data set and will include dates that are in the future.

This formula returns the max of your order dates that are less than or equal to today.

Creating a field that returns today’s date is useful if you know your data is updating frequently and your users will want to see current day data.

Finally, if you want the date that populates your parameter to be a specific date, you can make a field that evaluates using a specific date.

Now that we’ve created these fields, let’s choose what date to show when the workbook opens. Edit your parameter and click on the drop down to reveal the fields that we created above. Choose which date you want to show by default. Now your filter field you created will be evaluating against the desired date!

Now apply the filter fields you’ve created across all the worksheets in your dashboard and you will have dashboards evaluating against the same dates and show the same time range. Keep in mind that this is just one use case out of many, but this one sticks out due to the number of times that I’ve run into a situation with clients when dynamic parameters would have saved the day.


