Utilizing the Active Directory within Tableau Server can save the site manager hours of time spent adding users individually. Instead, you can reference a CSV file and add an entire organization in just minutes. If you are creating a brand-new server, a new site on an existing server, or simply adding new users, this method will come in handy.
In this post, we’ll explain why using the Active Directory to add users to Tableau Server is important, how to use the Active Directory, and provide step by step instructions.
What is the Active Directory and Why Does it Matter?
To understand Tableau Server’s Active Directory, you must first understand how Tableau Server manages user data. Upon the creation of the server, Tableau will have the option to create an internal directory or connect to an external directory. Internal refers to the process of storing and managing all the users within the Tableau Server repository. External refers to the process of connecting to a source outside of Tableau where that external source manages user and group data. If your Tableau Server is connected to an external source, then you can take full advantage of the Active Directory feature!
This is a huge advantage because of the time it saves site admins. Tens if not hundreds of hours would be spent manually adding each user individually by looking up their email/username each time. By connecting to a CSV file, often easily downloadable from the external directory that Tableau Server connects to, admins and managers can use their valuable time spent on other tasks.
Step 1: Set up the CSV for Tableau Server to Utilize
There are seven parts to include: username, password, display name, license level, administrator level, publishing capacity, and email address. Not all values are required, but the order determines how they will connect to Tableau Server. This is the most important part of the process! If the CSV is configured incorrectly, it could result in errors for the entire directory.
Username (Column A): the username. If the server is configured to use Active Directory, this value must match a user defined in Active Directory. If the username is not unique across domains, you must include the domain as part of the username. Example: example\Adam or adam@example.
*This is the only required field. If you choose to only include the Username, site access and permissions will need to be granted when adding users to projects.
Password (Column B): a password for the user. This value is NOT used when connecting to an Active Directory. Instead, leave column B blank in the CSV.
Display Name (Column C): the display name is used to identify the user. This value is NOT used when connecting to an Active Directory. Instead, leave column C blank in the CSV.
License Level (Column D): input the License Level you wish the user to have. This value should be Creator, Explorer, Viewer, or Unlicensed.
Administrator Level (Column E): this setting determines the user’s administration access. Values for administer level include System, Site, or None. If you are importing users with the web UI, you can set the administrator site role to System only if you import the file at the server (All Sites) level. If you are signed into a specific site, and if the administrator column for a user in the CSV file is set to System, Tableau Server imports the user as a site.
Publishing Capability (Column F): determines the user’s capability to publish content to Tableau Server or not. If you are using the web UI, the publisher setting is used only if you import while signed into a specific site. If you import users at the server (All Sites) level, this value isn’t used. Values include: yes/true/1 or no/false/0.
Email Address (Column G): The email address is part of the information used to identify a user on the server. If the email address is already in use, Tableau Server updates the existing user information with the settings in the CSV file.
Note: make sure not to include column headers as they will be included as user values.
When you’re done, your CSV should look something like this:

Step 2: Navigate to Add Users
Now that our CSV is all set up, we can connect to it with Tableau Server! On the menu tab on the left side, select “Users” to pull up the “Site Users” page as shown below. Once you’re there, select the “Add Users” dropdown box and select “Import File”

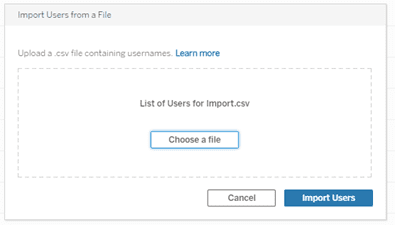
Step 3: Import!
The last step is to choose the CSV file and import the users! If the CSV was setup correctly, you will be able to see the users with their given permissions in the “User” tab.
Conclusion
Using a CSV file to import user to Tableau Server is undoubtedly the fastest way to add and manage users’ access and privileges. Following these three steps will ensure that you accurately set up your CSV so that you can add thousands of users in just a few minutes time. Set up your CSV file following the steps provided above, navigate to Tableau Server to add users, and then finally import the whole list! Again, make sure to note that the order of the columns follows the format exactly, otherwise the access and privileges will not be accurate and will default to the lowest level of access. Additionally, only the username is a required column; all other columns are considered optional. If left blank, they will also default to the lowest level of access. Once you have all of that covered, your users will be added in no time!
Do you have more questions about Tableau? Talk to our expert consultants today and have all your questions answered!


