Here at phData, we often get early access to some of the Snowflake Data Cloud’s more exciting features. This allows us to not just help Snowflake test these features, but it allows us to stay on the cutting edge of what Snowflake provides.
After a year of working with this innovative technology, and it being announced for Public Preview, we’d love to share with you our thoughts on this technology and how to best use it.
In this blog, we’ll explore the new Snowpipe Streaming API feature, why it matters, and how to implement it.
What is Snowflake's Snowpipe Streaming API?
Currently, Snowflake supports loading most data through bulk loads using Snowpipe. This can add latency to your streaming data and requires you to store your data in a stage that Snowpipe can access and load into a table. This adds both latency and storage costs to your streaming data.
Snowflake’s solution to this was to create a Streaming API that can be used to connect and write directly to the database using your own managed application, which lowers latency and removes the requirement of storing files in a stage.
So how does Snowflake do this?
Snowflake provides a Streaming Ingest SDK that you can implement using Java. This SDK allows you to directly connect to your Snowflake Data Warehouse and create a mapping of values and rows that need to be inserted. Once this step is complete, you can then insert the data.
While building a whole new application might sound like a lot of work, if you’re already using Kafka to connect to Snowflake, you can upgrade your connection to version 1.8 and have your Kafka connector use the Streaming Ingest SDK instead of writing messages or streams to an internal stage.
When to Use Snowflake’s Snowpipe Streaming API?
First, the best use case for Snowflake’s Streaming API is any piece of streaming or messaging data. For example: a Kafka Topic, an API tracking changes in the stock market, IoT sensors streaming metrics about equipment, website events and clicks, live video game player interactions, etc. As you can see the list goes on as there are loads of different types of streaming data that can be ingested with Snowflake’s Streaming API.
As an example, let’s say that you work for a Financial Institution that is looking at optimizing their portfolios with some stock data. There are loads of websocket APIs out there to fetch the latest changes in the stock market, however to get the data into Snowflake, you have to take that stream data and write it to a file in a stage and then have Snowpipe bring those changes into your Data Warehouse.
Depending on your configuration, your Data Warehouse is either batch loading a file every x amount of time putting your business behind, or every new stream/message is being created as a separate file and consumed into Snowflake. Both options have different latencies and either generate large files or large amounts of files that fill up a stage and increase storage costs.
With this new API, you can implement the Streaming Ingest SDK, and as soon as a message arrives, you can hand it off to Snowflake, map the values to the columns of a table, and insert the rows. Again, reducing latency and removing file storage costs from your stage.
How to Implement Snowflake’s Snowpipe Streaming API?
There are a couple of ways to implement Snowflake’s Streaming API, we will start by implementing the change in Kafka. To implement the Snowflake Streaming API in Kafka, all you need to do is make sure your connector is at least version 1.8.
If you’re on that version or greater, all you need to do is update your Snowflake properties by setting: Snowflake.Ingest.Method to SNOWPIPE_STREAMING, and Snowflake.Role.Name to the role that you want to perform the inserts into the table. Those are the only two required config changes to set up your Kafka connector to use the new Snowflake Streaming API. However, there are other properties you can set for the buffer, polling, and error handling. You can find more on these and other option properties here.
How about using the Streaming Ingest SDK with your own Java application?
This is fairly straightforward but does take a little more work. However, you’re in luck because I have an example prepared for you. I’ll continue with my example above, and we will create a Java application to consume a Websocket stream of Stock data.
Let us start by setting up our Maven pom to bring in our dependencies. In the case of this example project, I only had three dependencies: a package to help me parse the json message, a Websocket client that I could extend, and our Snowflake ingest sdk.
My dependencies look like this:

Next, we want to build our Websocket client so that way we can subscribe to the API and receive the stream of transactions. In this example, I extend the WebSocketClient, I override the onOpen to subscribe to five tech stocks that I want to monitor following the APIs documentation. onClose and onError I log any connection close or connection error to a log file.
The real bit of work happens onMessage, within this function I process the JSON message I receive from the API to extract the message type and the data tied to the message so that way I can send it off to my SnowflakeIngestStream class. The SnowflakeIngestStream class is where I use the SDK that Snowflake has provided to connect to Snowflake and write my messages directly to a table.

Next, we need to implement our SnowflakeIngestStream class, and the first step is to bring in a custom profile.json file that specifies the information we need to connect to Snowflake. It will look something like this:

I start by setting the path to the profile, creating an object mapper to read the json and then I parse the file to get a properties variable with all of the information needed to connect to Snowflake. You might be wondering what that properties file should look like. Here is an example of how the file should look:
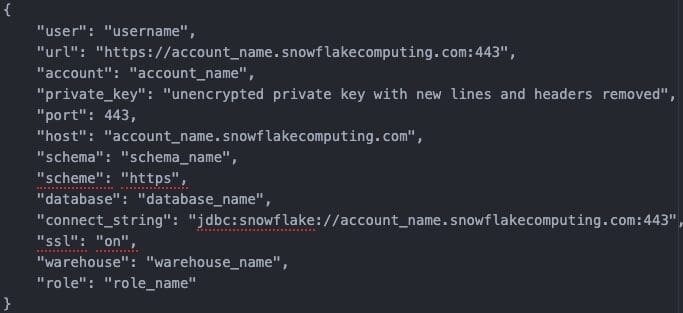
The main thing to notice is that the SDK at this moment does not support encrypted private keys. You will have to manually decrypt your private key (if it is an encrypted key) and remove the header/footer and any new lines. Otherwise, the rest of the information is plug and play like your username, account name, schema name, database name, role name, and warehouse name.
Now that our program has the necessary properties to connect to the database, we can create a client, request, and a channel to connect to Snowflake Streaming. That will look something like:
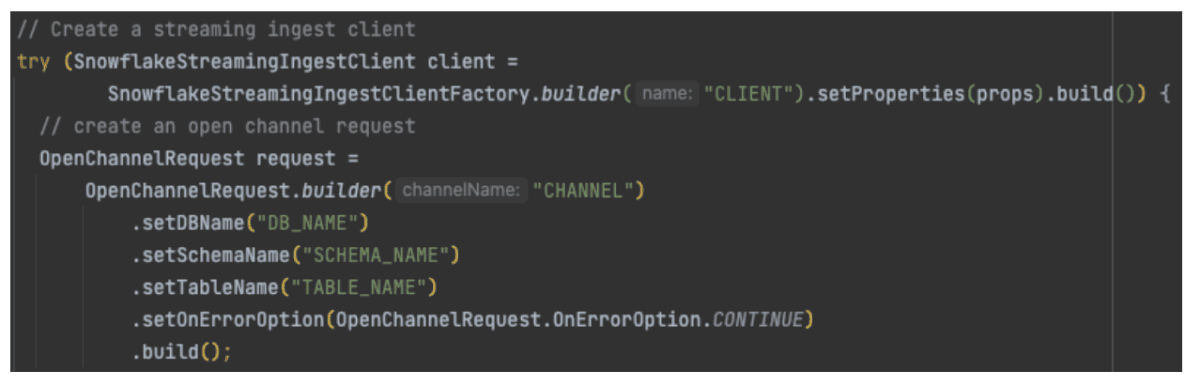
Here we start by creating a client based on the properties file we brought in earlier. Next, we create a request and we set the Database, Schema, and Table that the request should point at. Finally, we create a channel to send the insert through. With these things out of the way, we can now create the Map object necessary to insert a row.
In my case, the JSON message could have several data points sent at a time, so I decided to go ahead and extract that information using Java and then insert it into a table. Again, I’m consuming some stock market data, so the attributes I have are the Symbol, Price, Unix Timestamp, and the Volume of the trade. Here is an example of iterating through the message data, creating the row, and inserting it:

In the mapping above, we begin by iterating over our JSON object, and for every piece of data in that JSON array we need to create a new row to be inserted. We do that by creating a Map of the column name, and then the piece of data to be inserted into the table. Each row within the map belongs to a column in the table.
Once we’ve fully populated our map, we use the channel we created to insert the row, and then we check for any errors and throw them to be logged. All that’s left to do is call the Websocket Client we created so we can connect to our API and start listening for any streaming data. That looks something like this:

Now, all we have to do is have our Java code run. It will create our Websocket client, connect to the API, and everytime the client receives a new message, it will ingest that message data into the table directly thanks to the Stream Ingest SDK that Snowflake provides to interact with the Snowflake Streaming API. With the service now connected and running, you can go to your table and view the data streaming directly to the table.
Closing
As you can see, the new Snowpipe Streaming API makes it very easy to begin ingesting stream data directly into your tables, improving the latency of your data and reducing cloud storage costs by skipping over the need to write and store your data on a stage.
If you’re using Kafka, a quick properties change allows you to be up and running with the new API, meanwhile, if you’re maintaining your own Java application, it is now very easy to use the SDK and interact with the streaming API and send your streaming data directly to Snowflake.
Interested in leveraging new (and old) Snowflake features? As the Snowflake 2022 Partner of the Year, phData has the experience and expertise to help your organization get the most out of your Snowflake investment. Reach out today to learn how we can help.


