Have you ever wanted to connect Microsoft Excel to the Snowflake Data Cloud for data analysis? Snowflake, of course, has its own web interface for interacting with the database engine and running queries directly.
Many thirty-party tools and languages are available, offering both cloud-based and on-premises feature-rich solutions such as PowerBI, Tableau, and Python. However, when all you have is a hammer, everything else looks like a nail, right? Well, it turns out you can, and it is fairly straightforward to accomplish.
In this article, let’s look at how you might query data in Snowflake from Excel, what you will need to do so, and perhaps why you might want to consider Excel in the first place.
Why Use Excel for Data Analytics Against Snowflake?
There are many reasonable use cases for connecting Excel directly to Snowflake. In many organizations, there is a fair amount of competency built up with Excel, and many users simply do not have the time to learn yet another analytics tool.
Perhaps you simply want to export a small dataset to a CSV file, for example. Querying Snowflake from Excel makes it easy to do so. Moreover, it provides you the convenience to manipulate and visualize the data directly within the application.
With a direct connection to Snowflake, you can still leverage the power of Snowflake’s cloud-based computational engine but also the familiar data manipulation features that Excel has to offer.
ODBC Driver and Data Source Setup
Snowflake ODBC Driver Download
To try out the tips presented in this article, you will, of course, need Excel, Windows, and access to a Snowflake account. Snowflake offers a 30-day free trial here, and I encourage you to sign up for one if you do not otherwise have access. In addition, you will also need to download the latest version of the Snowflake ODBC driver. The repository for the driver can be found on the downloads page accessible from the Snowflake web interface.
The Snowflake web interface makes finding the driver easy. Once you get connected to your Snowflake account, you can download the driver via the help options accessible from the navigation bar at the top of the interface.
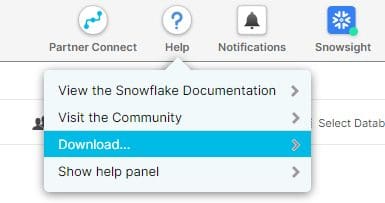
To find and download the ODBC driver:
- Click “” from the navigation bar.
- From the drop-down menu, click <Download…>.
- From the downloads dialog, click .
- Click the “Snowflake Repository” link.
- Click the folder link (“win32” or “win64”) named appropriately for your specific system’s architecture.
- Click the folder link “latest”.
- Click the Microsoft Installer Package file indicated in the list; for example, “snowflake64_odbc-2.24.6.msi” to download the installer file.
Once downloaded, open and execute the installer following all instructions to install the Snowflake ODBC driver.
Keep in mind to install and configure the ODBC driver. You will need to be signed in to Windows with an administrator account or with an account having the ability to elevate to administrator-level privileges.
Configure a Snowflake Data Source
After successfully installing the Snowflake ODBC driver, you will need to add in Snowflake as an ODBC data source, so that Excel, or really any other software that uses ODBC, can make use of the driver.
In order to set up a new data source, open the ODBC Data Sources dialog that pertains to your architecture and add a new data source name (DSN). An ODBC DSN holds the necessary information to configure an ODBC driver for use. Keep in mind that a User DSN is only accessible by the user who created it on the workstation, and a System DSN is accessible by any user logging into the workstation. Either configuration will work fine for this example.
To Configure an ODBC Data Source:
- Click the Microsoft Windows icon and type in “ODBC Data Sources”. Choose again the application appropriate for the file you downloaded and your architecture; either ODBC Data Sources (32-bit) or ODBC Data Sources (64-bit).
- The default tab sets us up to create a User DSN and so from here, we can click “<Add…>”:
- On the next dialog, we need to select the driver with which we want to set up a data source. We will choose “SnowflakeDSIIDriver” and click “<Finish>”.

- At this point, we can now configure our new data source.

For the purposes of this example and to keep it simple, there are only three items that need to be supplied:
Parameter | Value |
|---|---|
Data Source | Specifies the name of your DSN. |
User | Specifies the login name of the Snowflake user to authenticate. |
Server | Specifies the hostname for your account in the following format: <account_identifier>.snowflakecomputing.com For more information on Snowflake “Account Identifiers”, go here but essentially, this will be the URL of your Snowflake account. For example, a trial account for Snowflake would look something like: “az12345.centralus.azure.snowflakecomputing.com” |
Once you have entered a data source name, user and server, you can click “<OK>” to return to the previous dialog. You may be wondering why we are leaving the password item blank. Of course, in this case a password is required to connect to Snowflake but in Windows, even though the ODBC driver displays a “password” field, the driver does not store any values entered in the field. Instead, the driver requires login credentials to be provided at connection time. You will see this later when we attempt to connect from Excel.
The remaining items either have a default value or are considered optional. Having said that, you might notice a “<Test…>” button at the bottom left of the Snowflake Configuration Dialog. If you would like, you could enter a password and click “<Test…>” in order to test your connection. However, once you click “<OK>” your password will not be saved and if you click “<Configure…>” to configure your newly created DSN, you see that the password field has returned to blank.
You are now ready to use this connection from within the Excel application. Read on and in the next section we will do just that.
Connecting to Snowflake from Excel
Microsoft Excel has long been the go-to tool for analyzing data. It’s familiar and most people, certainly business analysts know how to use it or can easily figure it out. It has built in tools like Power Query to transform and load data from several different data sources. However, performing data analytics in Excel does carry with it a few pitfalls and many will argue that doing so does not equal true business intelligence. Nonetheless, that debate is well beyond the scope of this article.
Suffice it to say, Excel can be just another arrow in your business intelligence quiver and so let us give loading up some data a try. I will be using the latest version of Excel included with Microsoft’s Office 365 suite and at the time of this writing was Microsoft Excel for Microsoft 365 (Version 2202 Build 16.0.14931.20128 – 64-bit).
Let’s open Excel and start with a blank workbook. Once you have a new workbook opened, you can immediately go to the menu bar and click “<Data>”. Then, from the ribbon you can choose “Get Data | From Other Sources | From ODBC”.

Excel will then prompt you to choose the Data Source Name (DSN) that you would like to connect to for analysis. Here you can click on the DSN drop-down and select the DSN you created above and click “<OK>”.

Querying Snowflake from Excel
After choosing “<OK>”, the Excel Navigator Dialog will open and from there you can choose from a list of database objects to which your user account has access. For example, let’s load a list of databases from Snowflake into an Excel worksheet.
From the Navigator dialog, expand “SNOWFLAKE”, expand “INFORMATION_SCHEMA” and finally, select “DATABASES”. At this point, the navigator will populate a preview pane with a sample of the table data you requested.

Here you can select either to load the data into your worksheet or transform the data first. Transforming the data is beyond the scope of this article and so here we will click “<LOAD>” but in a nutshell, choosing “<Transform Data>” opens the Power Query engine in Excel allowing you to perform operations such as
- Manipulating columns, such as adding, removing, renaming, splitting, and expanding them.
- Pivoting and unpivoting column data or apply special sorting and filtering operations.
- Work with more complicated structured data such as JSON or XML.
After taking a moment to connect to Snowflake and gather the requested data, Excel will render it in a new worksheet for your analysis.

Keep in mind that Excel does impose some limitations on the amount of data that it can load and as such is limited to 1,048,576 rows and 16,384 columns. Hopefully, no data source that you will be working with would ever come close to reaching 16,384 columns. Moreover, the DSN link remains persisted in the workbook and so if you ever need to refresh the data, simply click “<Refresh>” from the Excel ribbon.
Closing
So, there you go! Pretty easy, right? As I said earlier, there are several feature rich tools that do a great job of assisting with the analysis of data and in fact, large amounts of it. I do not think that Excel is positioned to compete in that space, but for small datasets or quick ad hoc analysis, it may be a good fit and worth consideration. The answer as to whether it is or not is like the answer to so many other technical discussions; the answer simply depends and your mileage may vary.
Have more Snowflake questions? Our team of experts is here to help!
FAQs
Yes you can. In order to authenticate properly, you would need to set the “authenticator” parameter of your ODBC Data Source Name, as required according to the vendor chosen as the Identity Provider(IdP) for the Snowflake account you are connecting to. For example, if the Snowflake account was using Active Directory Federation Services (Microsoft ADFS) as an Identity Provider, you would set the “authenticator” field to “ExternalBrowser”.
In so called “Browser-based” SSO, the application (Excel) would launch your default web browser opening a new tab/window displaying the authentication page for the IdP. After the IdP has authenticated your credentials, you would be able to switch back to Excel and use the Snowflake session that had been initiated.
Your best place would be the help documentation within the Excel application itself. You can also have a look here for more information from Microsoft Support.
ODBC error 193 usually indicates a mixing of 64-bit and 32-bit drivers and applications. Microsoft Excel is available in both 32-bit and 64-bit versions and a 64-bit version of Windows will run them both.
If you have the 32-bit version of Excel installed, you will need the 32-bit Snowflake driver and need to use the 32-bit version of the ODBC Data Source Administrator to create your DSN. Likewise, if you have the 64-bit version of Excel installed, you will need the 64-bit version of the driver and ODBC Data Source Administrator.
Make sure the driver and ODBC Data Source Administrator application match the architecture of the version of Excel you are using.


