This post was co-written by Mayank Singh and Ayush Kumar Singh.
For businesses utilizing Salesforce as their Customer Relationship Management (CRM) platform, the Snowflake Data Cloud and Tableau offer an excellent solution for scalable and accurate analytics.
In order to unlock the potential of these tools, your CRM data must remain synced between Salesforce and Snowflake. Salesforce Sync Out offers an excellent and cost-efficient solution for seamlessly ingesting Salesforce data into Snowflake.
In this blog, we’ll provide a detailed, step-by-step guide on using Sync Out to seamlessly transfer data from Salesforce to Snowflake. This process paves the way for better data management, sharper analytics, and more efficient operations.
What is Salesforce Sync Out?
Salesforce Sync Out is a crucial tool that enables businesses to transfer data from their Salesforce platform to external systems like Snowflake, AWS S3, and Azure ADLS. Maintaining this data synchronization between Salesforce and the organization’s data warehouse will enable more efficient and streamlined business operations, including:
Time savings
Error detection and reduction
Faster and more accurate operational insights
Data security
How to Use Salesforce Sync Out
To start, you must first create a connection between your Salesforce platform and the external system you wish to sync with. Once the connection is established, select the data you want to sync and the frequency of synchronization.
To configure Salesforce and Snowflake using the Sync Out connector, follow these steps:
Step 1: Create Snowflake Objects
To use Sync Out with Snowflake, you need to configure the following Snowflake objects appropriately in your Snowflake account:
Database and schema that will be used for the Salesforce data.
Warehouse for loading the data (start with XSMALL or SMALL warehouses).
Role with usage permissions on the warehouse and the privileges on the database and schema that will be used. This includes; Create and Replace tables, Insert, Update, Truncate, and Merge Data functions, and permissions to create a temporary internal stage
A user(s) that has been granted the Role mentioned above.

Step 2: Enable Sync Out
Enable Sync Out and the Snowflake output connection in Salesforce CRM Analytics by following these steps:
Click Setup in Salesforce CRM Analytics.
In the Quick Find bar, type Analytics. Click Settings.
Check Enable Data Sync and Connections and Enable Snowflake output connection.
If you want to enable live connection to Snowflake, check Enable direct data for external data sources.

Step 3: Configure Snowflake Output Connection
Configure the Snowflake output connection that will be used by Sync Out by following these steps:
In Salesforce, open Analytics Studio and go to the Data Manager.
In Data Manager, select the Connect tab and click the Connect to Data button on the top right.
Select New Connection from the top right corner, then go to Output Connections.
Click Next.

Select the Snowflake Output Connector.
Enter all required fields for your connection, including the Snowflake information described below. See the Salesforce documentation for more information.
Click Save & Test to test the connection.

Step 4: Connect to Local Salesforce Data and Configure the Data Sync
Use the Salesforce Data Manager to connect to local Salesforce data, enable Sync Out, and set a schedule.
Click the Connect to Data button in Analytics Studio.
Select Salesforce as your connection type.
Enter your Salesforce credentials.
Select your Salesforce object(s) and click Next.

Here, we can select the columns, check the data preview, and apply any data sync filter we want.

Configure your sync settings and click Finish.
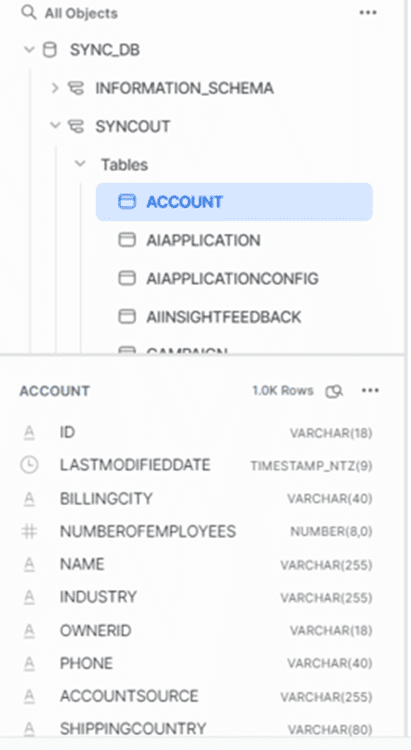
Finally, verify your data in Snowflake.
Additionally, scheduling and alert notifications can also be configured.
Conclusion
Integrating Salesforce data with Snowflake’s Data Cloud using Tableau CRM Sync Out can benefit organizations by consolidating internal and third-party data on a single platform, making it easier to find valuable insights while removing the challenges of data silos and movement.
The Salesforce Sync Out connector moves Salesforce data directly into Snowflake, simplifying the data pipeline and reducing latency. The connector also automates Data Definition Language (DDL) creation on the Snowflake side, saving additional setup time and capturing incremental loads from many Salesforce objects to keep the data fresh. However, integrating Salesforce data with Snowflake requires some technical expertise.
Speaking of technical expertise, phData is the 2023 Snowflake Partner of the Year and has a proven track record for consistently helping organizations of all sizes succeed with Snowflake. If you’re looking for help, phData would love to be a part of your Snowflake success story!