Have you ever built an informative, actionable, beautiful dashboard only for it to get a few views by the end-users it is intended to benefit? Until I learned about email subscriptions in Tableau Server and Tableau Online, many of my dashboards were not reaching the intended audience.
This blog covers how to address this common problem in analytics by walking you through how to add users to a subscription, alter the subscription, and provide best practices on how to increase engagement.
Why is Setting Up Email Subscriptions Important?
This simple addition to Tableau Server or Tableau Online will help any business extract the maximum value from insights gathered in a dashboard. The information delivered automatically into the hands of users who need it most is a powerful thing.
With minimal effort, you can set up subscriptions to deliver information straight to your desired end-users’ inboxes at the frequency they need it.
How to Schedule an Email Subscription
To get started, publish the dashboard to Tableau Server or Tableau Online and navigate to the view you want to subscribe to.
Step 1: Where to Look
In Tableau Online click ‘Watch’ and then ‘Subscriptions.’ In Tableau Server, you can directly click ‘Subscribe’ in the toolbar.

Tableau Online

Tableau Server
Step 2: Who Do You Want to Share With?
Add the users or user groups in the ‘Subscribe Users’ box that you would like to receive the email. They must have ‘view’ and ‘download Image/PDF’ permissions.
You can add yourself manually or select the checkbox next to “Subscribe me.” Including yourself can be beneficial to ensure emails are properly sent as scheduled and make it to the correct inboxes.
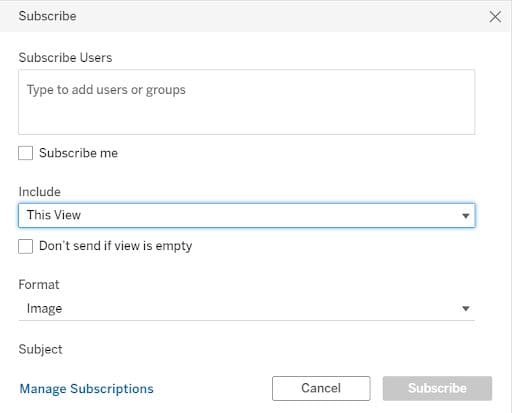
Step 3: What Do You Want to Share?
Choose whether you want to send the entire workbook or just the current view. If you choose to send the entire workbook, each dashboard will appear in order, one on top of the other vertically.
Pick whether you want an image, PDF, or both. If your choice is a PDF, it will arrive as an attachment, and you can choose the size and orientation. An image will be embedded in the email message, which the end-user can directly click on to be taken to the actual dashboard within Tableau Server or Online.
Something to Consider: If you send an image, it will more likely attract their attention, whereas a PDF attachment might go easily unnoticed. Perhaps send both if the end-user could benefit from having the attachment for presentations.

Step 4: How to Get the End-User to Open Your Email
Choose an email header that is something meaningful to alert the receiver to what they are looking at.
Something to Consider: I find this is one of the more important things here. A good subject line will attract your audience’s attention and increase the chances they open the email over getting ignored or, worse, sent to the trash.
Step 5: How Often Do You Email?
Select the frequency you want the email sent. You can either pick When Data Refreshes or a decided Frequency. If you choose the latter, you can then decide how often (i.e., daily, weekly, monthly), at what time, and what day(s) you want to send.
Something to Consider: Choosing the correct frequency is vital. Think about how often the data is updated. My example here is Monthly NPS Update; sending an email every week would not be helpful. Whereas data that is updated hourly wouldn’t be as informative if sent once a month.
Consider the role of the recipient. Someone in leadership may only need a monthly update, but a sales team leader may want updated information every morning to be able to take action if needed? Asking yourself these questions beforehand will lead to an appropriate dissemination of information without overwhelming your audience.
Step 6: You’re Done!
Click ‘Subscribe,’ and you are good to go!
How to Update or Unsubscribe To an Email
My favorite way to update subscriptions is in the ‘subscriptions’ tab in your workbook. I do this most often when a user wants to change the frequency of when they are receiving the emails.

You can change one user at a time if they all have different requirements. The easiest way to accomplish this is by clicking on the ellipses next to their name under the “Actions” column. Here, you can change the frequency, subject, empty view mode, and format or unsubscribe them completely from the email.

If you want to make changes for multiple people or everyone on your list, you can select multiple people or ‘select all’ and then click the ‘Actions’ dropdown. Here you can change the frequency, format, or unsubscribe.

Closing
By following these six steps, you can provide your audience with a simple and effective way to stay informed on data topics they are interested in. They can see the latest relevant data in their email inbox, which will help them make data-driven decisions when it matters most.
It is a simple task that I find many are unaware of, but now you are! My final tip is to wield your newfound power for good and not inundate your users with too many emails unless, of course, that is what they have asked for.
Do you have more questions about Tableau or how to utilize the platform effectively? Reach out to our team of experts!


