The following post is a part of a series looking at different options for mimicking Pivot Tables in Tableau: Building Pivot Tables in Tableau Series.
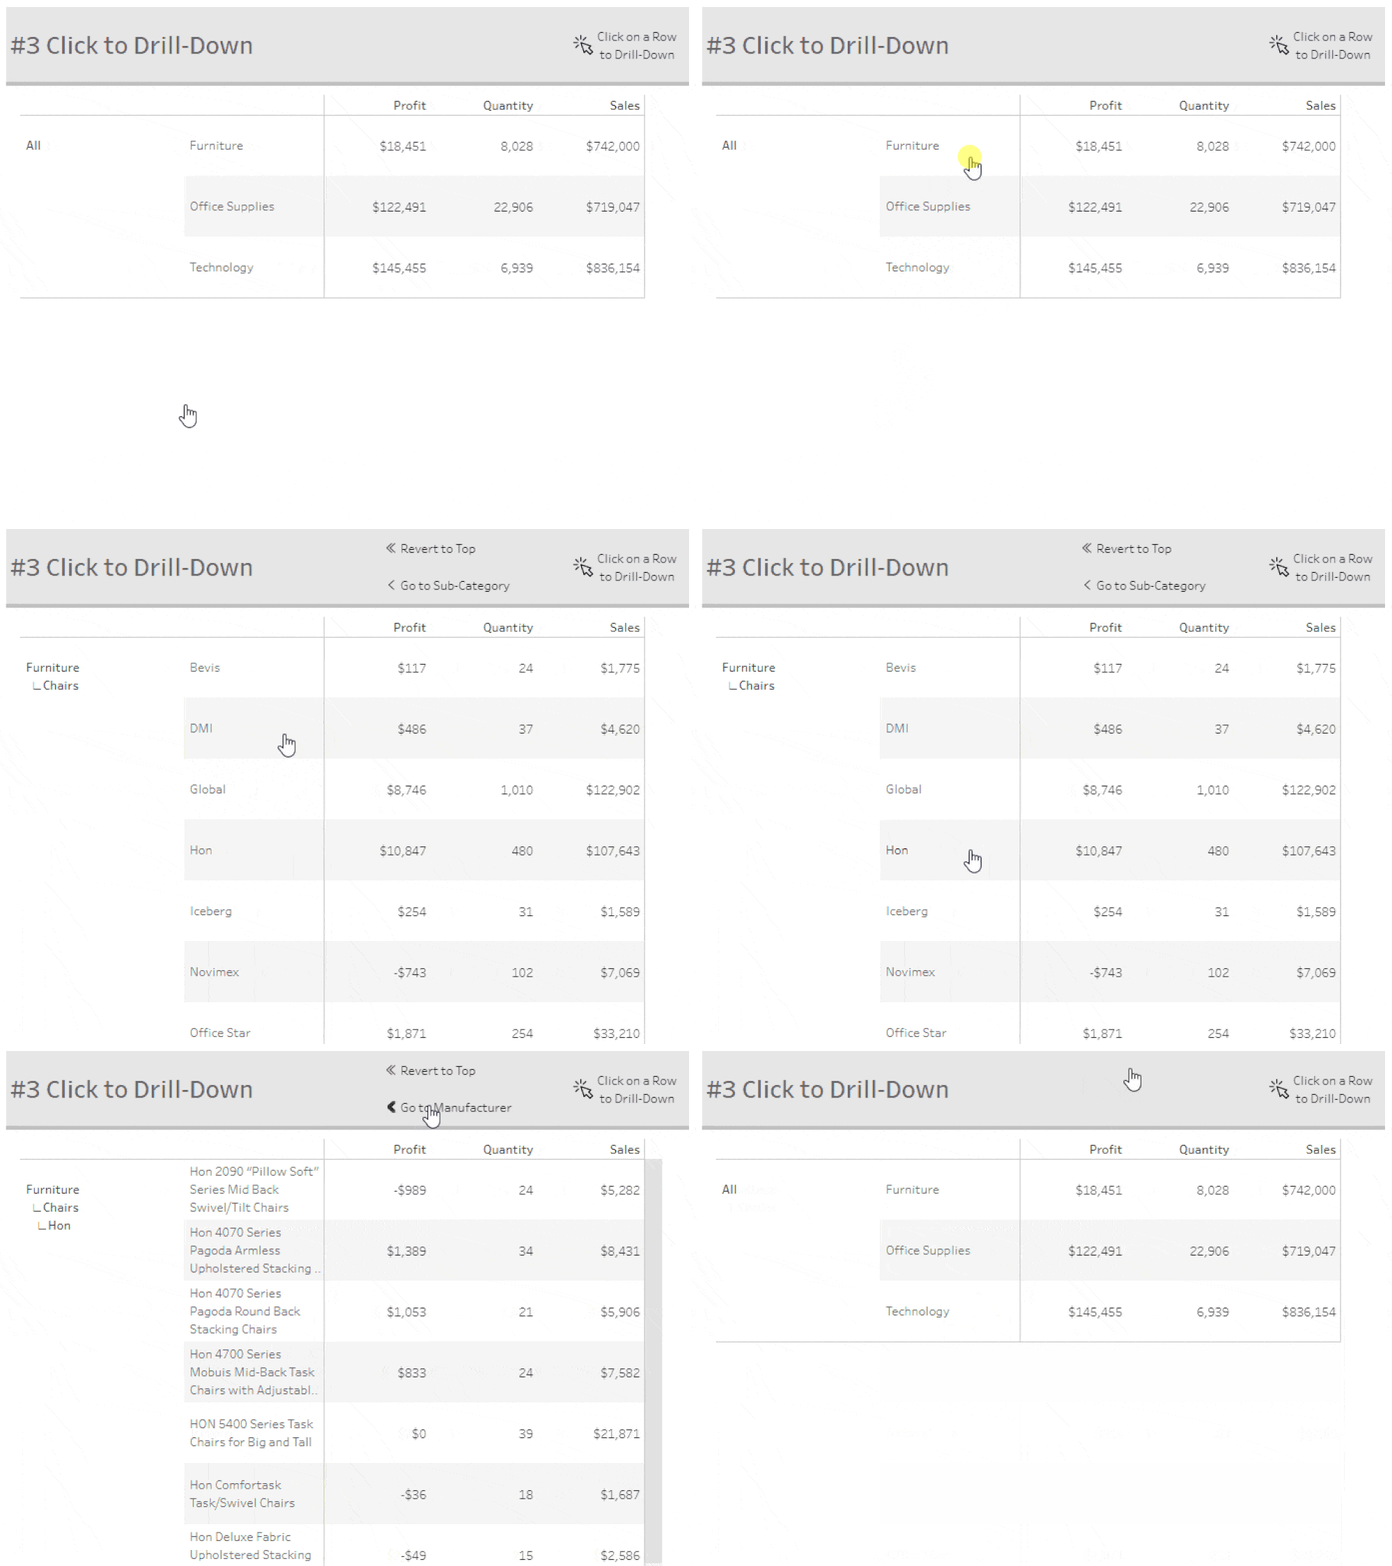
This option uses Parameter Actions to offer a click to drill down functionality past the two levels that are built into Tableau with Set Actions. For this example, the drill-down path will be Category > Sub-Category > Manufacturer > Product Name. First, we will focus on creating the drill-down functionality, then adding the drill up one level and revert to top functionality.
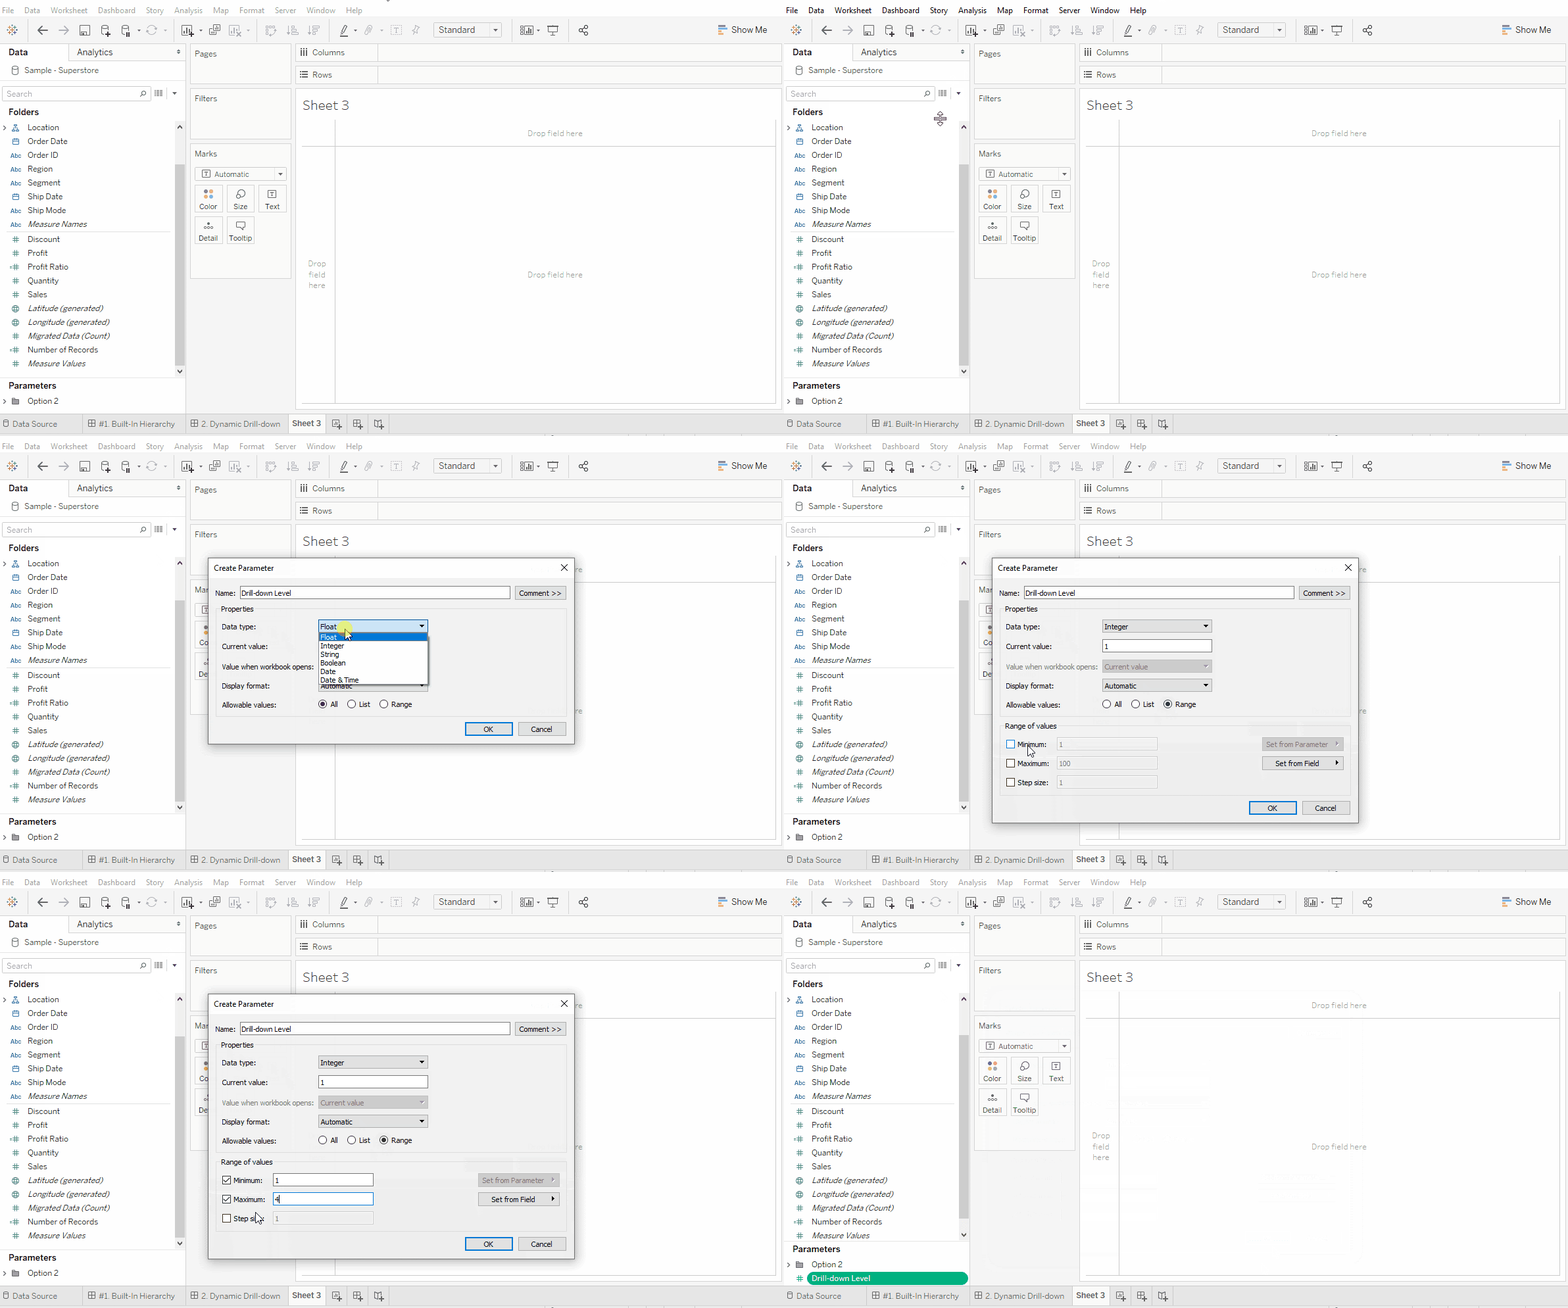
Step #1: Create Level Parameter
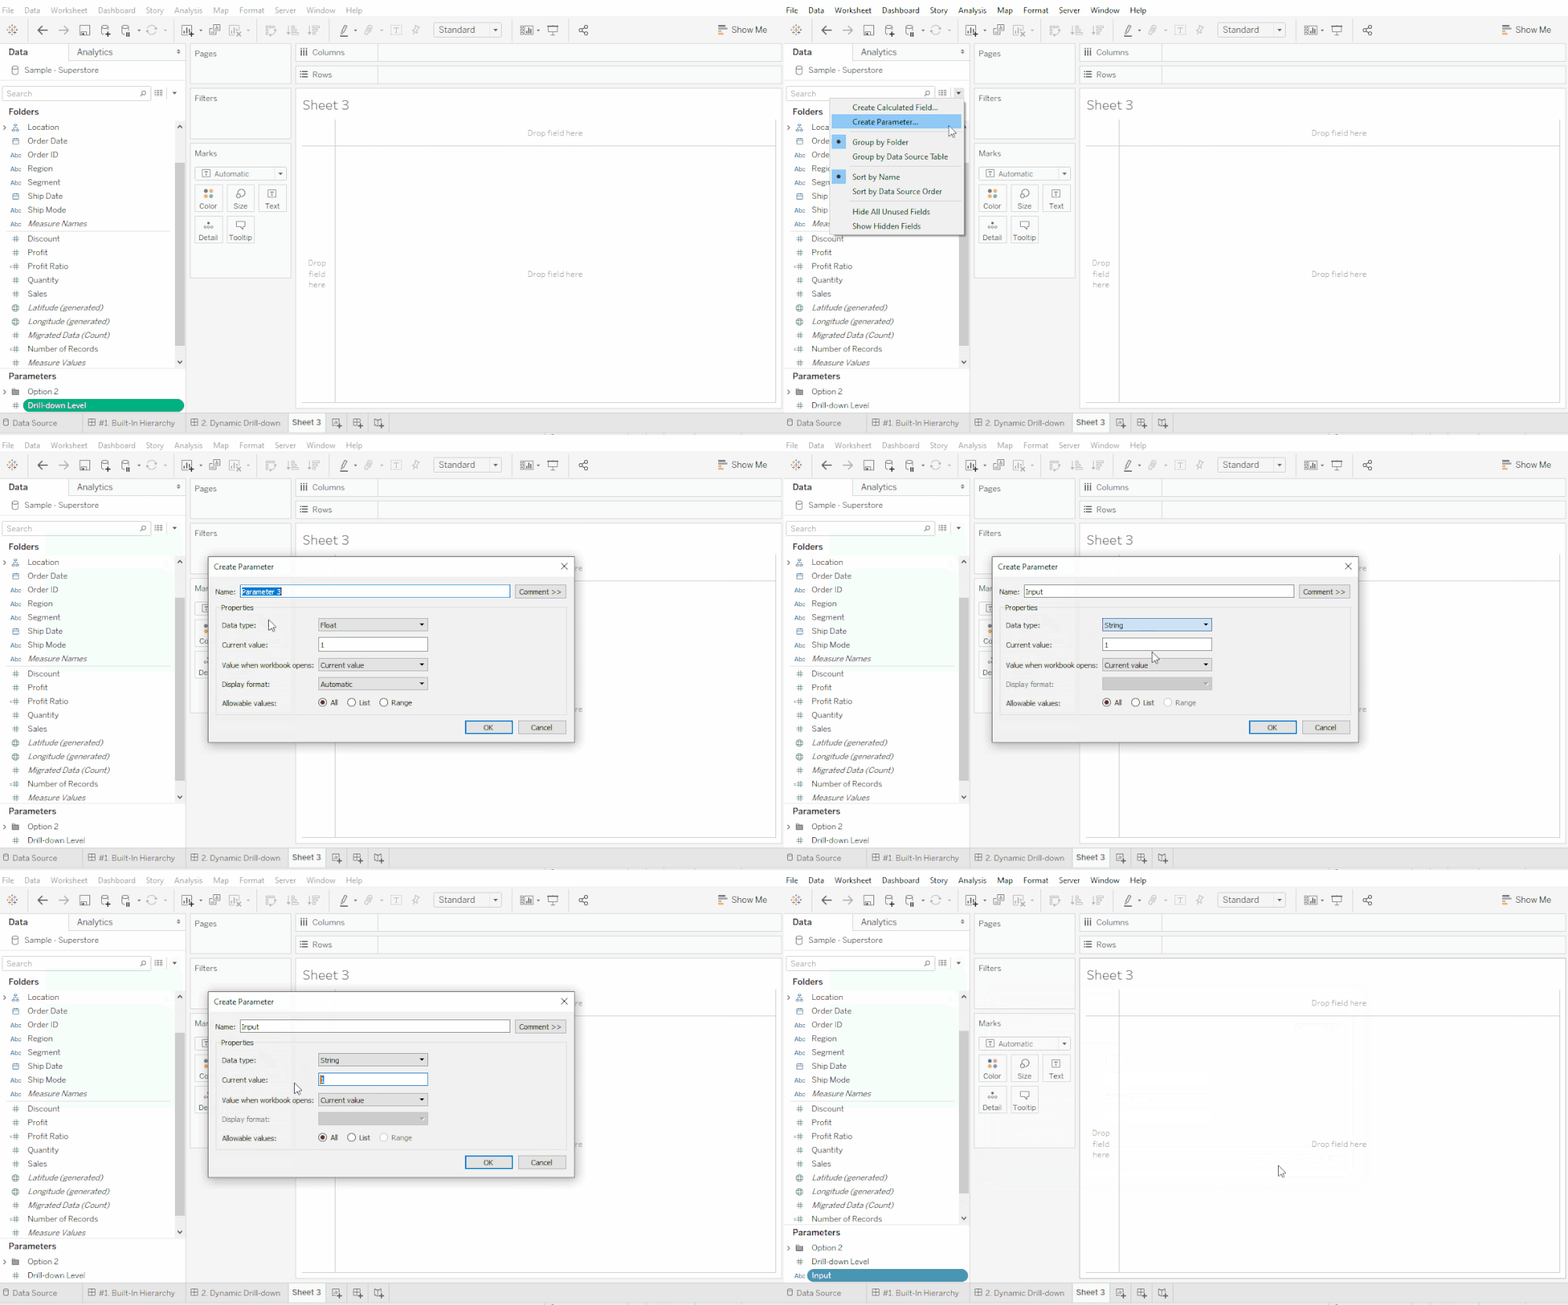
Step #2: Create the Input Parameter
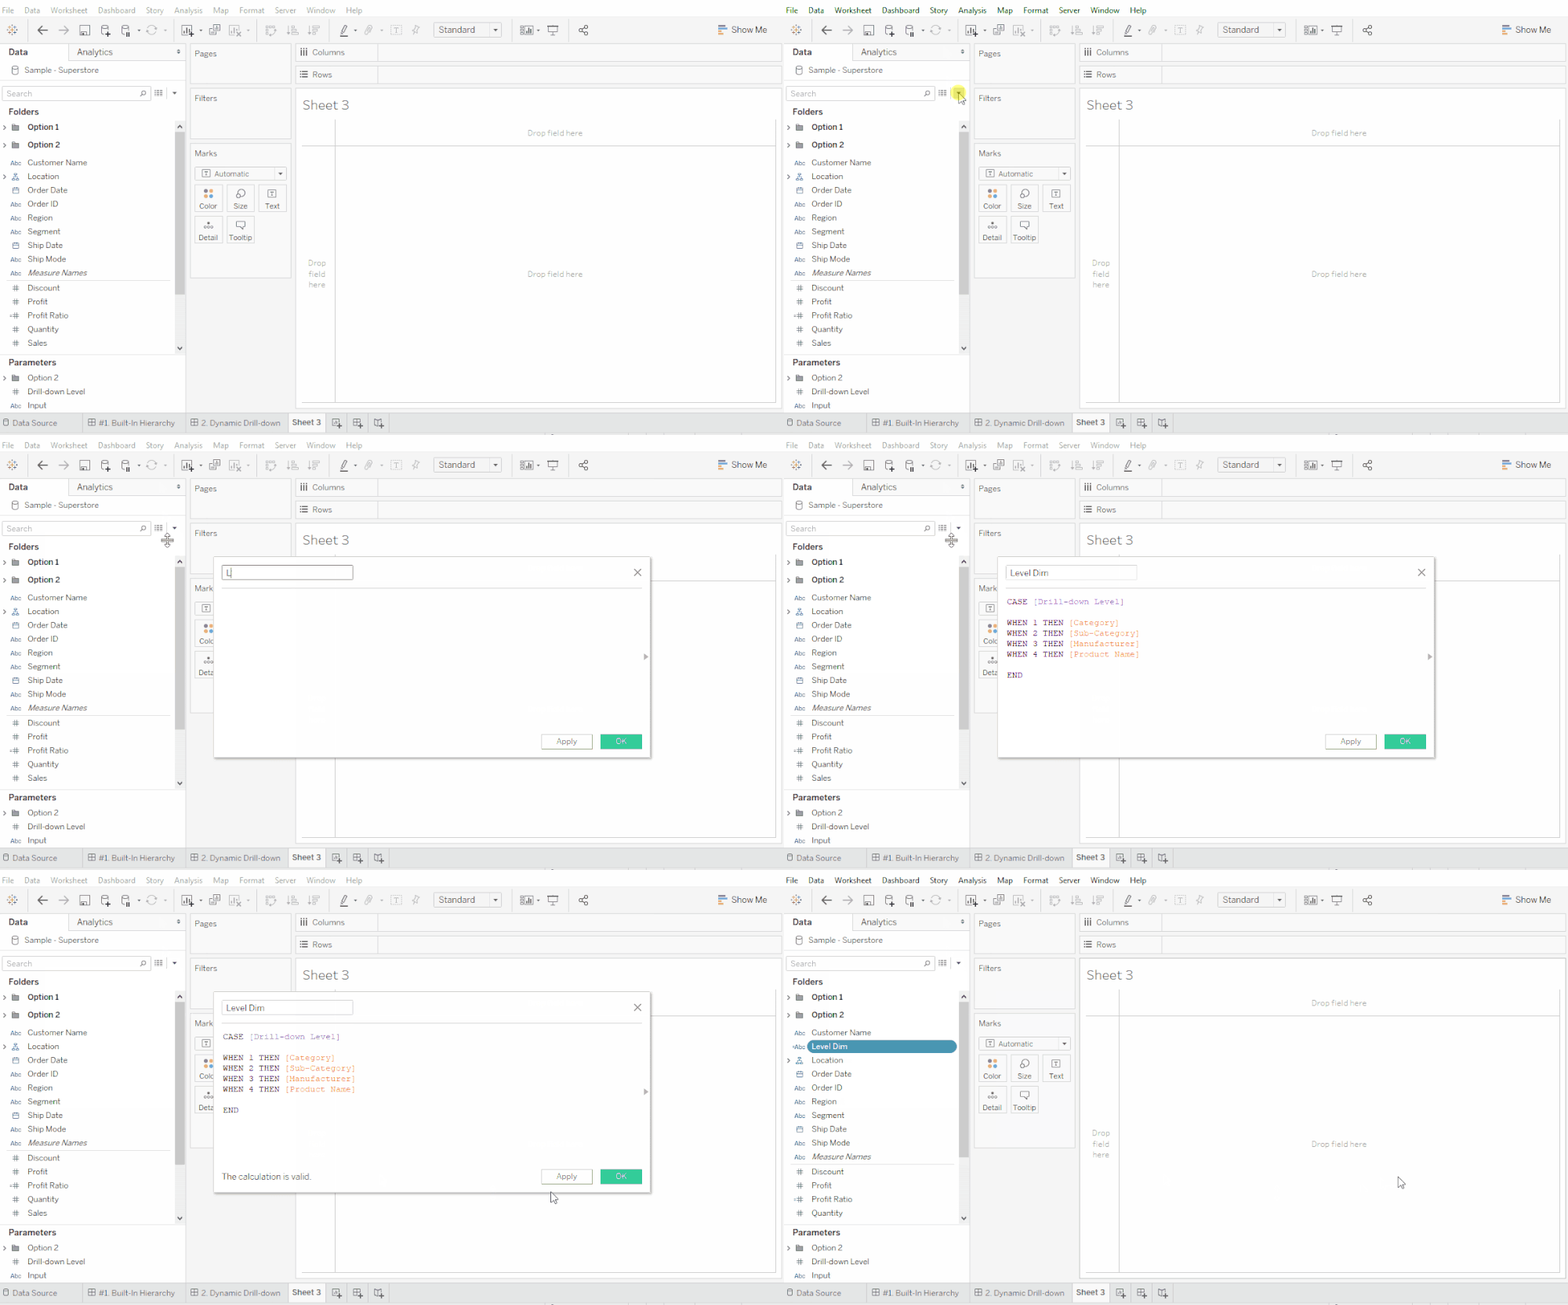
Step #3: Create Input Level Options
					//Level Dim

CASE [Drill-down Level]

WHEN 1 THEN [Category]
WHEN 2 THEN [Sub-Category]
WHEN 3 THEN [Manufacturer]
WHEN 4 THEN [Product Name]

END
Step #4: Add Input Field
Now we create the field that will determine what is in the [Input] parameter. This field will be used in the dashboard parameter action to tell Tableau what the end-user clicked on.
					//Add Input

IF [Drill-down Level] < 4
THEN [Input] + "," + [Level Dim]
ELSE [Input]
END
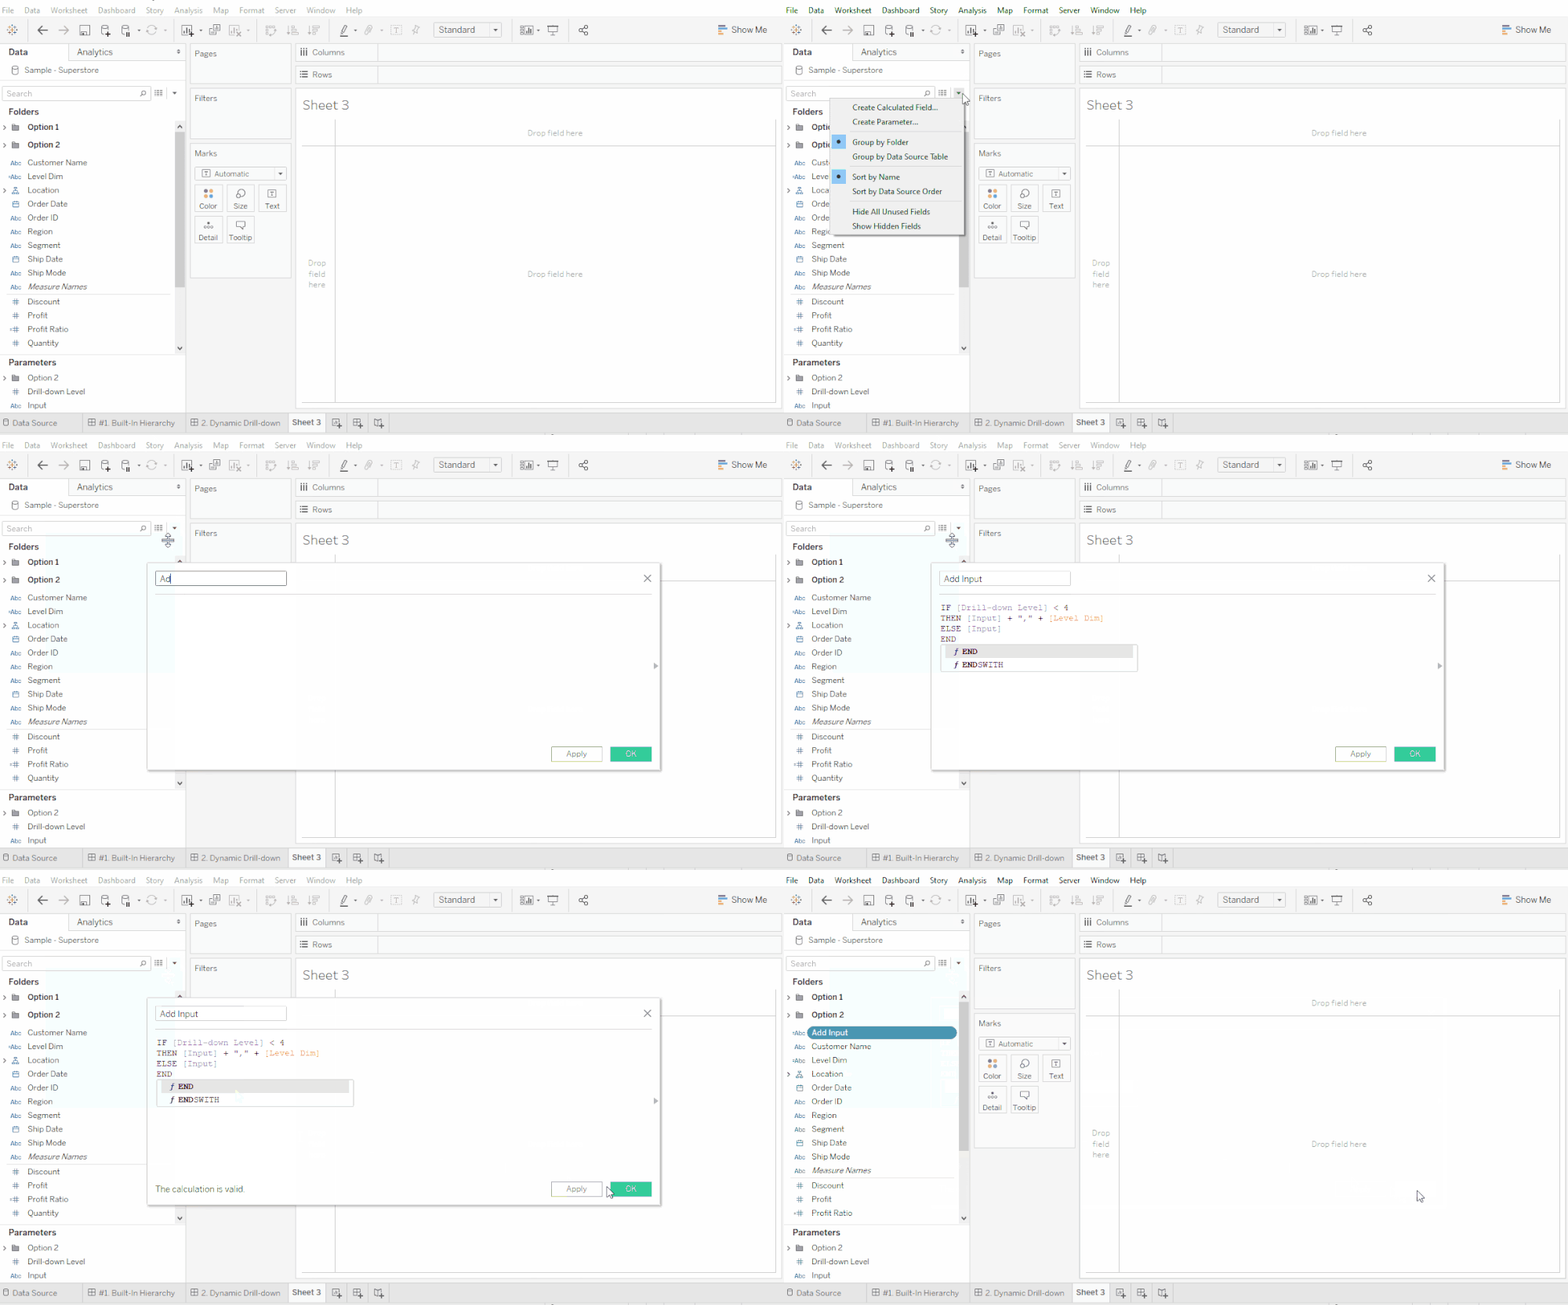
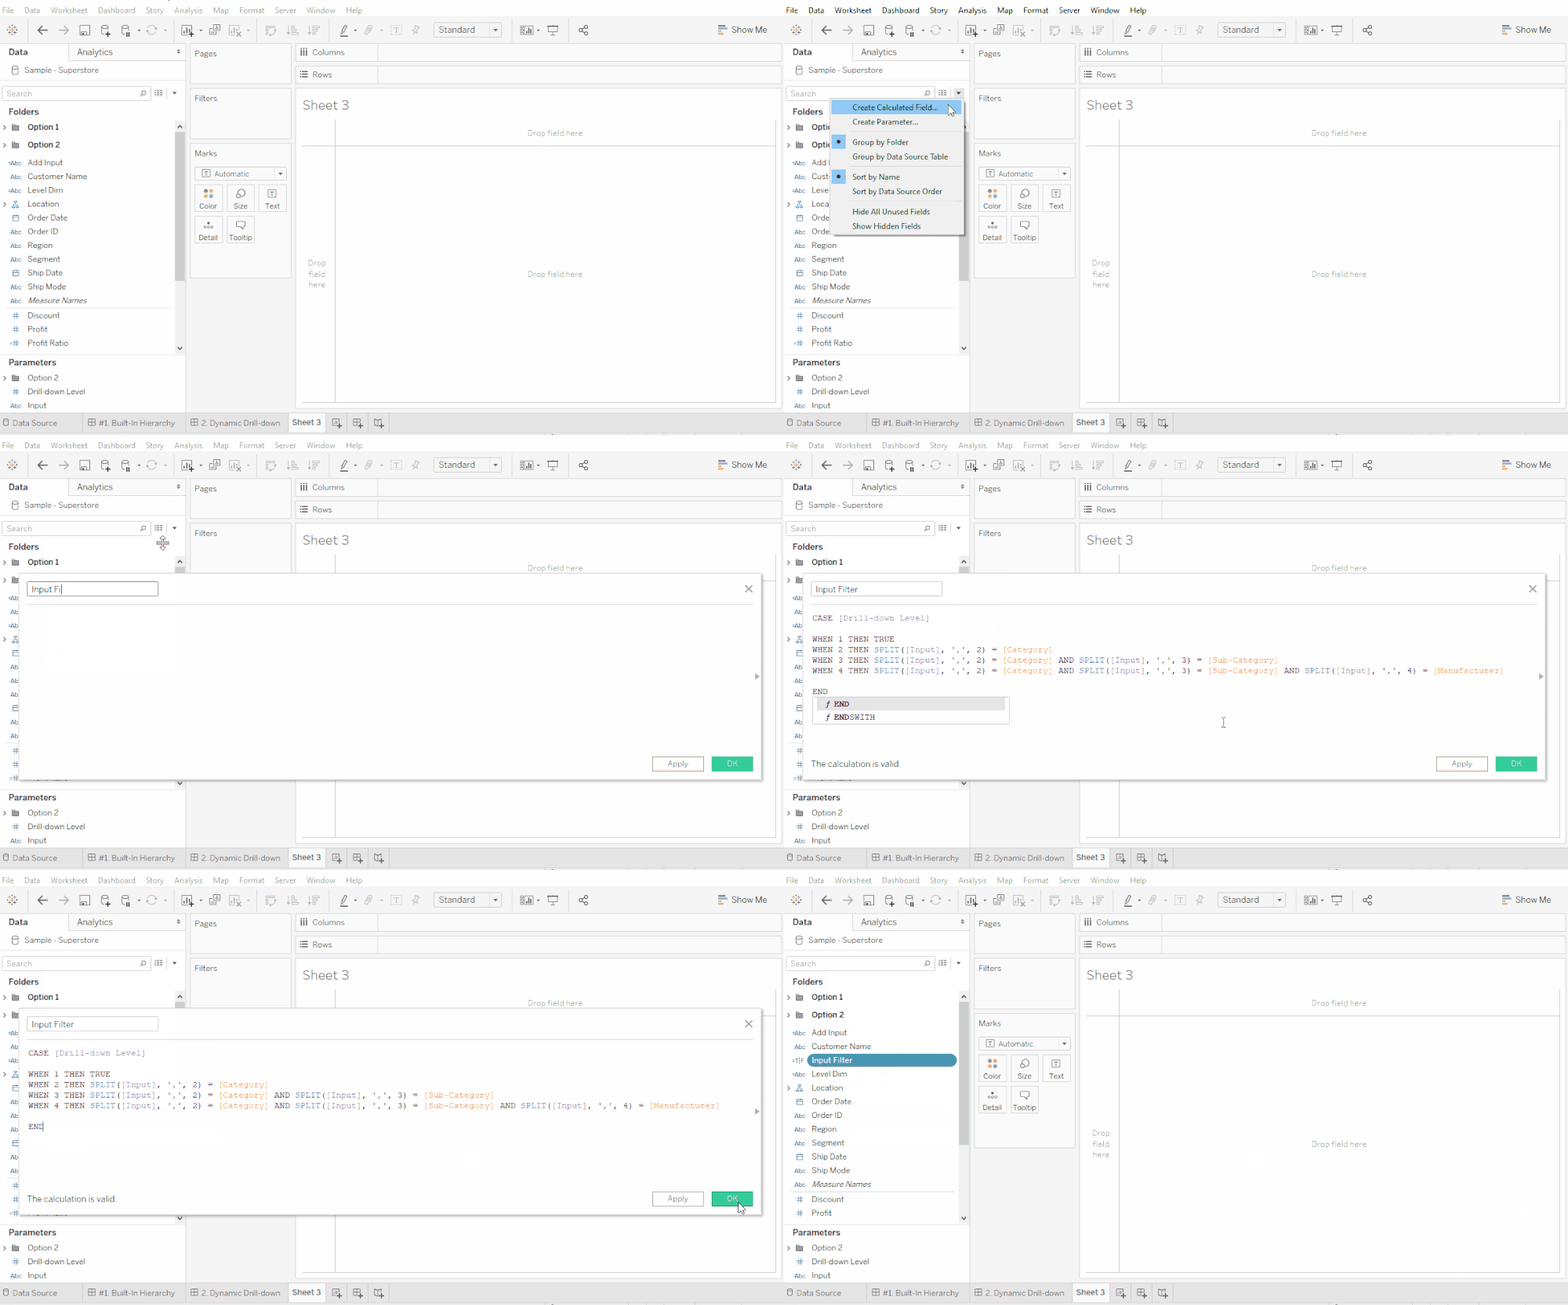
Step #5: Input Filter
Here is where the magic begins. We need to create a filter that excludes anything the user does not want to drill into.
					//Input Filter

CASE [Drill-down Level]

WHEN 1 THEN TRUE
WHEN 2 THEN SPLIT([Input], ',', 2) = [Category]
WHEN 3 THEN SPLIT([Input], ',', 2) = [Category] AND SPLIT([Input], ',', 3) = [Sub-Category]
WHEN 4 THEN SPLIT([Input], ',', 2) = [Category] AND SPLIT([Input], ',', 3) = [Sub-Category]
            AND SPLIT([Input], ',', 4) = [Manufacturer]

END
This [Input Filter] field is saying: take what’s currently in the
[Input] Parameter and split it into pieces at the comma. Now, filter the data for when a piece matches the drill-down level selected AND all previous drill-down levels.
If your data contains more than 4 levels of drill-down, you can add more SPLIT cases. Remember that our [Input] is set up to add a comma before the input text. This is why at drill-down level 2, the SPLIT formula starts at 2. Here is more information about the SPLIT formula: String Functions
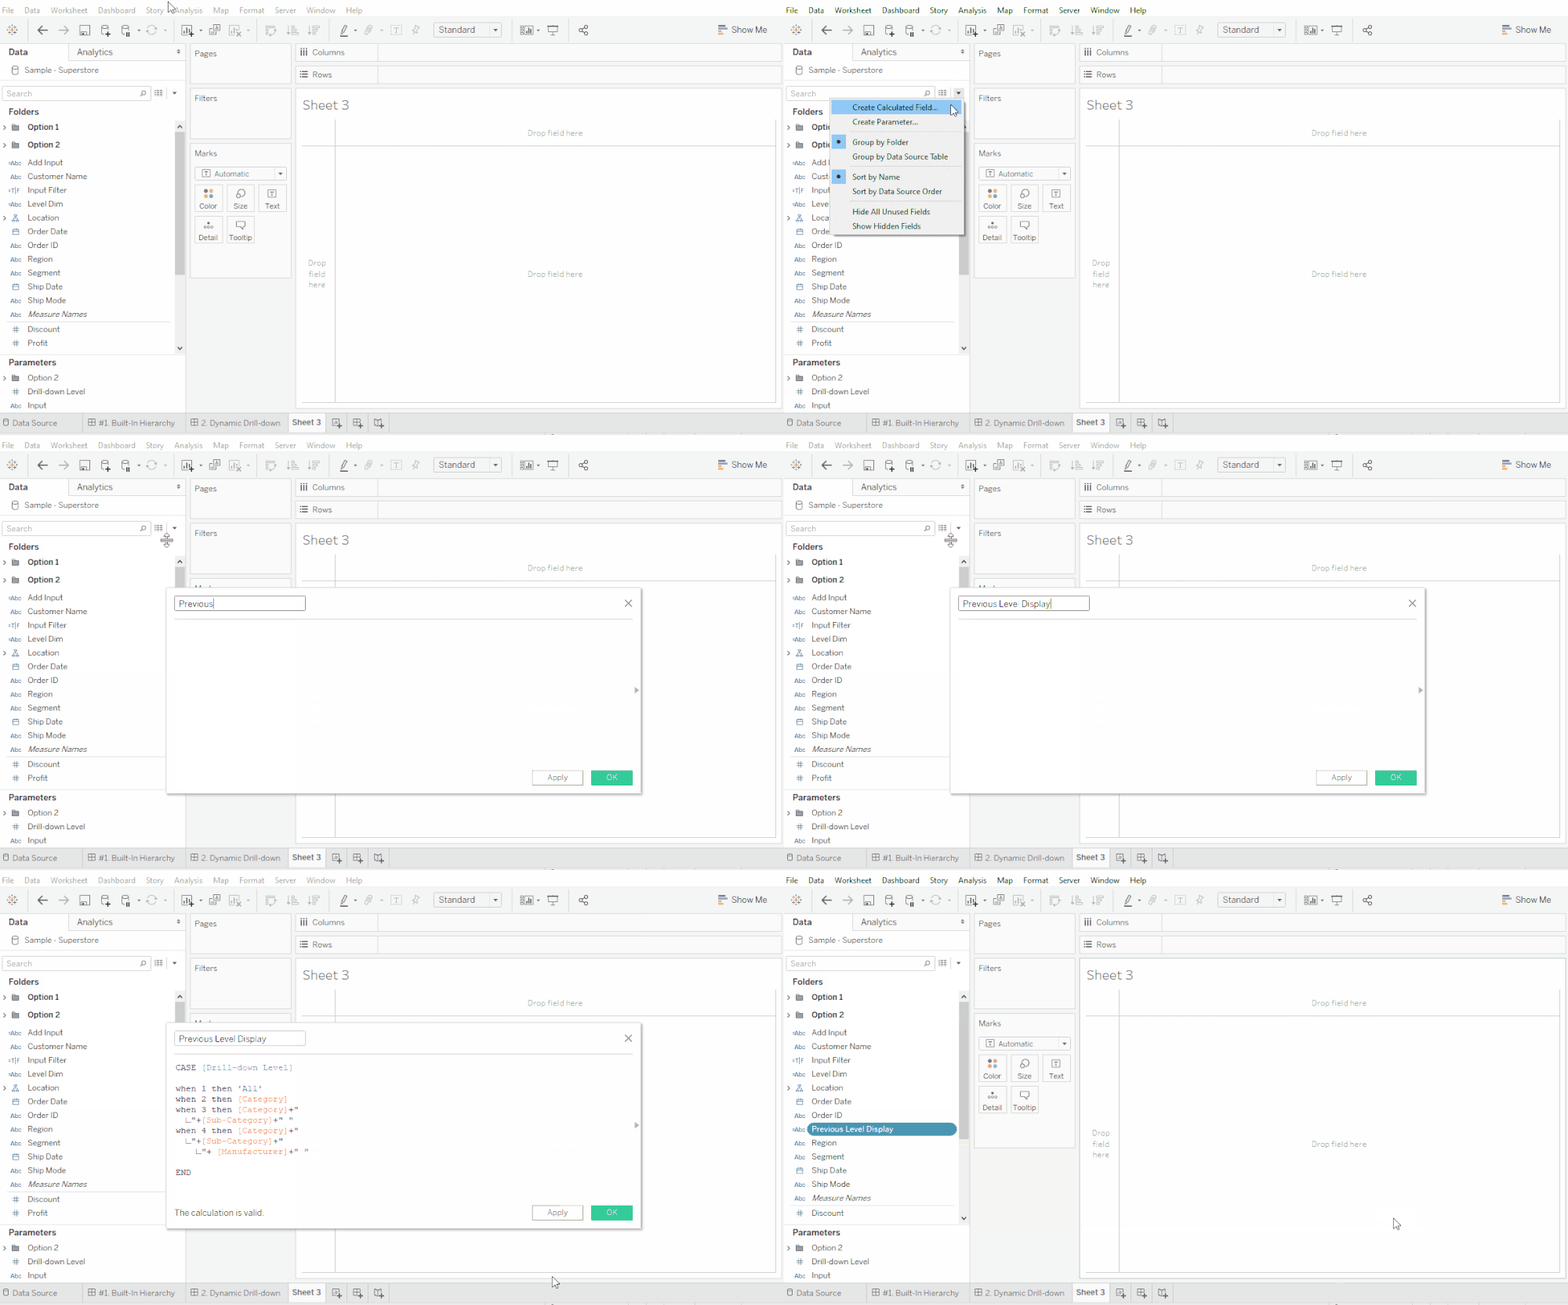
Step #6: Previous Level Display
In order to keep the dashboard user friendly, we can create a field that displays the previously selected drill-down options. Choose an icon that will be familiar to your users, but I suggest using either using a bracket (∟) or arrow (▼). Here is where I copy the shapes: alt-codes.net
					//Previous Level Display

CASE [Drill-down Level]

when 1 then 'All'
when 2 then [Category]
when 3 then [Category]+"
  ∟"+[Sub-Category]+" "
when 4 then [Category]+"
  ∟"+[Sub-Category]+"
    ∟"+ [Manufacturer]+" "

END
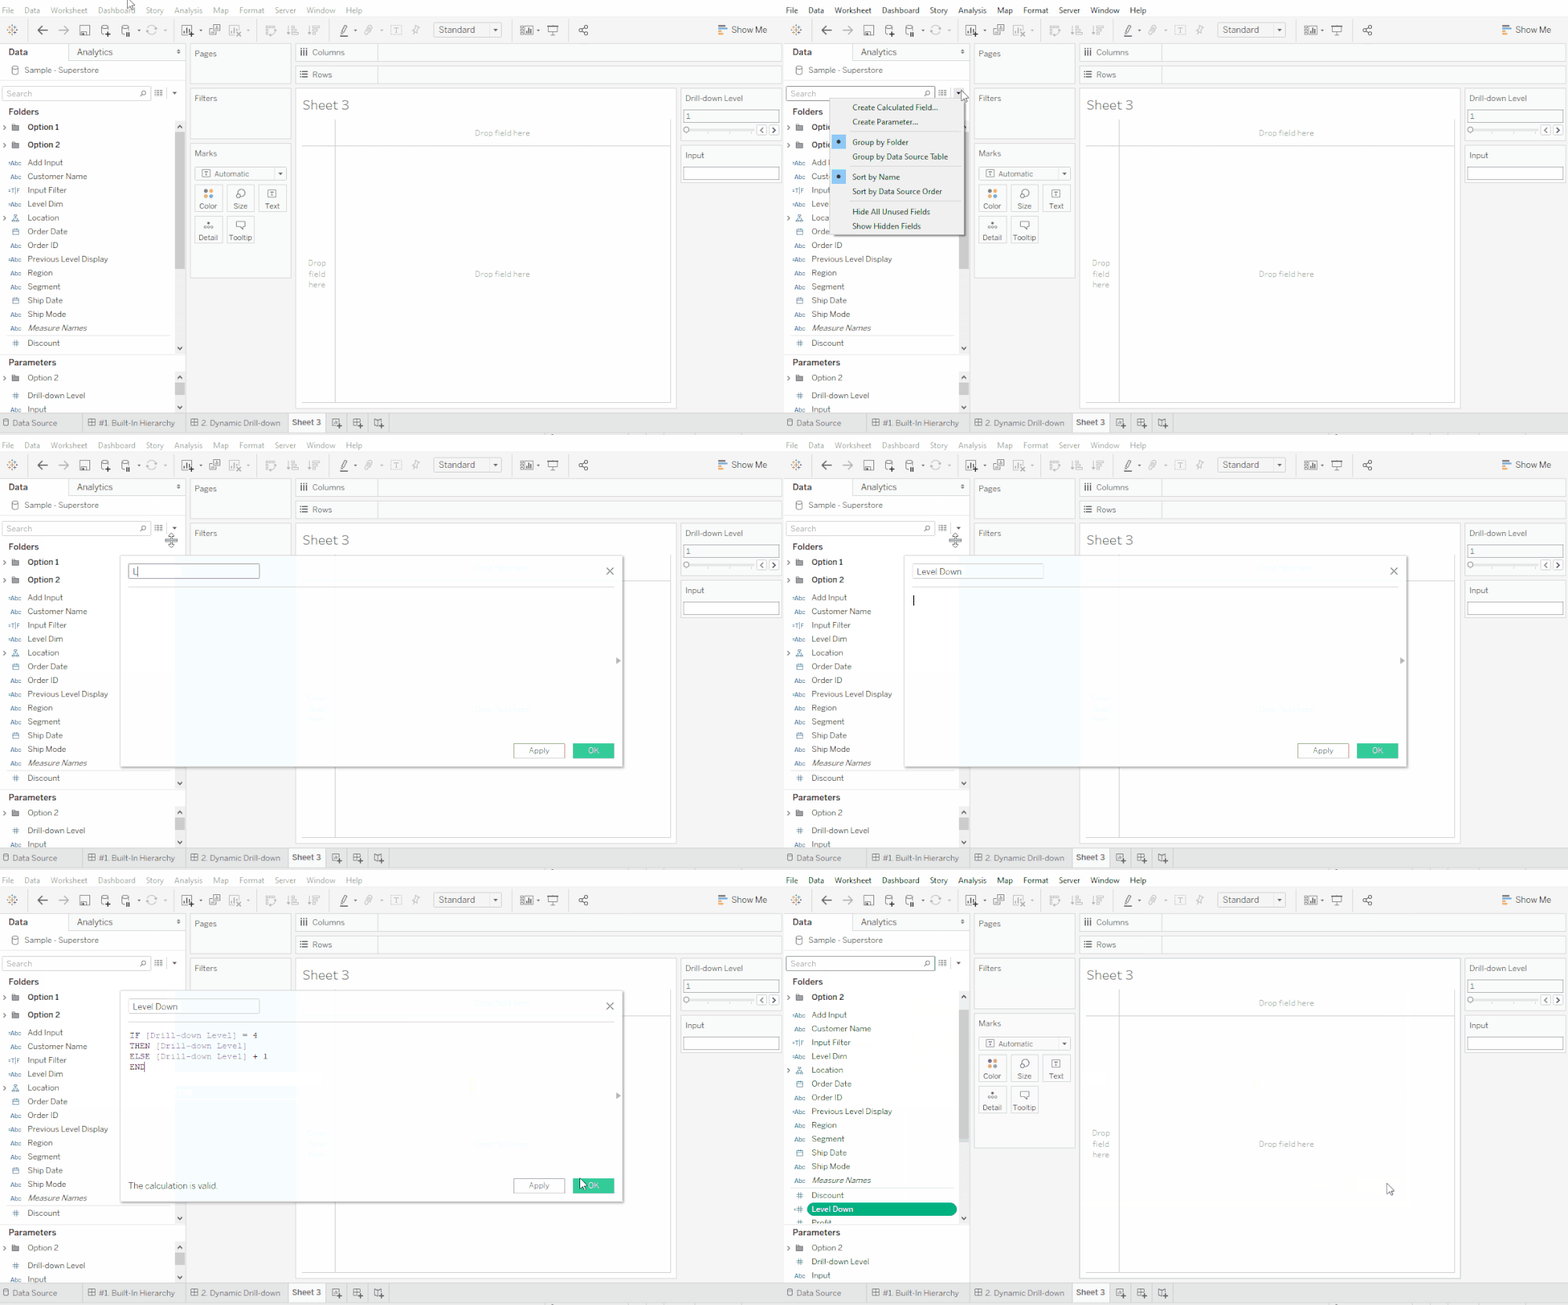
Step #7: Level Down Field
Next, we need a calculated field that will tell the [Drill-down Level] Parameter field to go down a level when the end-user clicks on something to drill into. The first part of this calculation says if we are at the lowest drill-down level, don’t change the level, otherwise, add 1. Be sure to update this number to be the max number of drill-down levels for your data.
					//Level Down

IF [Drill-down Level] = 4
THEN [Drill-down Level]
ELSE [Drill-down Level] + 1
END
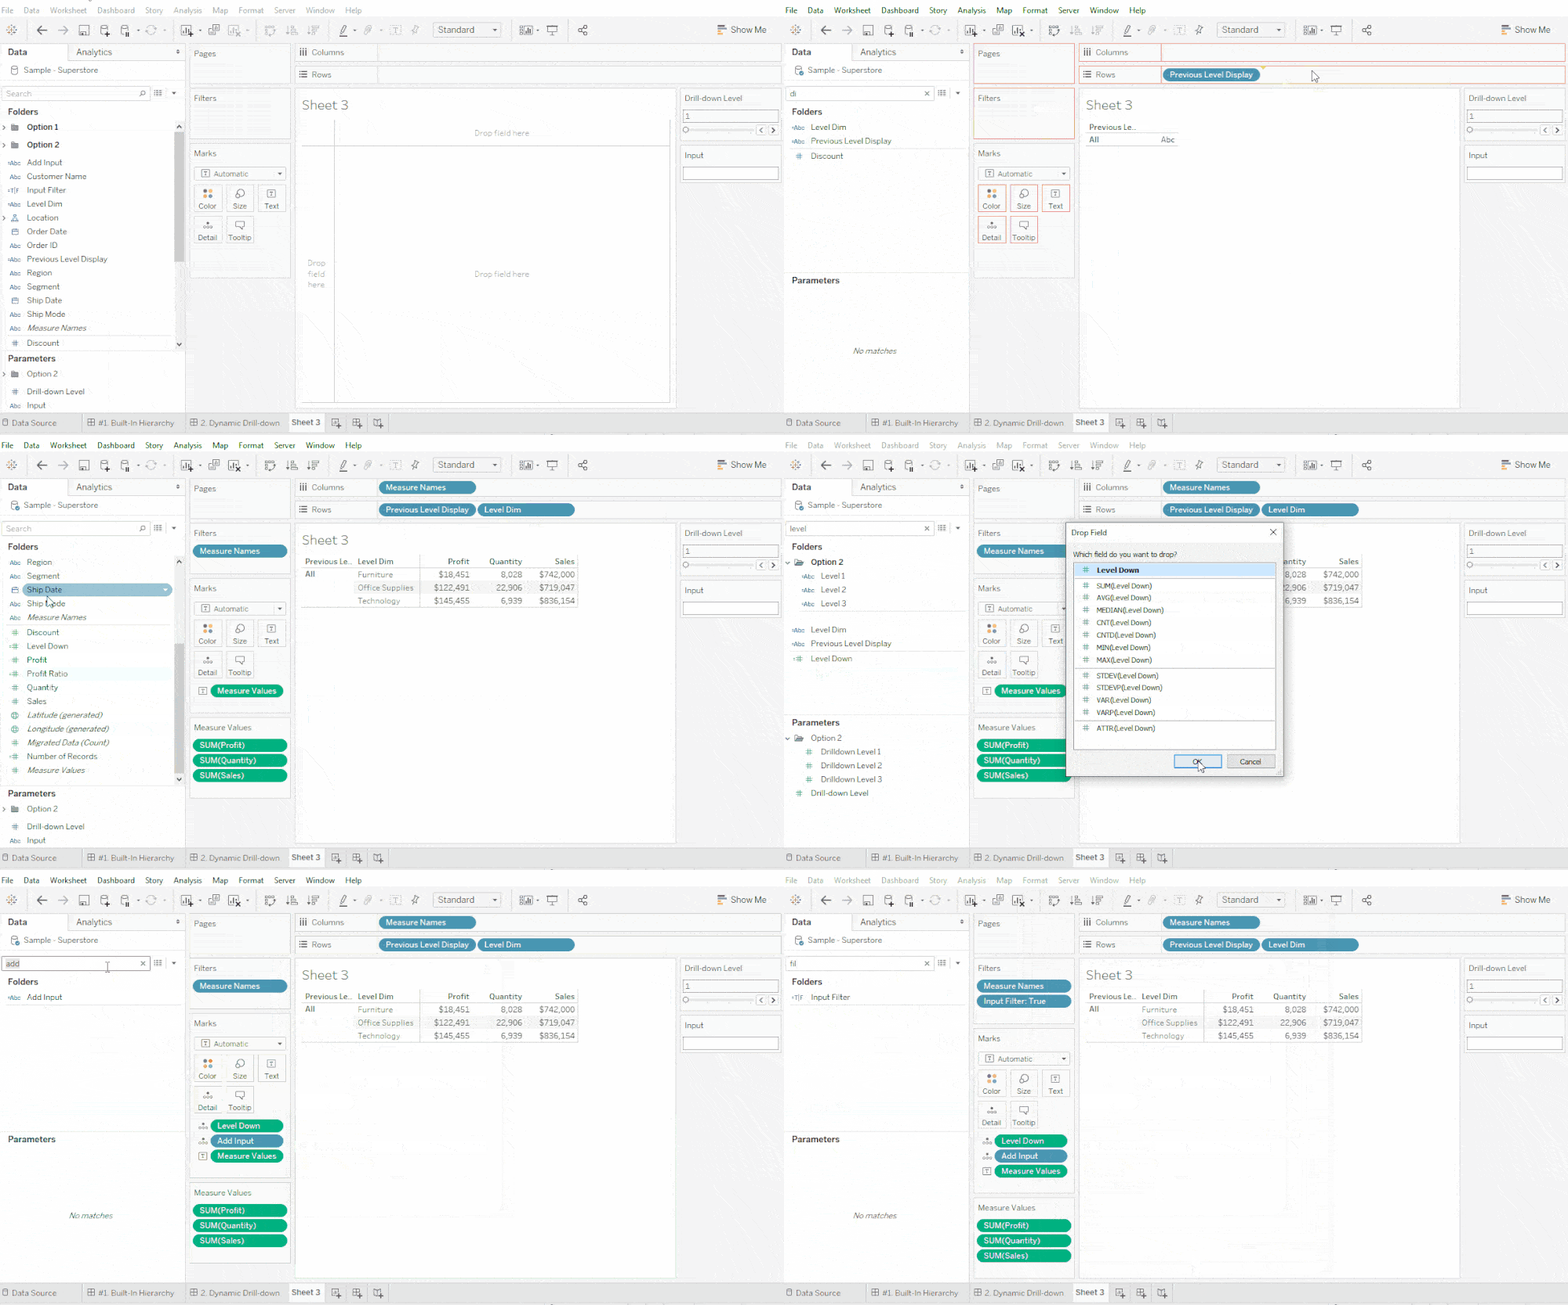
Step #8: Build the Table
- Add [Previous Level Display] and [Level Dim] to Rows
- Add desired Measures (ie [Sales], [Quantity], [Profit])
- Add [Level Down] and [Add Input] to the Details Tab
- [Level Down] needs to be a Continuous Dimension. You can add this quickly by right-clicking and dragging the field onto the details tab and selecting the first option in the popup menu. Here is more information about Dimensions and Measures: Data Field Types and Roles
- Add [Input Filter] and select the True checkbox
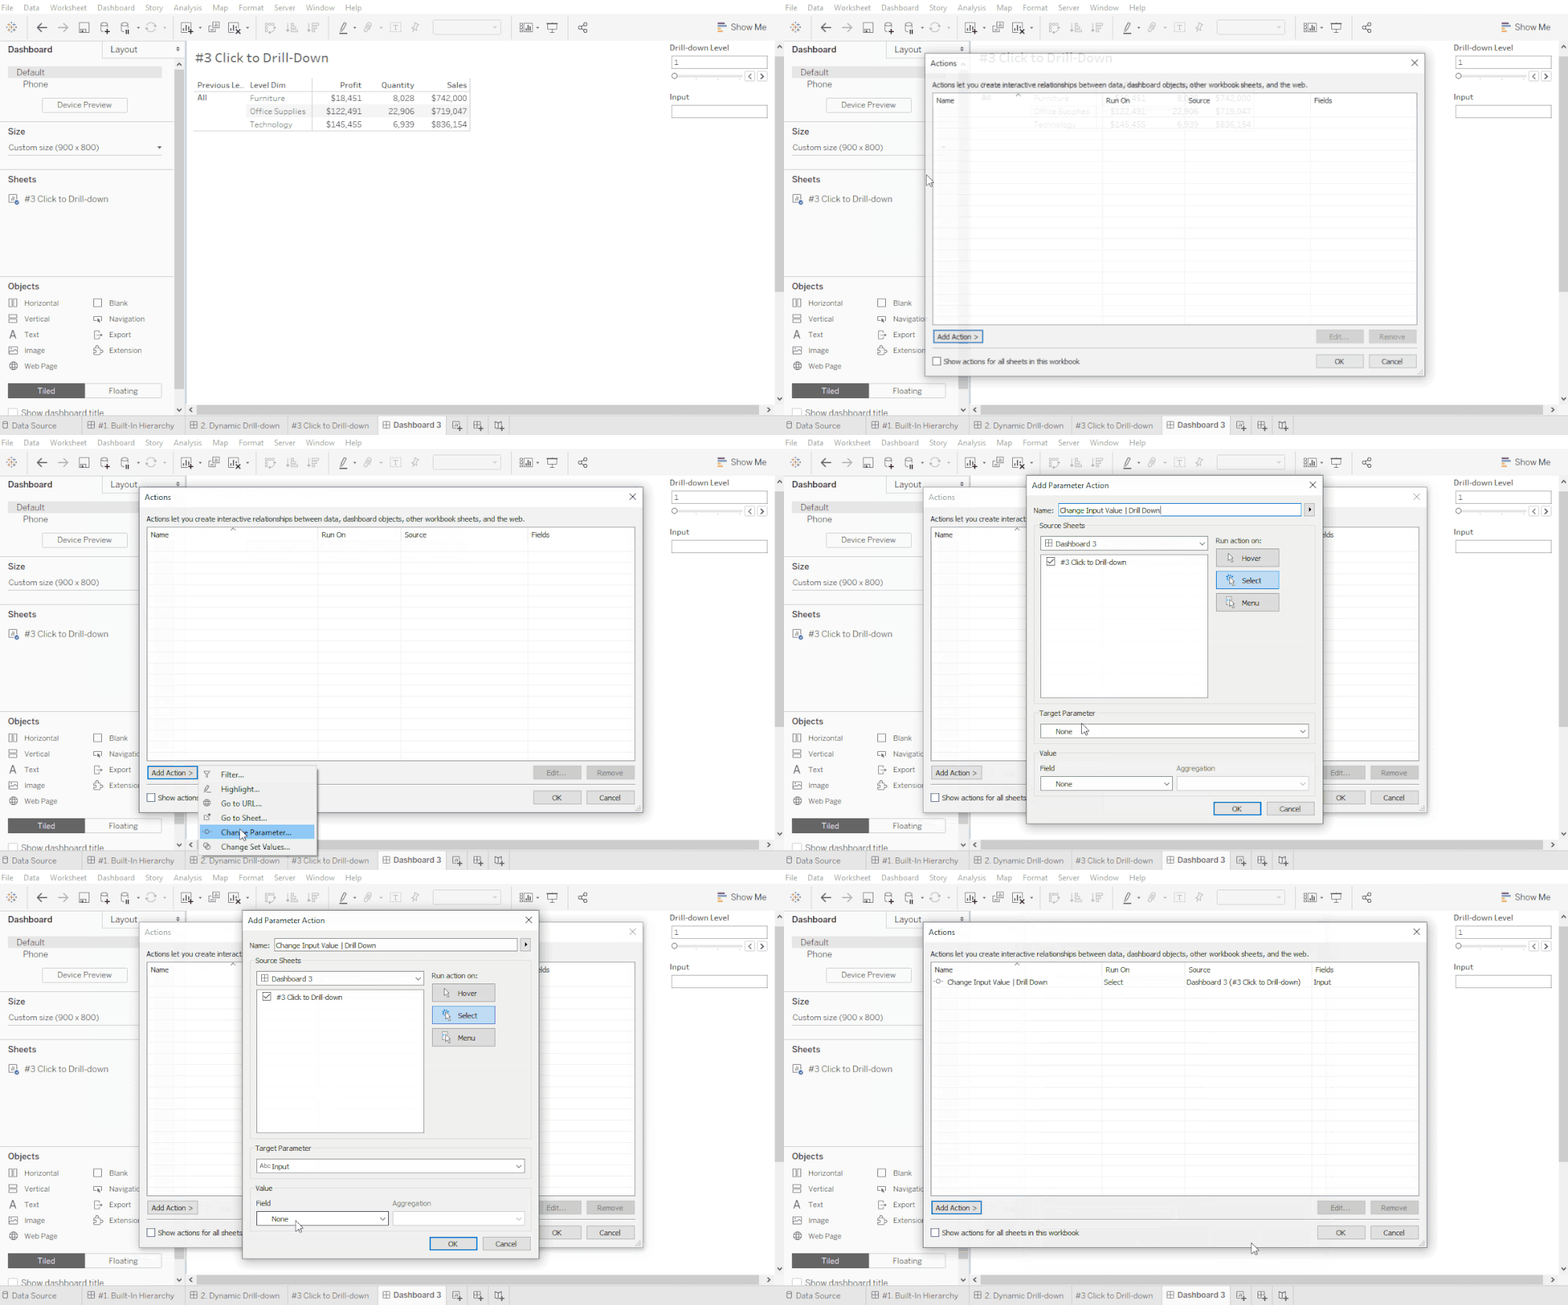
Step #9: Change the Input Value Dashboard Action
After the newly created table is on a dashboard, we can start to add the interactive functionality. The first Parameter Action (more information about Parameter Actions) is to fill the [Input] parameter which represents what the end-user would like to drill into.
For the Parameter Action configuration, select to run action when selecting on the Table worksheet. The Target Parameter is the parameter we want to change, in our case, it’s the [Input] Parameter. The value represents what we want to change the parameter to, with the action. We want to put the [Add Input] (the “,” + [Level Dim] calculation) field into the [Input] Parameter. There is no aggregation because the inputs are strings.
I strongly recommend using highly descriptive names when creating the parameter actions. There are going to be several actions that are set up similarly.
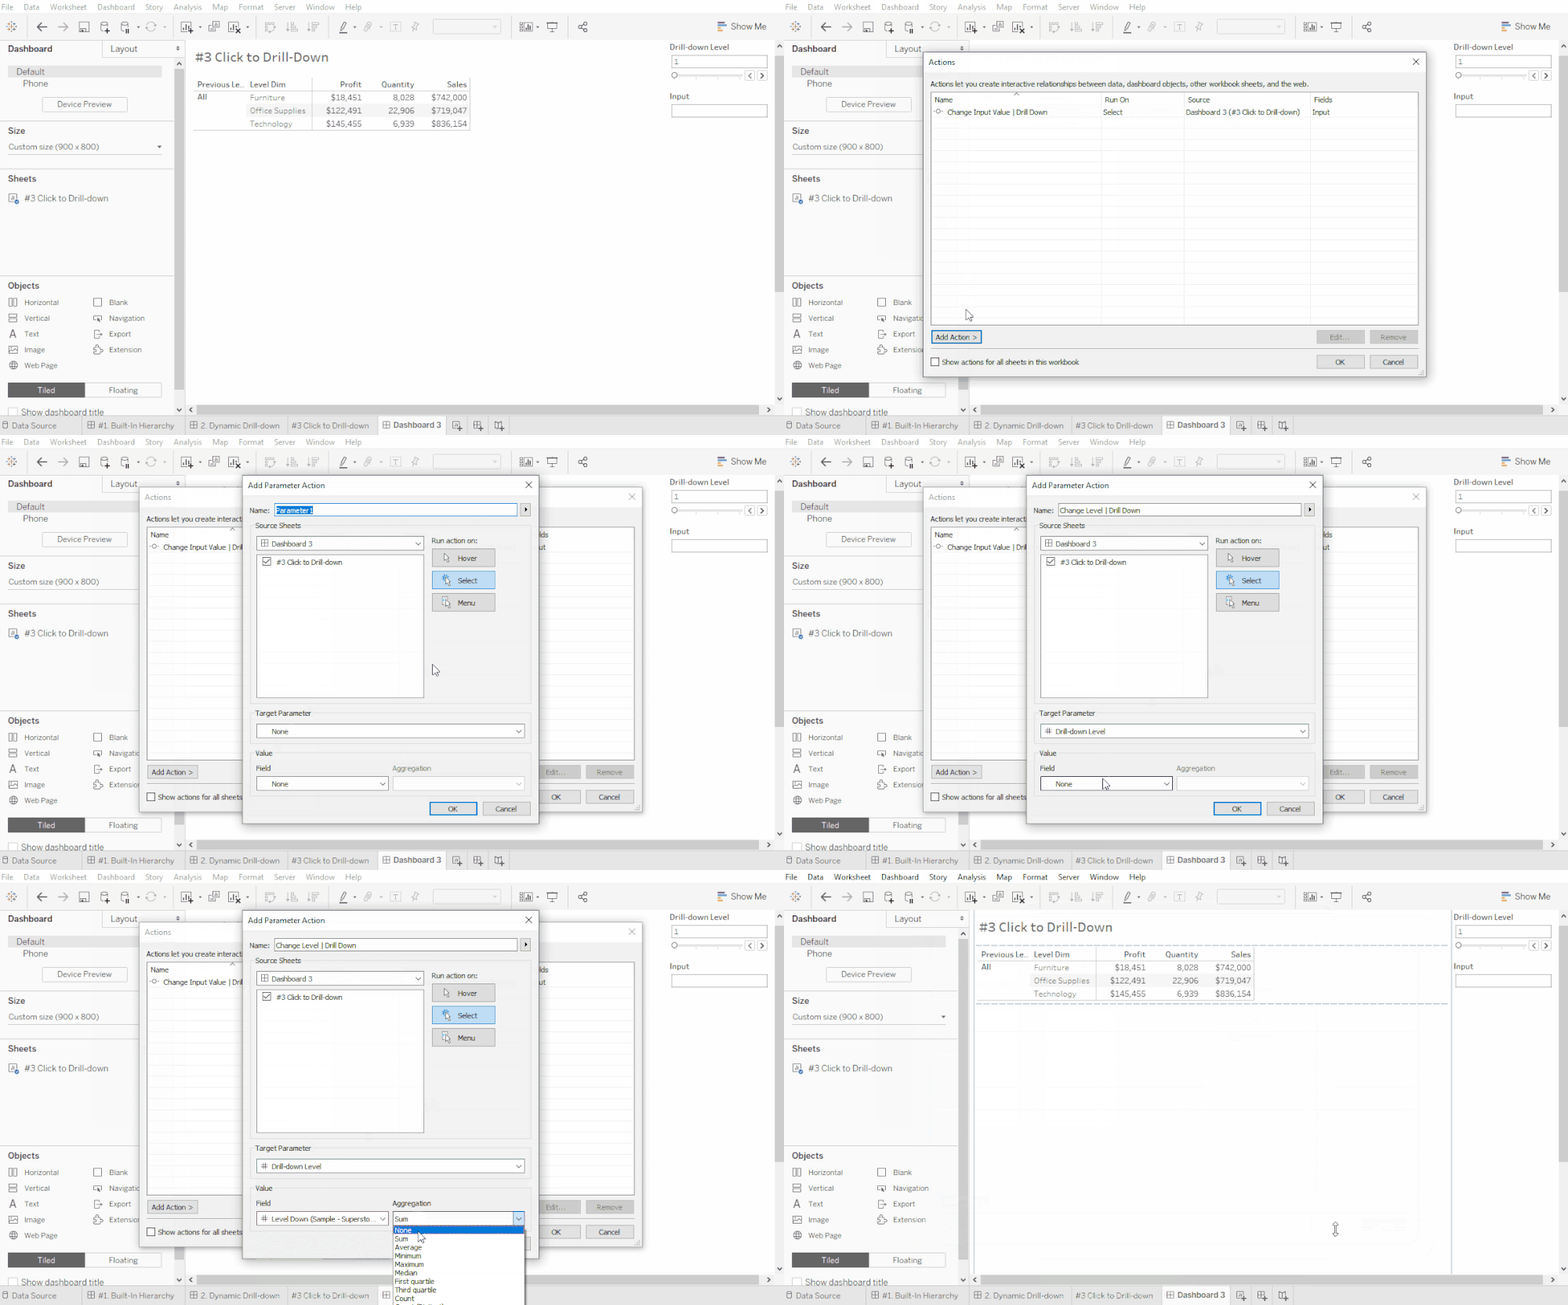
Step #10: Change the Level Value Dashboard Action
We need to create a similar action that increases the [Drill-down level] parameter when the end-user clicks on the table.
Again, for the Parameter Action configuration, select to run action when selecting on the Table worksheet. This time, the Target Parameter is the [Drill-down Level] field. This field is used to determine what level in the drill-down path should be shown. The value field is [Level Down] with no aggregation.
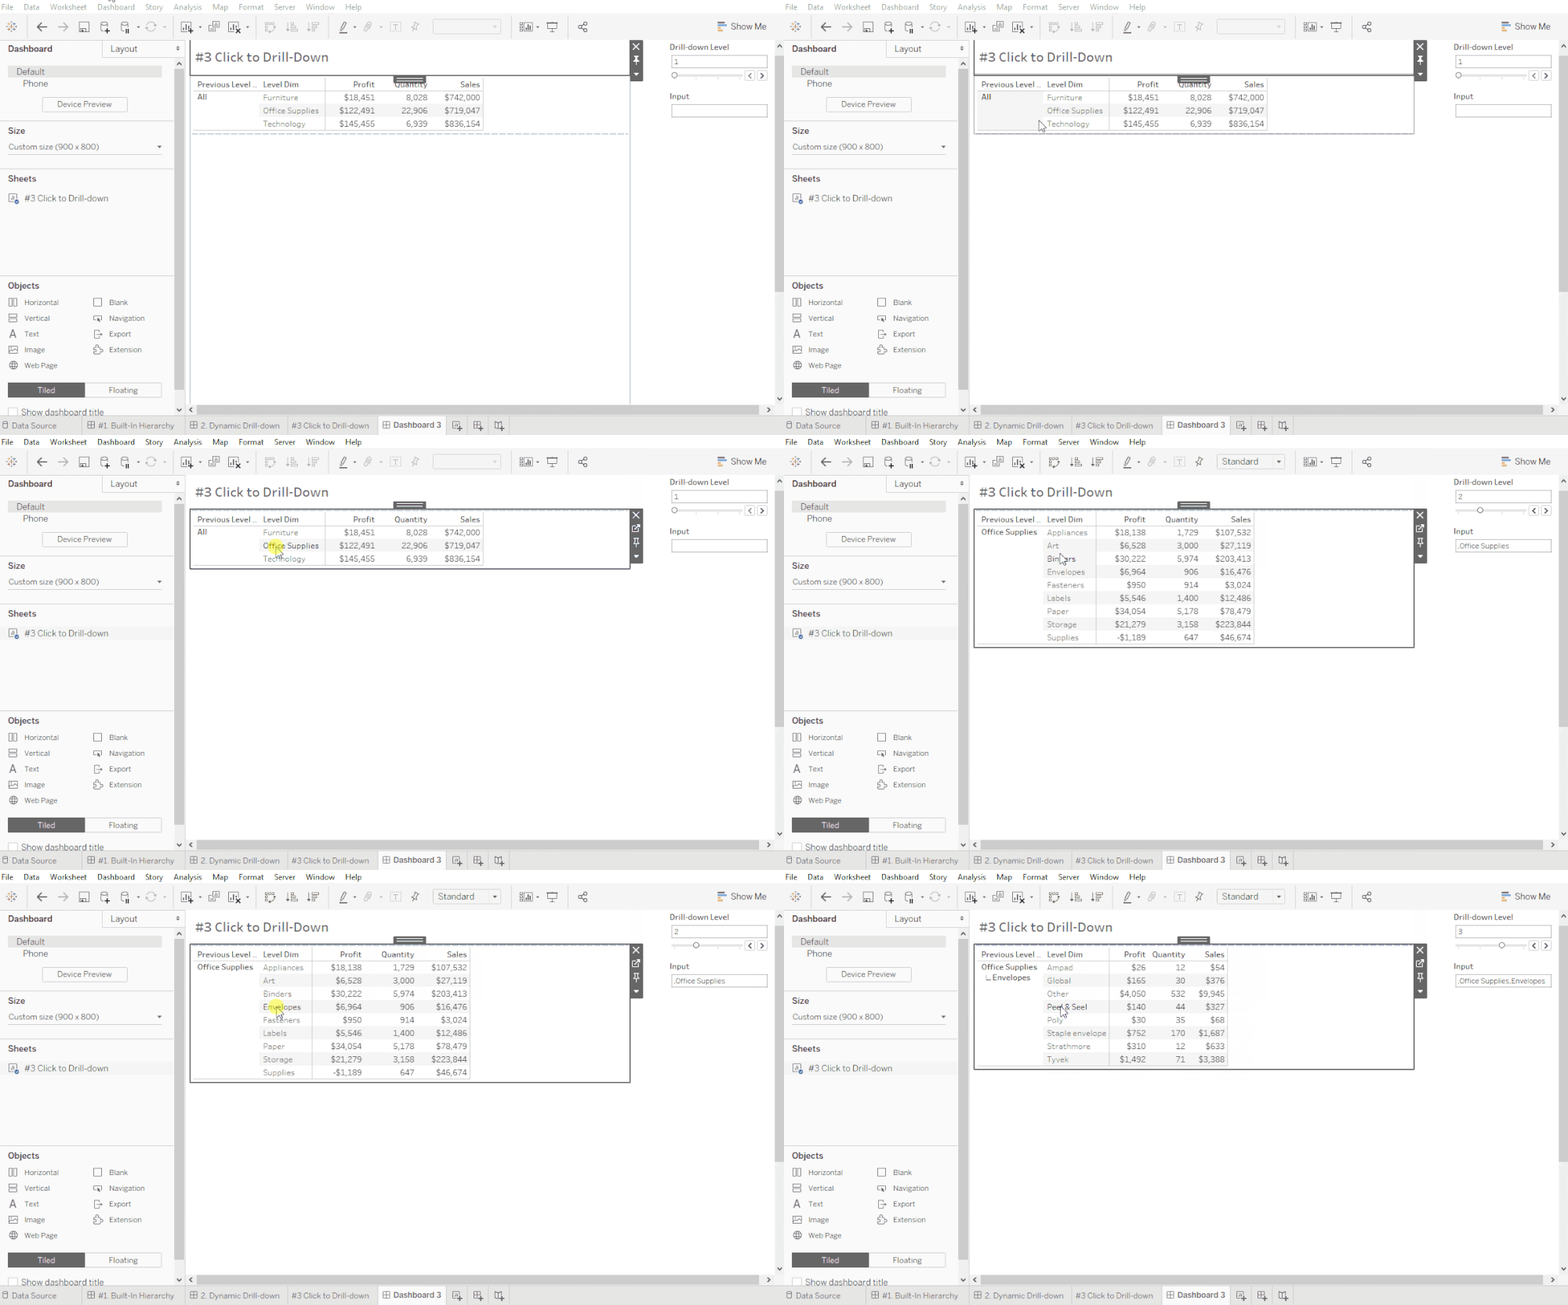
With a quick test, we can see the [Drill-down Level] and [Input] Parameters change when we click on items in the table.
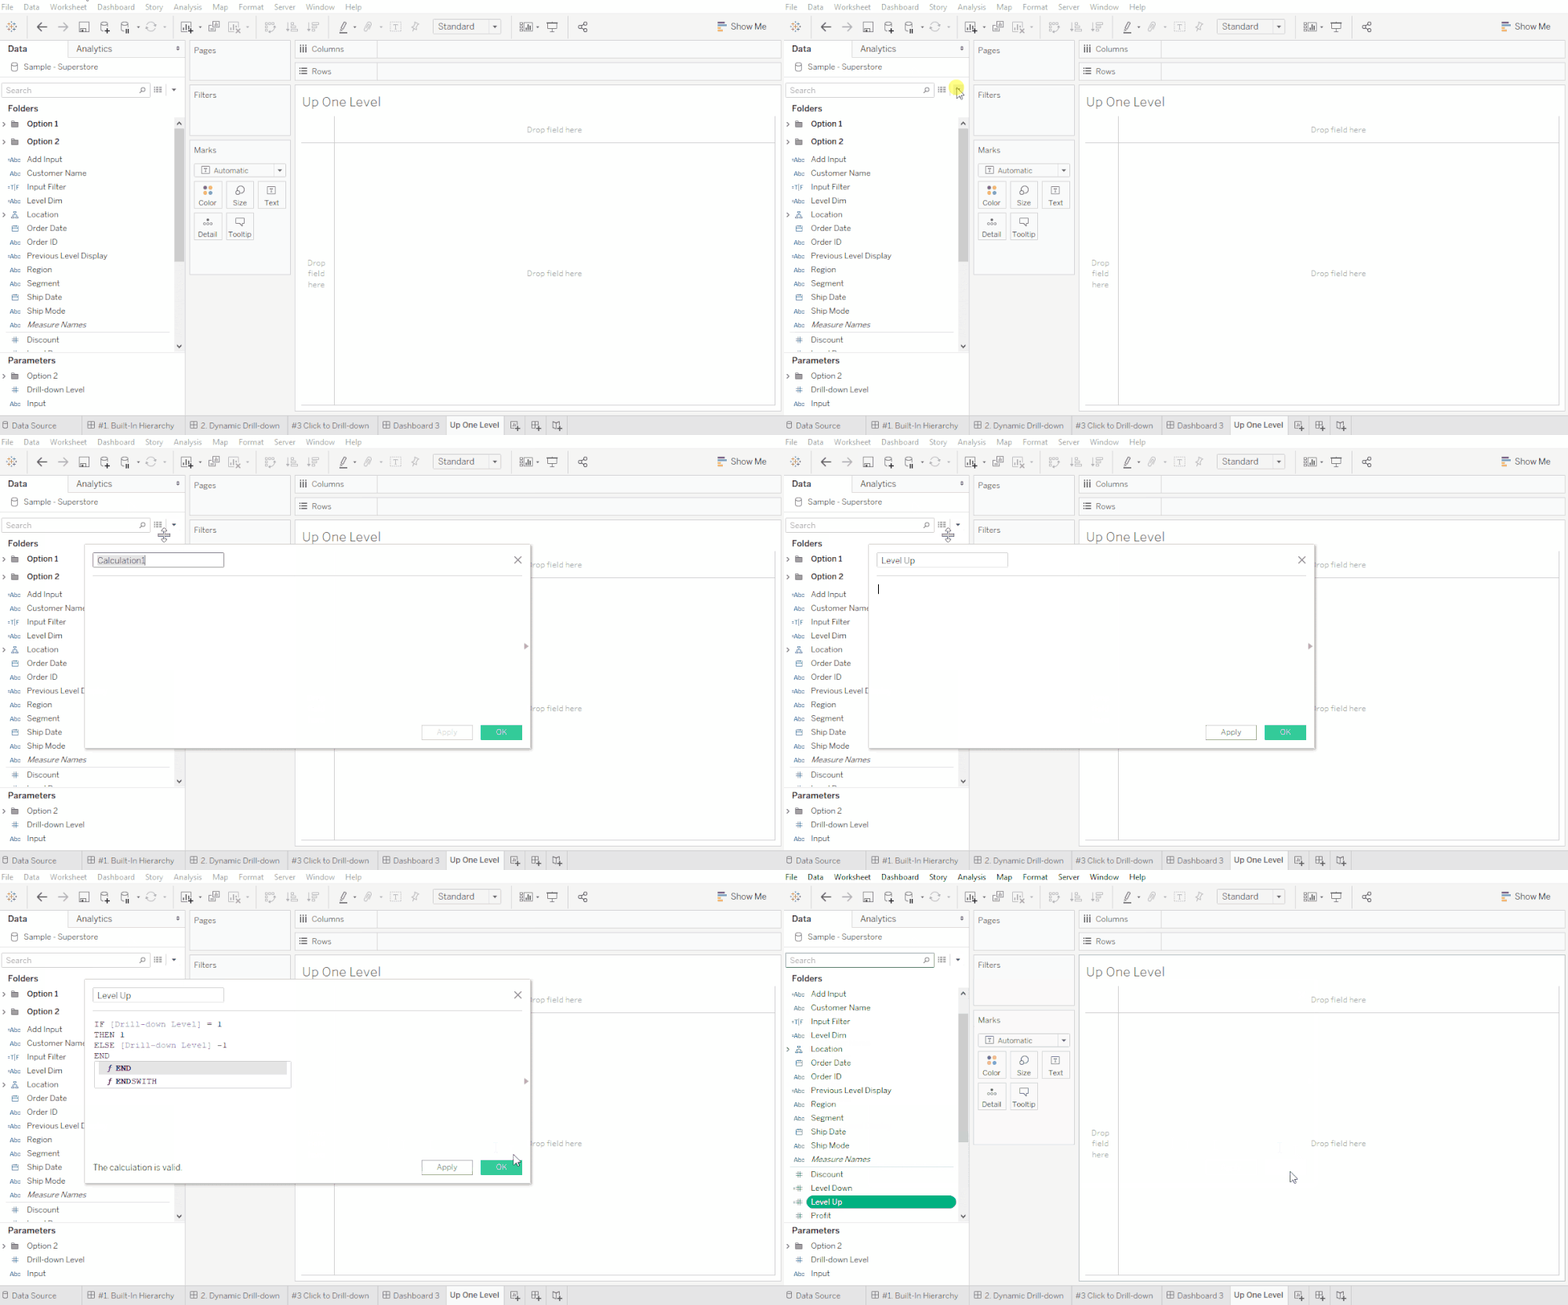
Step #11: Level Up Calculation
Now that we have the drill-down capability, we can create the drill up and revert to top/start functionality.
First, create a new “Level Up” calculated field. This calculation says if we aren’t at the top/first level go back one level.
					//Level Up

IF [Drill-down Level] = 1
THEN 1
ELSE [Drill-down Level] -1
END
Step #12: Calculate the Previous Level Input
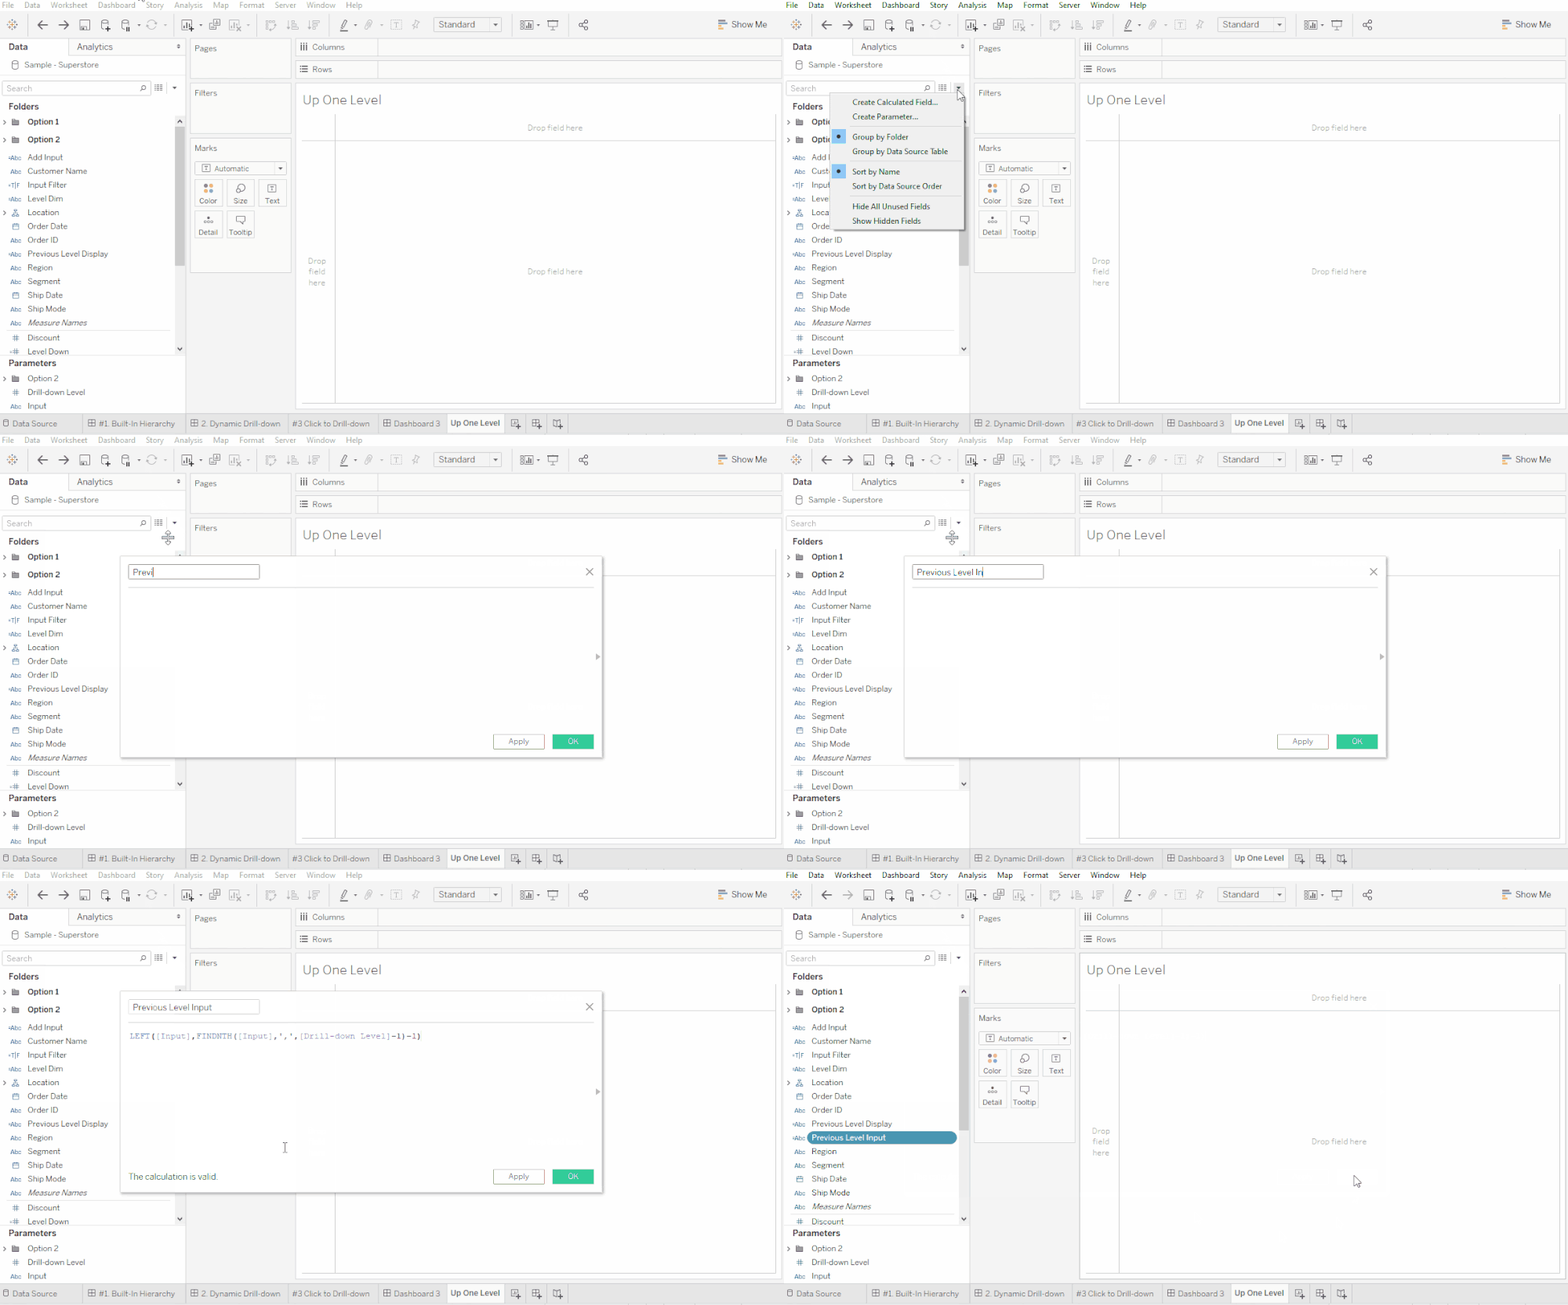
Here is more magic. We need to create a calculation for the [Input] field so Tableau can know what to display when going up one level. This calculation takes the current [Input] string and drops/erases the most recently added drill-down level.
					//Previous Level Input

LEFT([Input],FINDNTH([Input],',',[Drill-down Level]-1)-1)
This calculation works by finding the position of the Nth comma, where the Nth comma is based on the current drill-down level minus one (because we want to go back up one level) and then returning everything that’s left of that character (everything before the second comma).
For example, if our [Input] field reads “,Office Supplies,Envelopes” and we are on Level 3, the formula would read:
LEFT([,Office Supplies,Envelopes],FINDNTH([,Office Supplies,Envelopes],’,’,3-1)-1)
FINDNTH would look for the 2nd (3-1) comma, which is at character #17. Then, LEFT will return the leftmost 16 characters (17-1 because we don’t want to include the second comma).
The resulting output for the [Input] field is “,Office Supplies”
Here is more info about the LEFT and FINDNTH formulas: Tableau String Functions

Step #13: Create a Level Up Label
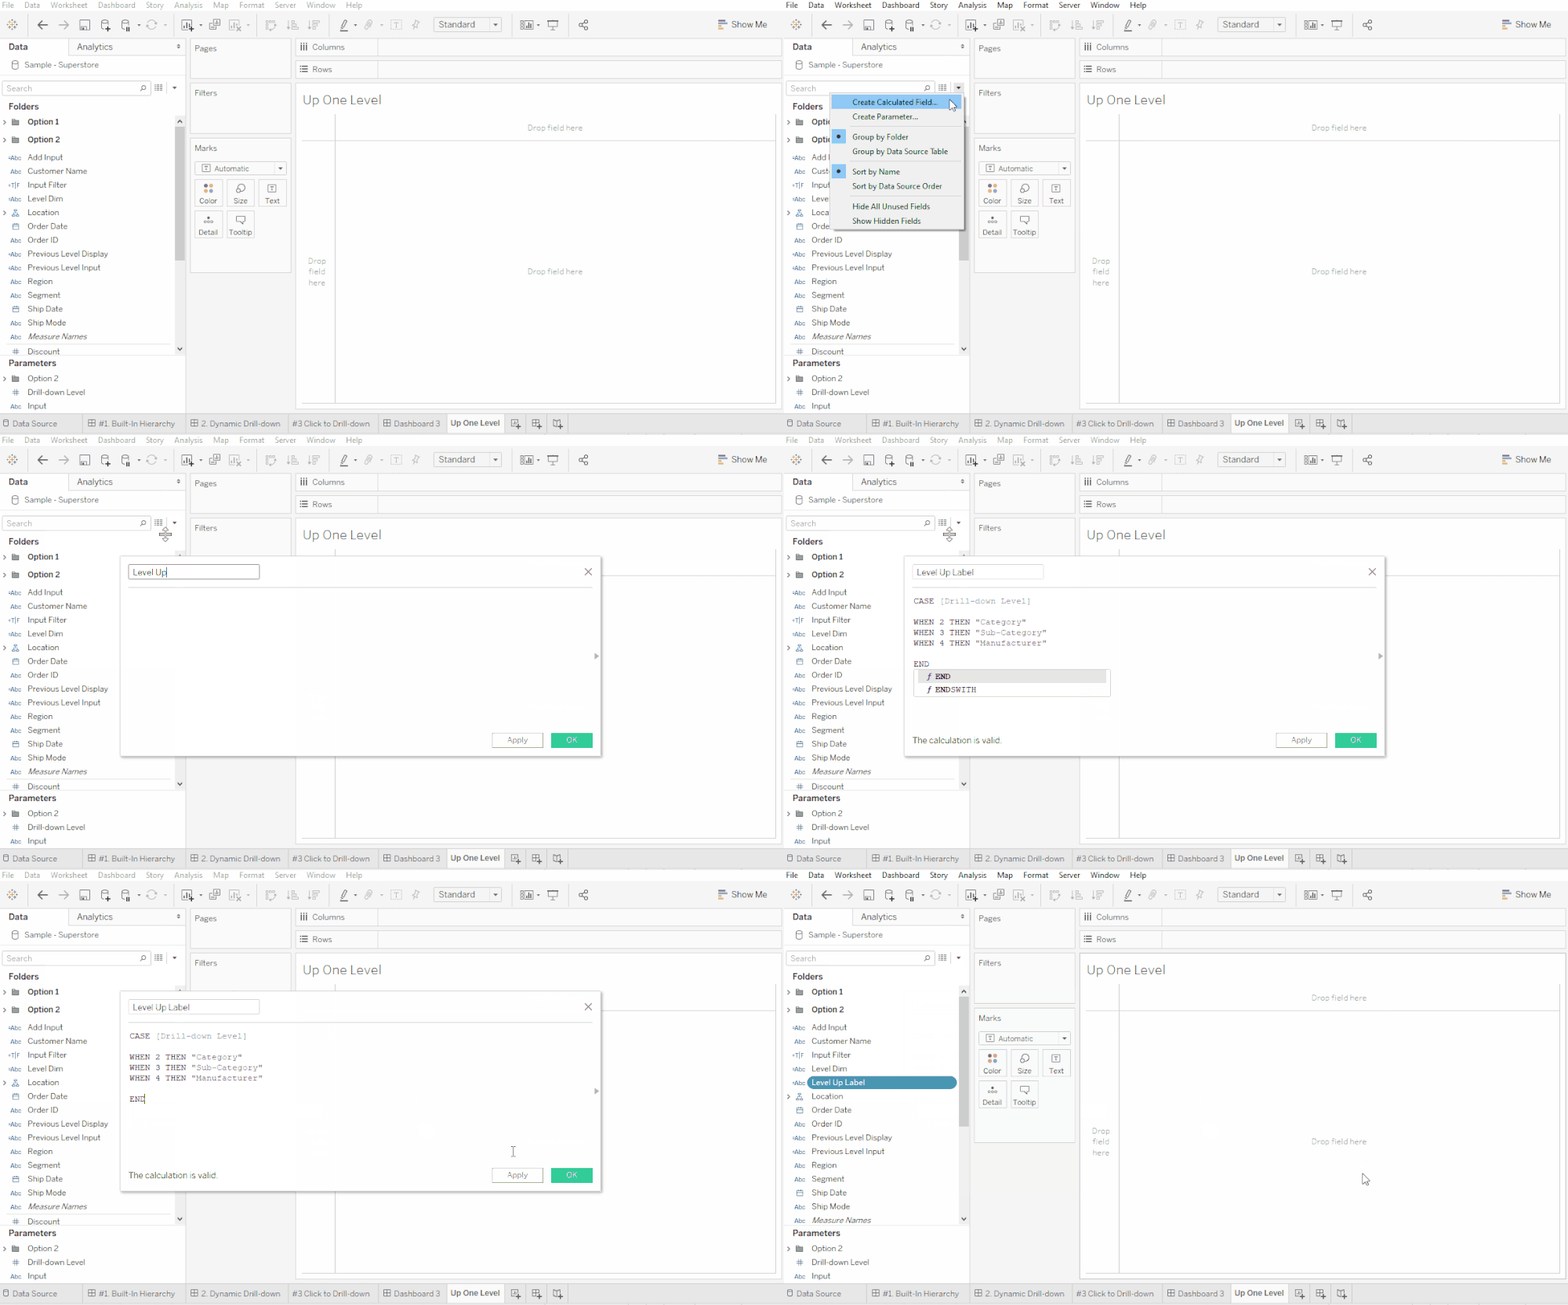
Next, we create a field that can function as a button to display the previous level in the drill-down path.
					//Level Up Label

CASE [Drill-down Level]
WHEN 2 THEN "Category"
WHEN 3 THEN "Sub-Category"
WHEN 4 THEN "Manufacturer"
END
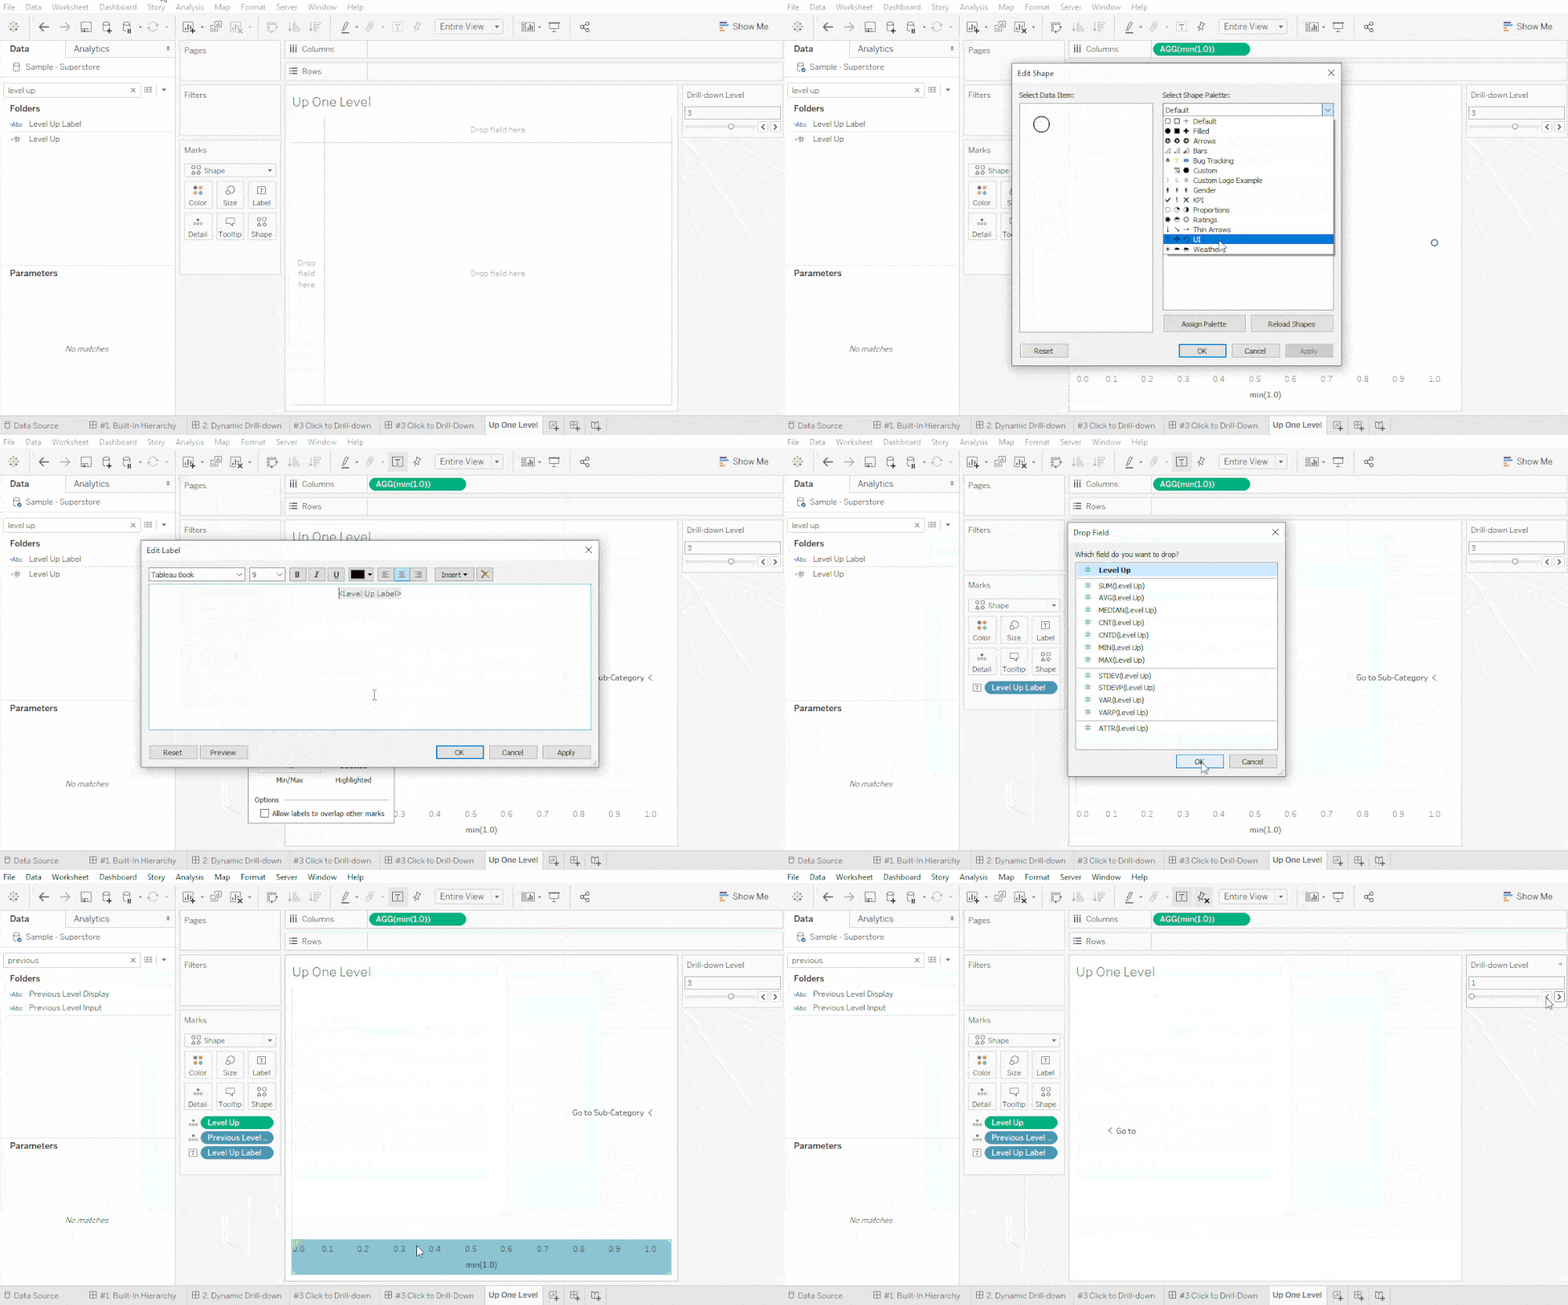
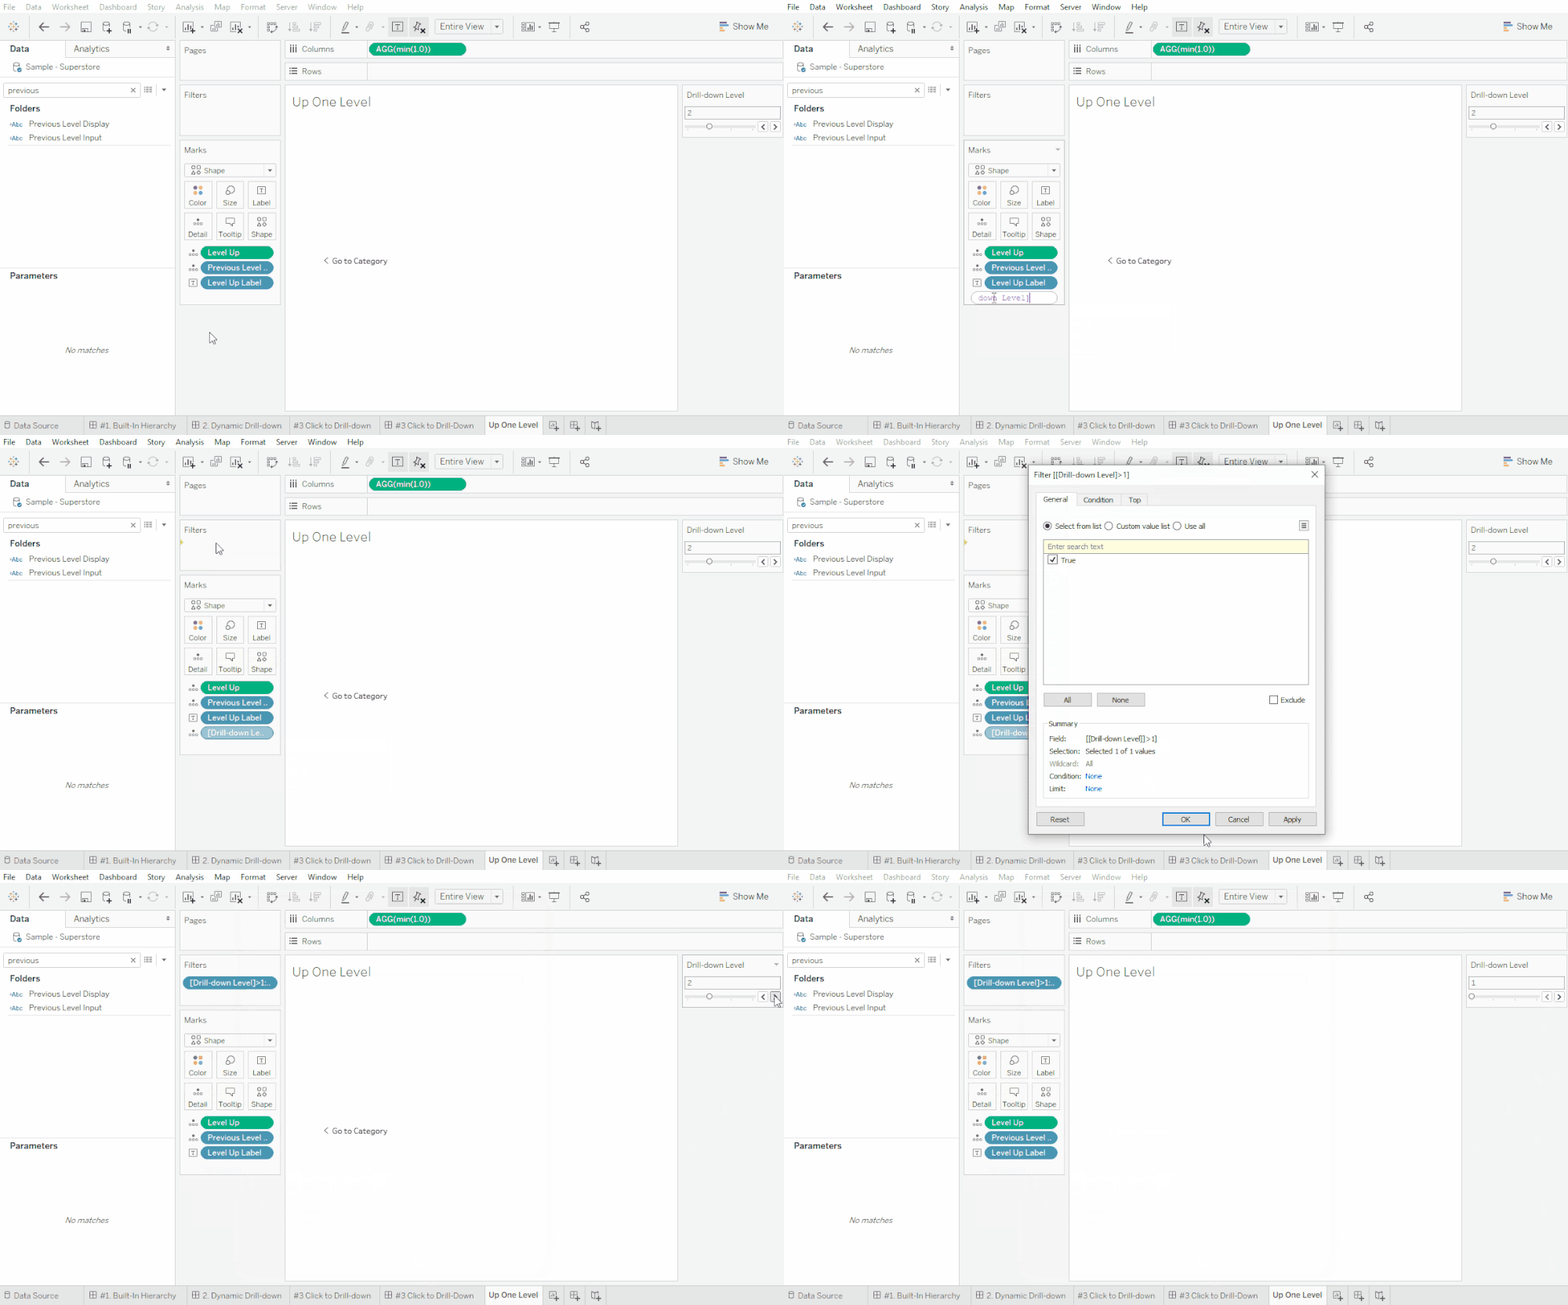
Step #14: Create the Level Up button
- Add MIN(1.0) to Columns.
- Drag [Level Up Label] onto Shapes and select a custom shape. (Here’s more information about custom shapes in Tableau: Shapes in Tableau)
- Add [Level Up Label] to Label.
- Add [Level Up] as a Continuous Dimension to Details
- Add [Previous Level Input] to Details
- Customize formatting as you’d like
Step #15: Up One Level Filter
The one level up button should not appear until we’re on level two. You can create a calculated field or add an on-viz filter for when [Drill-down Level] is greater than 1.
[Drill-down Level]>1
Step #16: Add Level Up Input Action
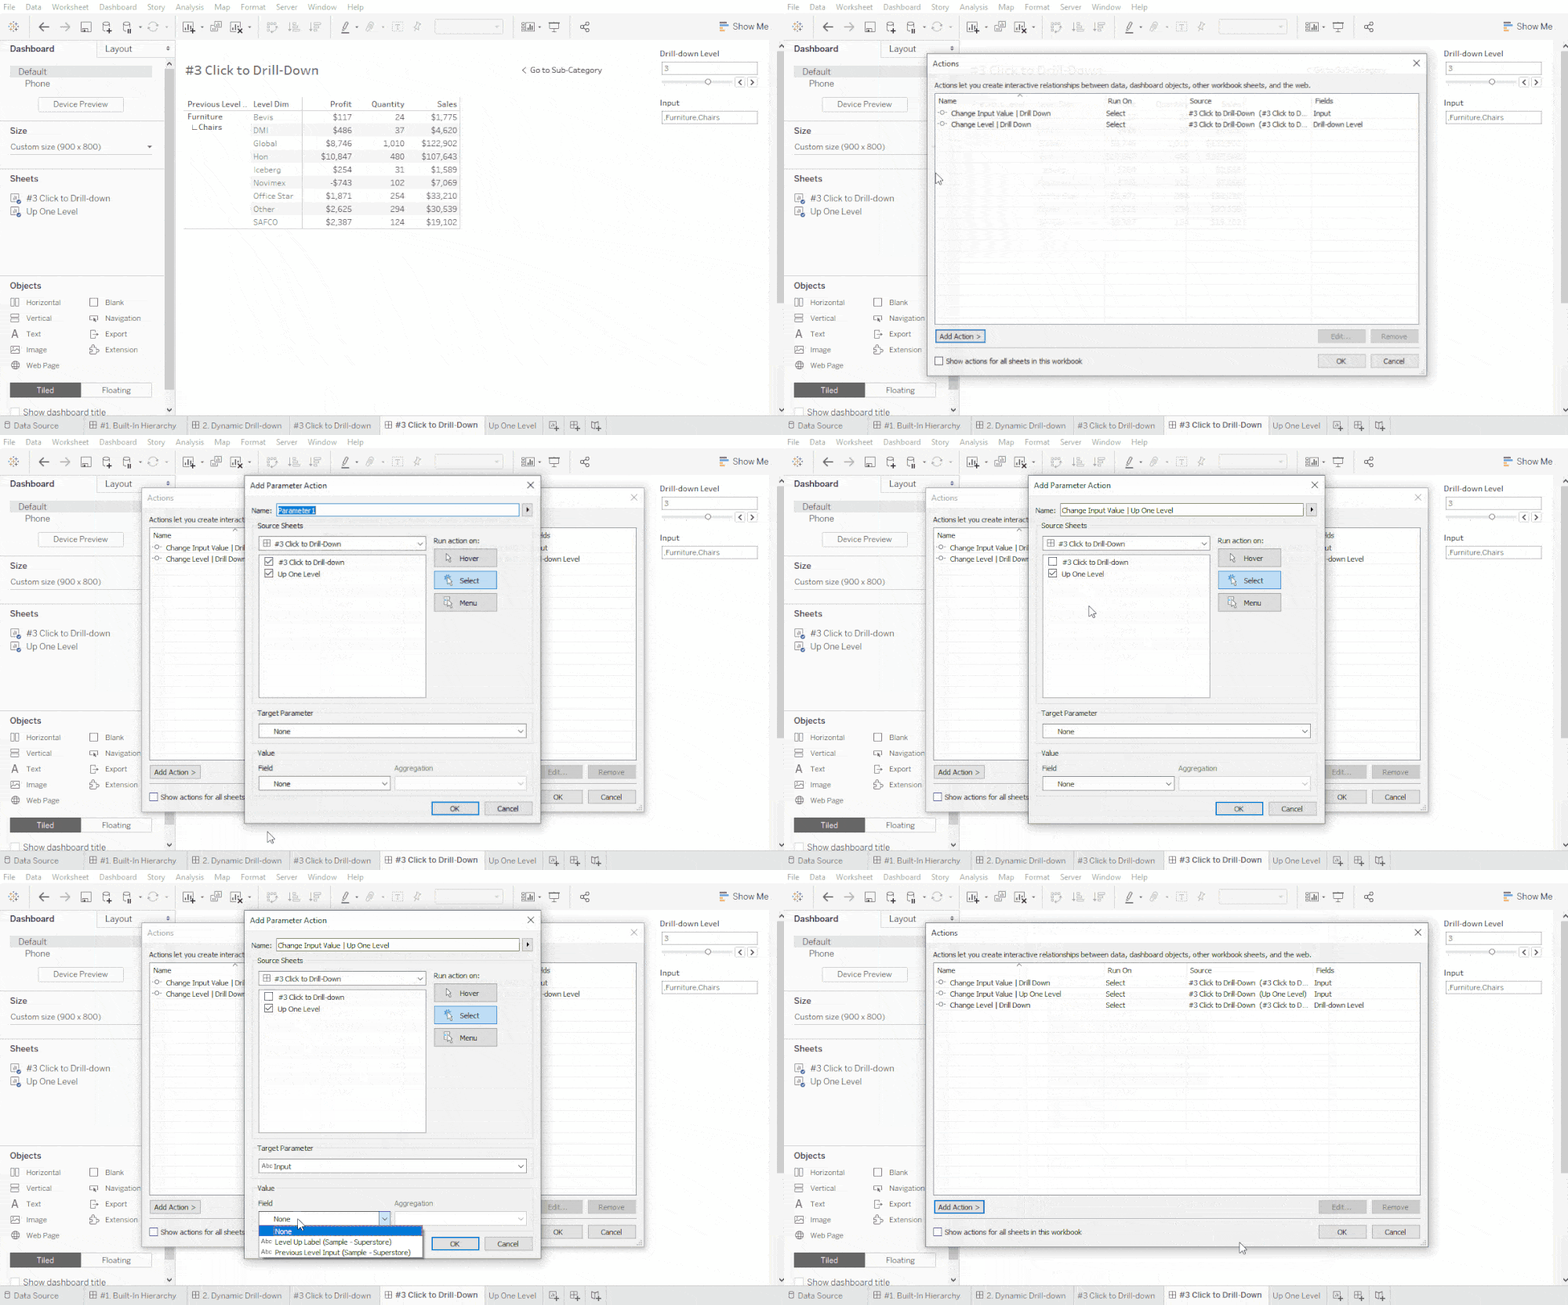
Once the Up One Level button sheet is on the Dashboard, we can add the Parameter Action to change the [Input] field.
Add a Parameter Action that runs on selecting only the Up One Level Sheet. The Target Parameter should be [Input] and the Value field is [Previous Level Input] with no aggregation.
Step #17: Add Drill-down Level Going Up Action
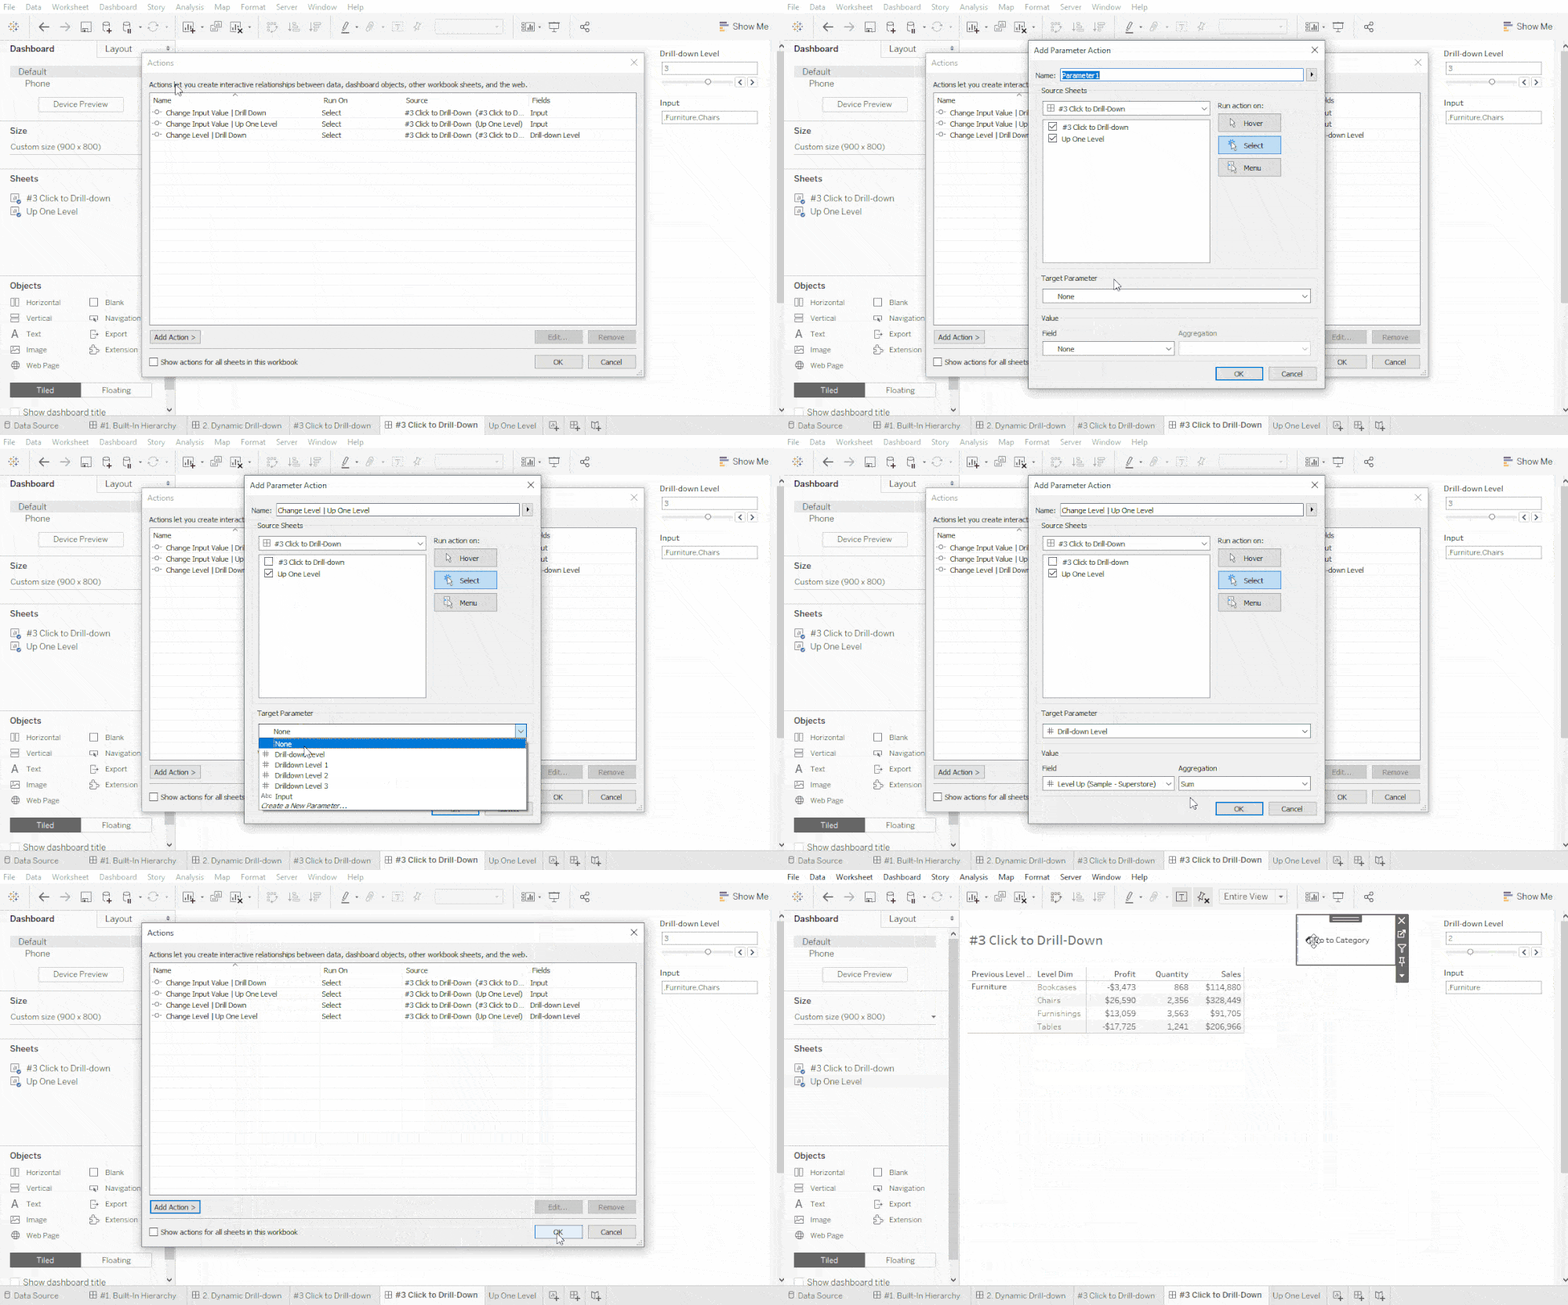
Now we add a similar dashboard action to change the [Drill-down Level] Parameter.
Add a Parameter Action that runs on selecting only the Up One Level Sheet. The Target Parameter should be [Drill-down Level] and the Value field is [Level Up] with no aggregation.
Step #18: Create Revert to Top Button
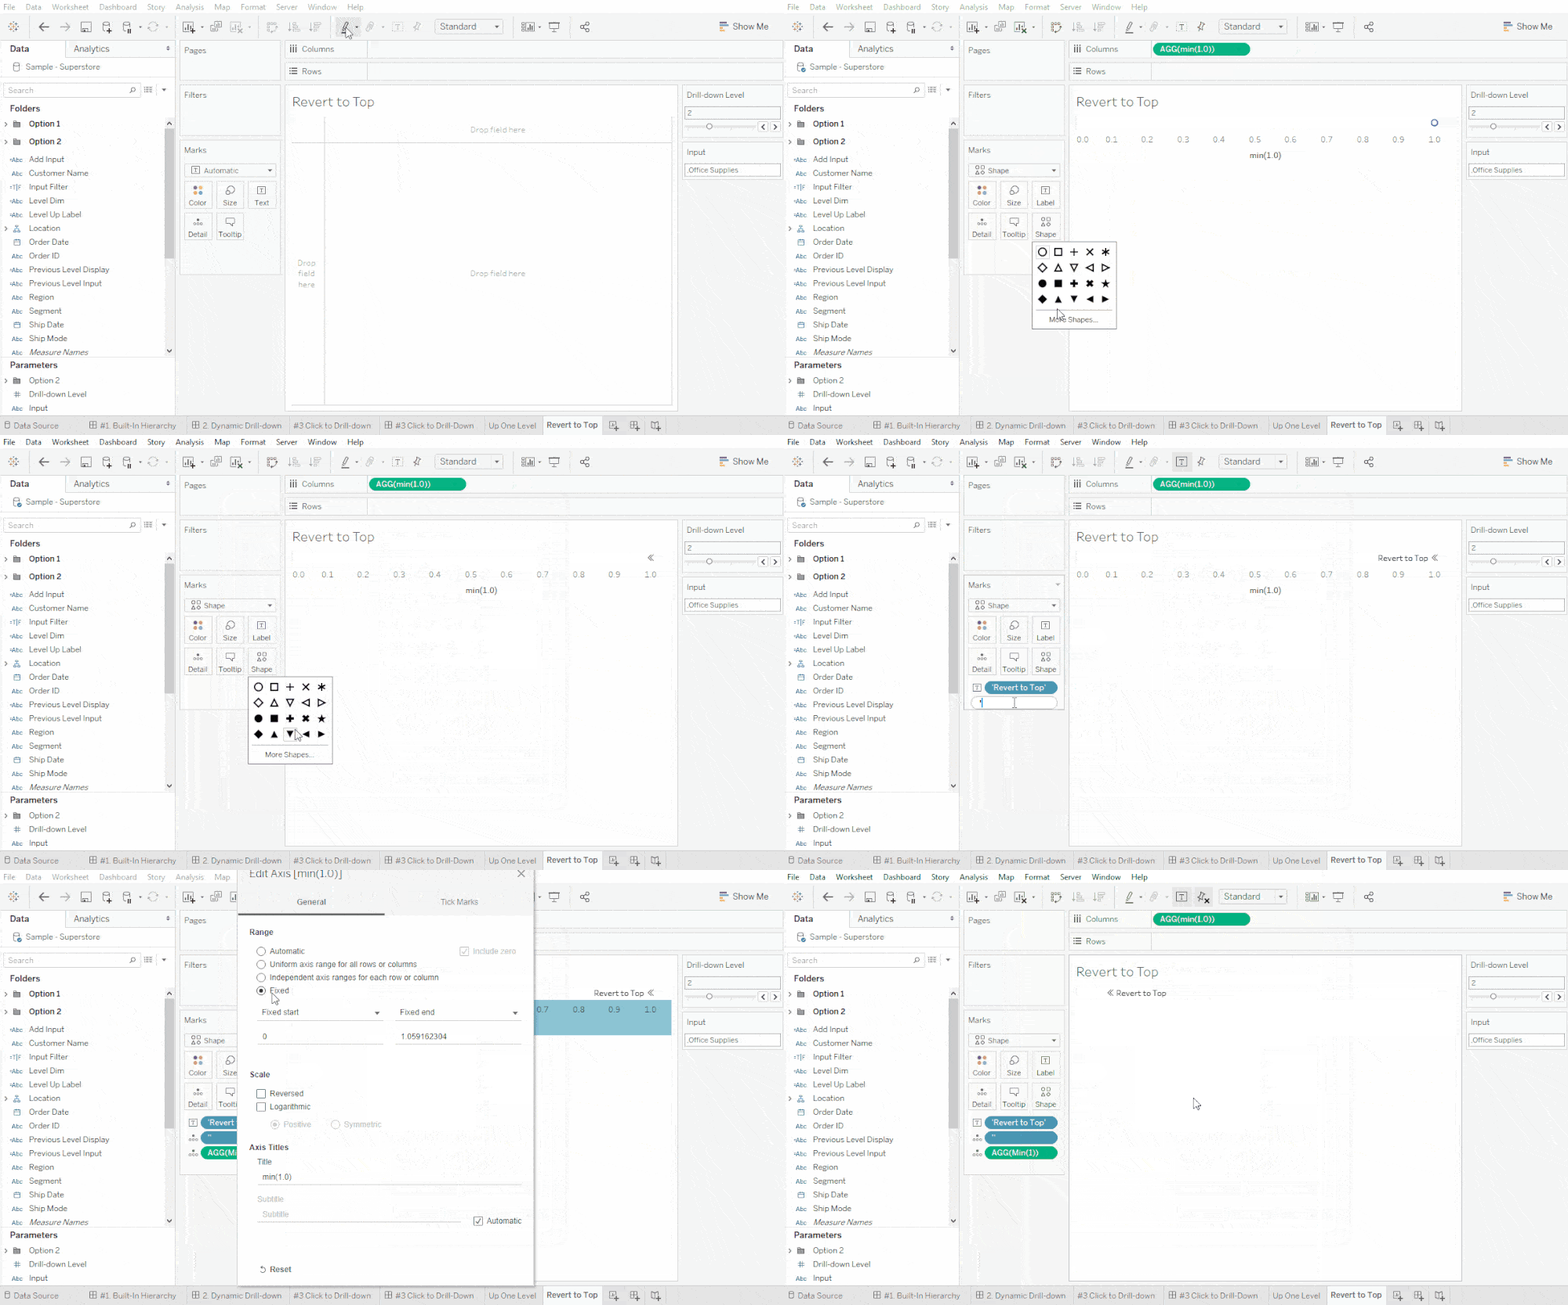
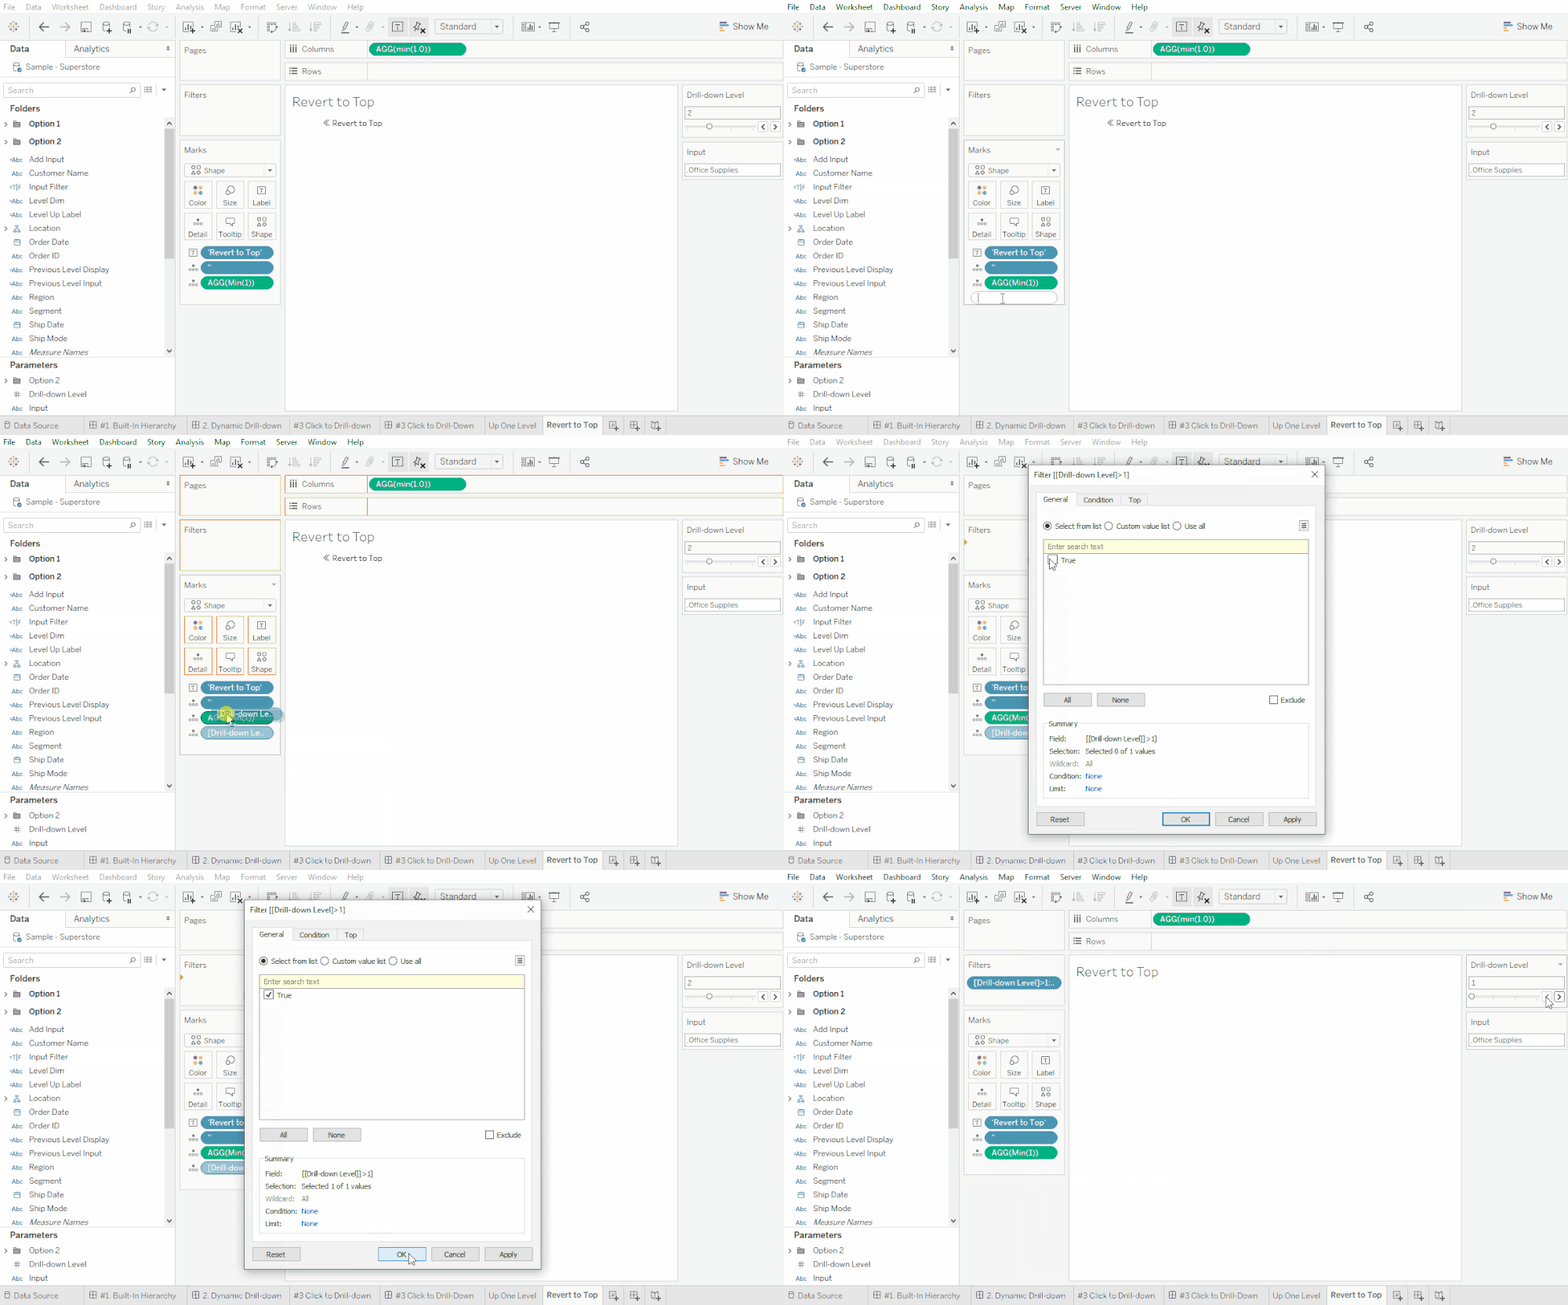
Next, we’re going to create “Revert to Top” buttons so the end-user can be on any level and quickly go back to the beginning. This button works like the Up One Level button but will replace the [Drill-down Level] with 1 and [Input] with a blank field (‘’).
I used on-viz fields to create this button, but you can create calculated fields if you’d like. There needs to be a blank field (‘’) and a field that is set to 1 on details. As well as something to label the button so end-users know how to interact with it.
Step #19: Revert to Top Filter
Again, we only want to show the Revert to Top button when the user has drilled down.
Add a filter for when [Drill-down Level]>1.
Step #20: Revert to Top Input Value Action
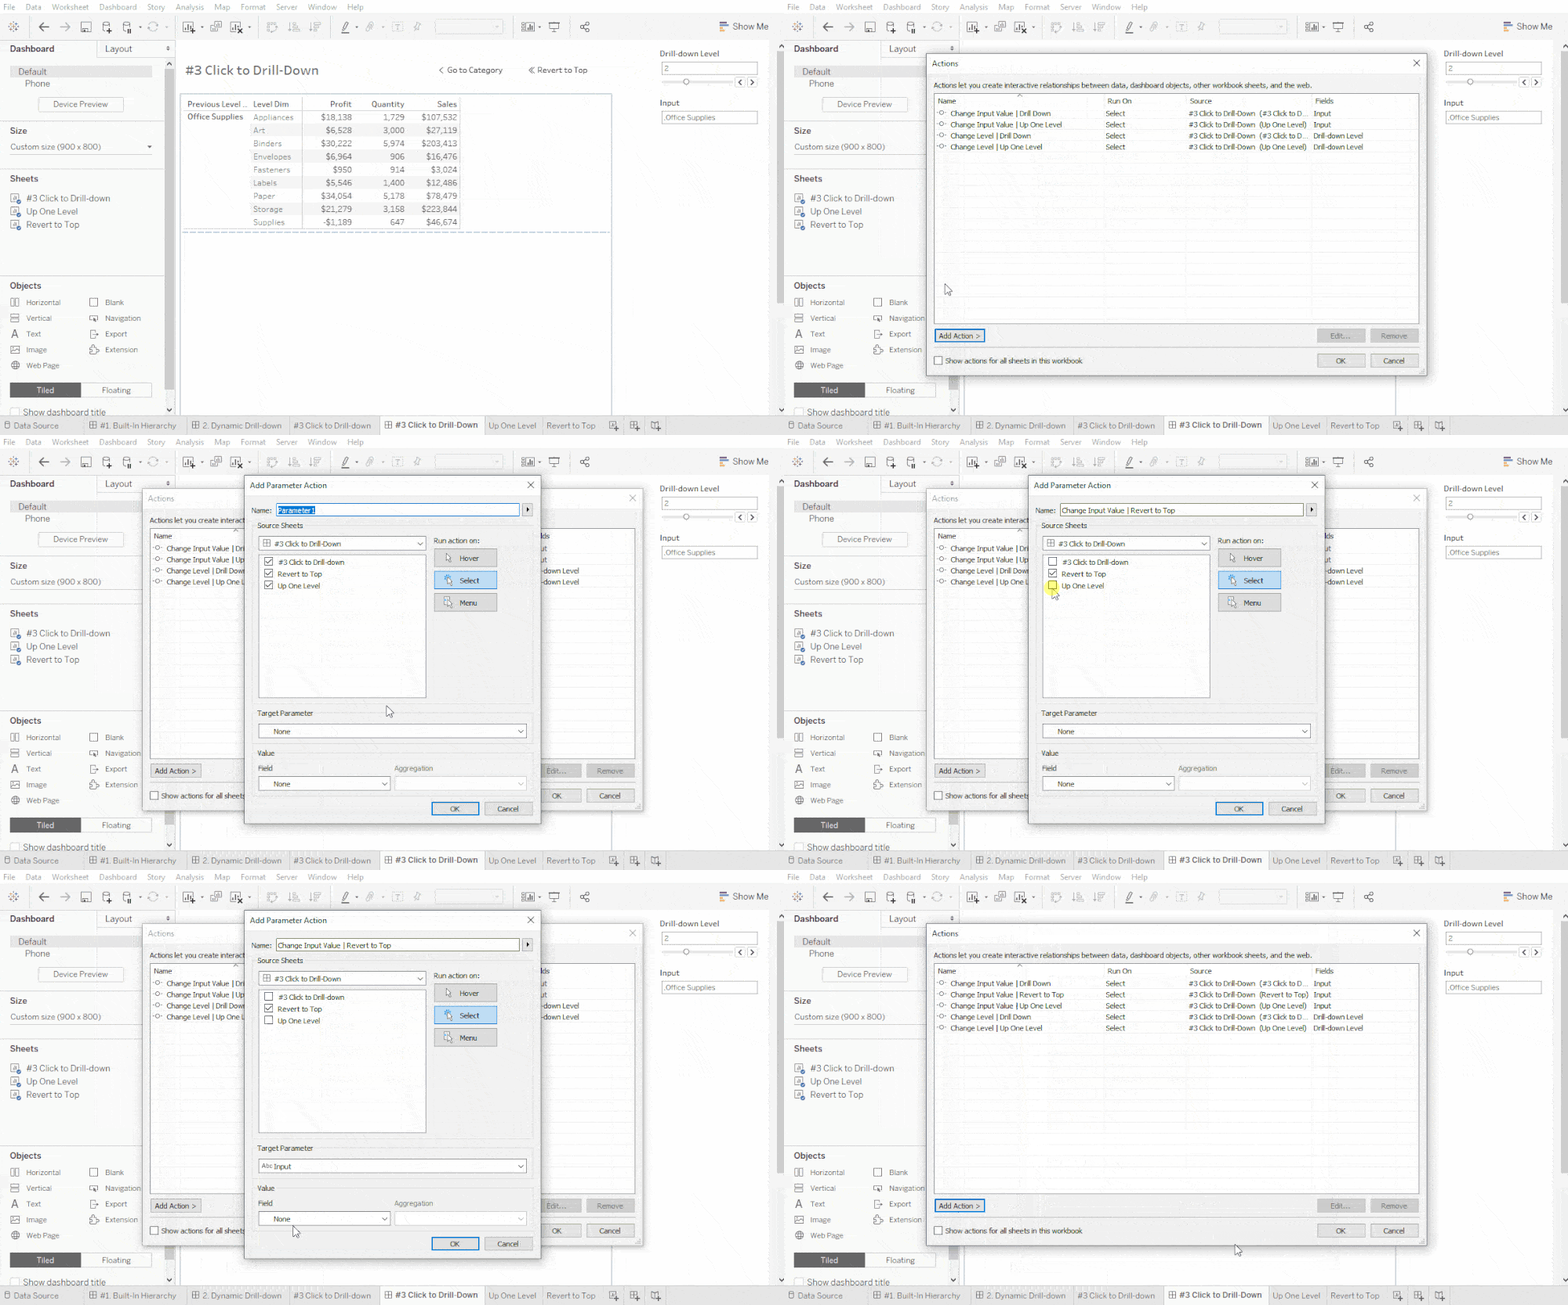
Once the Revert to Top Button sheet is on the Dashboard, you can create the first parameter action. This action will make the [Input] parameter blank.
Add a Parameter Action that runs on selecting only the Revert to Top Sheet. The Target Parameter should be [Input] and the Value field is “” (or your blank field name) with no aggregation.
Step #21: Revert to Top Drill-down Level Action
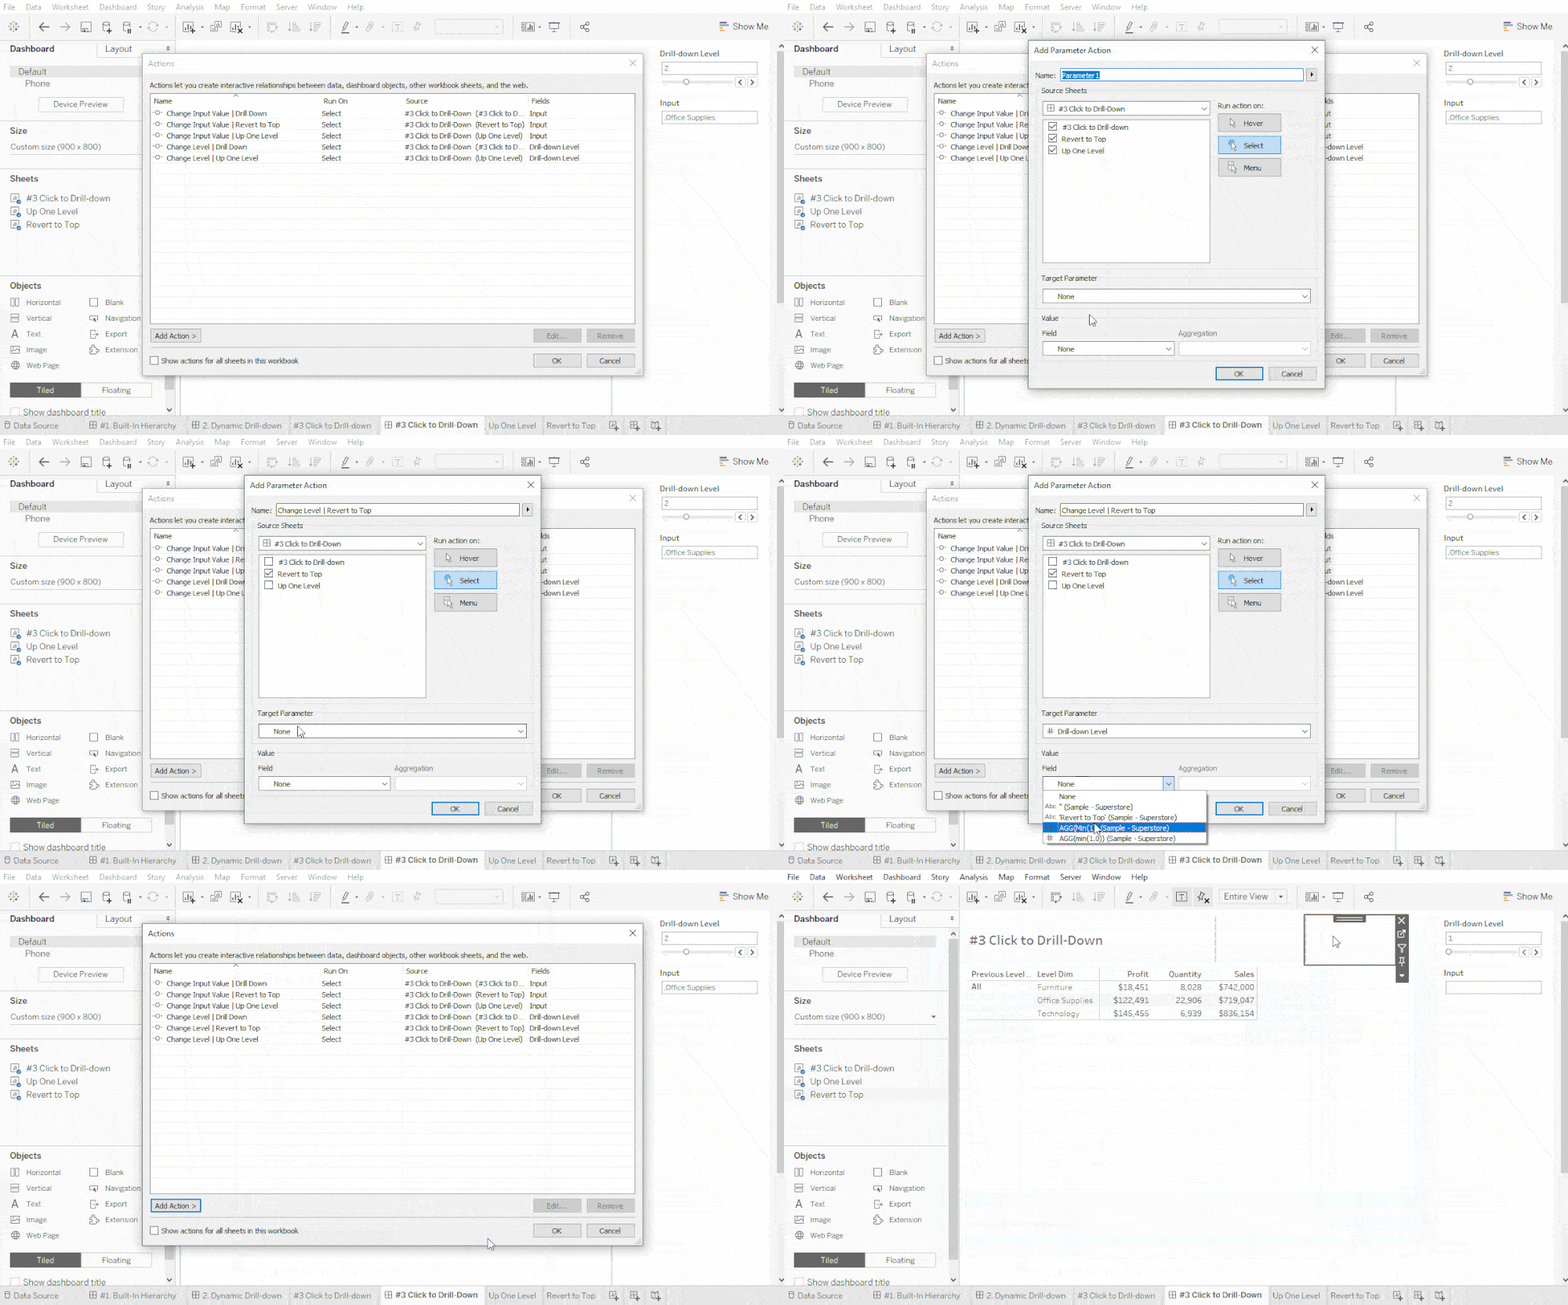
The final parameter action changes the [Drill-down Level] to 1.
Add a Parameter Action that runs on selecting only the Revert to Top Sheet. The Target Parameter should be [Drill-down Level] and the Value field is 1 (or your min(1) field name) with no aggregation.
Step #22: Formatting and Final Touches
Once you have everything on the Dashboard, add a floating blank object to prevent users from clicking on the drill-down path display and measure headers. Clicking on those two items will cause errors in the formulas and the worksheets will go blank.
You may also want to increase the size of your rows or columns depending on how many drill-down levels you have. Increasing the size will ensure the content is readable.
Another fancy feature is to have the buttons automatically deselect. Here’s instructions for that process: Automatically Deselect Marks

