This is Part 3 of a four-part series covering macros in Alteryx. In this post, I will walk you through how to build a batch macro in Alteryx.
A batch macro runs once for each record or group of records that are fed into the macro. If you’re familiar with programming, batch macros are similar to for loops. As we’ll see later in this post, batch macros are configured with an Interface tool known as a Control Parameter. The image below shows the current Alteryx icon for a control parameter.

In the following sections, I will walk you through a use case that I have frequently employed in my personal Alteryx projects — scraping web data for many URLs and combining the results.
The Procedure
I like mathematics and I like data visualizations. Therefore, I like making math-related data visualizations. An interesting resource is the Online Encyclopedia of Integer Sequences (OEIS). It has cataloged hundreds of thousands of integer sequences (such as the prime numbers, Fibonacci numbers, and square numbers).
For a project, I needed to scrape the numbers from thousands of these sequences to perform some analysis on the numbers that appear. The URL for a typical integer sequence page is as follows: http://oeis.org/A000040/b000040.txt
Each sequence has a six-number code, starting at 000001 and increasing by one for each new sequence.
Because each URL follows a regular pattern, I knew that if I constructed a list of sequence IDs I could feed them into a batch macro to get the necessary data.
Building a Batch Macro
Just as we saw with standard macros in the previous post, building a batch macro begins with constructing a standard workflow.

The benefit of building a batch macro in this way is that you can troubleshoot as you build. I hard-coded one URL into the Text Input tool at this stage, which allows you, as the developer, to test different inputs to ensure that the workflow is working as intended.
When building a web scraping macro, I like to have my input in two or more pieces:
- The part of the URL that does not change
- The part or parts of the URL that will change with each run of the batch macro.
You can see how I did that in the image below:

The Formula tool above takes the value from ID and replaces the string “[Seq]” within URL.
The Control Parameter
So far, we’ve built a standard workflow. It works great for individual URLs, but will not work if the input source contains multiple records (such as for IDs 000040 and 000041). What we now must do is incorporate a Control Parameter to change the value of the ID field for each pass.
From the Interface tool palette, drag a Control Parameter onto the canvas above the Text Input tool. Click-and-drag a connector from the magnifying glass icon on the Control Parameter to the lightning bolt icon on the Text Input tool. An Action tool will automatically appear between the two tools.

If you click on the Control Parameter you will only see one option: give it a label. This label is what end-users will see when they connect to the macro. I named mine “Connect a sequence ID field.”
The Action tool is slightly more complicated to configure. In it, you first determine how to update the data:
- (default) Cell
- Raw XML with Formula
- Value
- Value with Formula
In this case, I have chosen “Update Value” — it allows the developer to replace a value in a specific cell with a new value.
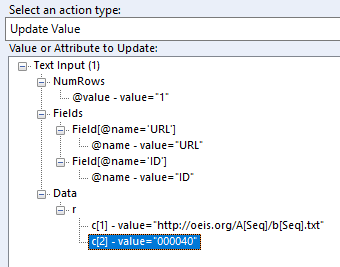
The “Update Value” action offers the choices above.
- NumRows: Change the number of rows in the input data set.
- Fields: Update the name of a field in the input data set.
- Data: Update a specific cell value. “r” stands for “rows” and “c” stands for columns.
By highlighting ‘c[2] – value=”000040″‘, the batch macro will change that specific cell’s value to the next ID number in the input data. This is what allows us to pull data from one URL after another.
Macro Output
In order to pass data out of the batch macro, we need to connect a Macro Output tool, just as we did with the standard macro in the previous post. All you must do is connect a Macro Output tool, give it an output name if you want, and you’re done!
The workflow that we saw earlier should now look like this:

Saving the Macro
Since we used a Control Parameter in the workflow, Alteryx has automatically converted the canvas to a batch macro. Go to save the macro, and you’ll notice the extension is .yxmc to indicate that it is a macro.
Alteryx has a default save location for macros, which can be changed at Options → User Settings → Edit User Settings → Macros.
I saved my macro into the default macro folder under the name “Scrape OEIS.yxmc.” When we go to connect to this macro in the next step, we’ll look for a tool named Scrape OEIS.
Connecting to the Macro
Open a new workflow. Prepare whatever data you’ll feed into the macro. In my example, I had to build the following:

The steps prior to connecting to the macro are wholly dependent on your specific case. For this example, I had to use the Generate Rows tool to build a series of sequence IDs (000001, 000002, …).
Drag the Scrape OEIS macro tool onto the canvas. You may notice something different about it: it has an input node with an upside-down question mark.
The upside-down question mark represents the control parameter input. In this case, our Control Parameter changes the value of a sequence ID, so this is where we’ll connect our list of sequence IDs. When you connect a data source to this input node, you must select a field to use:

Note that although in this case the macro did not have any other inputs, a batch macro can have other, non-control parameter inputs.
All that’s left now is to connect the Scrape OEIS tool’s output node to any tools you need to use beyond the macro. Again, this is entirely dependent on your individual needs. My workflow ended up like this:

Next Steps
In this example, we built a batch macro that allowed us to pull data from multiple URLs, one after another. Since the output of a batch macro is unioned to the output from the previous passes, each output ideally has the same structure. If the structure of the data flowing out of the macro might change, open the Interface Designer, and change to one of the other output modes.

Your choice of output mode is determined by the nature of your results. If column names will never change, but sometimes certain columns are missing, then “Auto Configure by Name” is the choice for you.
Now that we’ve learned about standard and batch macros, the next blog in this series will take the plunge into Iterative Macros.
Do you have more questions about Alteryx? Talk to our expert consultants today and have all your questions answered!


