This is Part 2 of a four-part series covering macros in Alteryx. In this post, I’ll walk you through how to build a standard macro in Alteryx.
In a previous job, I regularly received Excel reports that I had to clean, pivot, and ready for further analysis or visualization. We did not have nice tools like Alteryx or Tableau Prep, so I wrote all of my own code in VBA or R to automate those tedious, time-consuming tasks. I considered myself very good at writing VBA code and using Excel, but with a tool like Alteryx, I easily could have quartered the amount of time certain tasks took to complete.
A standard macro in Alteryx is very similar to the programs I wrote by hand. You feed it data, magic happens, and a nice, cleaned data set comes out the other side. Below, I’ll walk you through an example where we build a standard macro from the ground-up to format a report that we receive every morning.
The Data
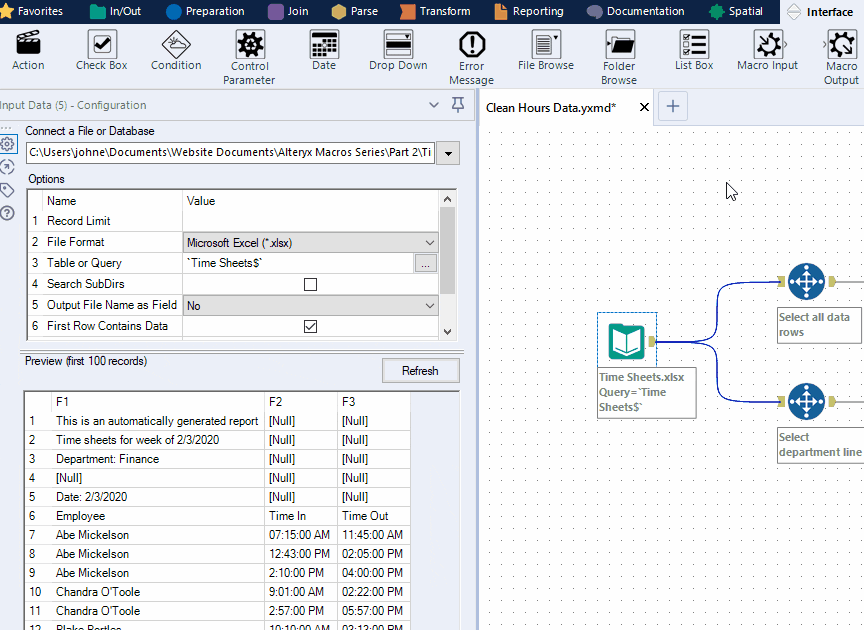
You get to work and find an email waiting for you. It’s last week’s timesheets. They’re waiting anxiously to be formatted and prepped for visualization in Tableau. As these things often go, the structure of the source data is not optimal, so you’ve decided to build a standard macro to clean them up.
Looking at the image below, we can see there are some lines with supplemental data above the raw data. Additionally, each day is separated by a blank line and the date is indicated in its own cell (see: A4 and A18).

For your reporting duties, you must convert this data set into three separate reports:
- A cleaned data set with proper headers, properly formatted dates and times, and no missing records
- A report that calculates the total hours per day per employee
- A report that calculates how many breaks each employee takes each day
For the purposes of this post, we won’t spend time creating the workflow; that part will be entirely dependent upon your requirements. Keep in mind, however, that a good macro is dynamic; as the data fed into it changes, the macro can accommodate those changes and still produce correct results. In general, “hard coding” things should be avoided as much as possible.

The workflow above achieves our three goals listed above. Now we can finally get into the meat of this post: converting this to a macro that can be plugged into other workflows and shared with other users.
Building a Standard Macro
The main differentiator between standard workflows and standard macros are Macro Inputs and Macro Outputs. These tools are found in the Interface tool palette.

Macro Input
Drag a Macro Input tool onto the canvas. You should notice that the tools on the canvas have little magnifying glass and lightning bolt icons on top. This indicates that the workflow has been converted to a standard macro. You can verify this by clicking a blank area on the canvas and then, in the configuration pane to the left click on “workflow.” This view will tell you what type of workflow you have. It should say “standard macro”now.
Our next goal is to replace the Input tool with the Macro Input. Click on the Macro Input and set a template. You can designate a template in one of two ways:
- Via a text input. This works like a Text Input tool; you may enter data manually or copy/paste from an existing source.
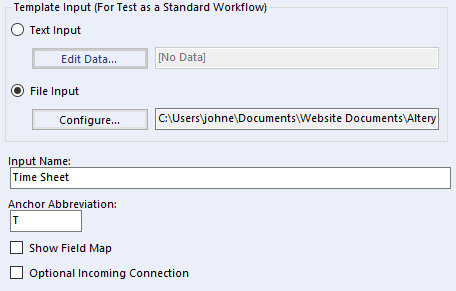
- Via a file input. This works like an Input tool; you browse for an input file like you would ordinarily. In this example, I chose this option.
Regardless of the template input you choose, it should match the input data when you built the workflow pre-macro.
The Macro Input tool’s configuration menu has a few more options that are worth understanding:
- Input Name: The name of the input connection into the macro icon. This is optional.
- Anchor Abbreviation: The single-letter abbreviation that will appear on the macro icon. This is optional.
- Show Field Map: When checked, the macro will display a configuration menu to assign fields from the input data source to specific fields in the macro. When unchecked, the data is passed through as-is.
- Optional Incoming Connection: When checked, the input is not required for the macro to work. This will make the input anchor gray.
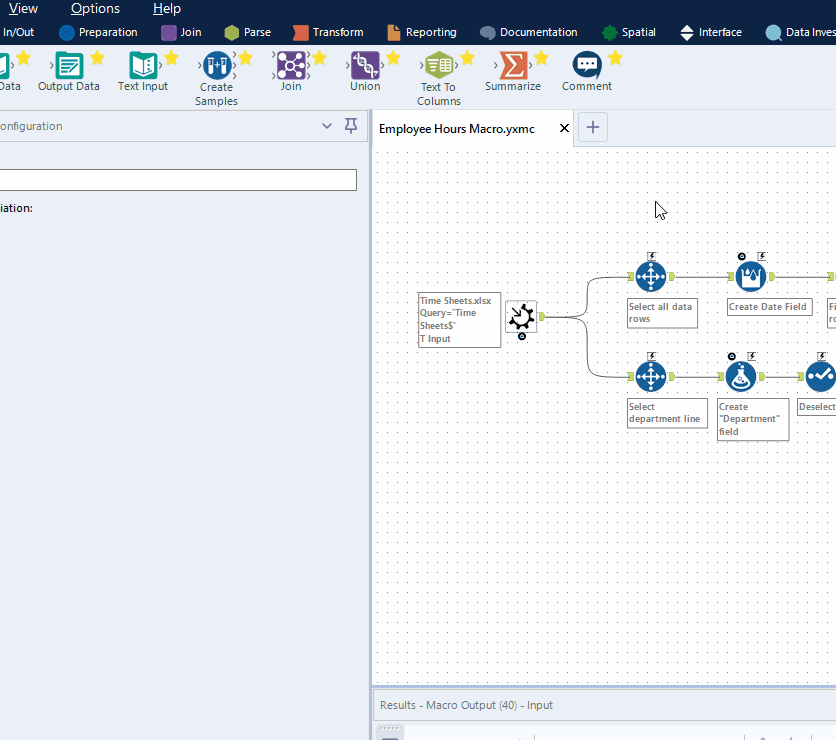
Once the Macro Input is configured, you can replace the Input tool with it. Go ahead and delete the original Input tool — we don’t need it anymore.

Macro Output
We can now go ahead and connect some Macro Output tools to the workflow. For our example, we’ll replace each Browse tool with a Macro Output tool.
Configuring the outputs is much simpler than the inputs: all you have to do is give the output a name and an abbreviation — and even these are optional!

Once you’ve connected each required output, you’re pretty much done. The new workflow should now resemble this:

Customizing
Standard macros don’t require any customization. You can save the workflow, connect some data to it, and the whole thing will work just fine.
Macro customization options are found by navigating to View → Interface Designer (Ctrl+Alt+D). Most of the options in the Interface Designer are used with analytic apps, batch macros, and iterative macros.
Here, we can customize the macro icon by navigating to the gear icon and selecting a standard or custom icon.
Saving
When you go to save the workflow, you’ll notice that the file extension has changed to .yxmc to indicate that the file is a macro. In addition, Alteryx has a default location where macros are saved. This location is accessed at Options → User Settings → Edit User Settings → Macros.
I saved the workflow into my default macro folder with the name “Employee Hours Macro.” This name is important — it is how the macro is displayed in the Macros tool palette as we’ll see in a minute.
Connecting to the Macro
Now that we’ve built the macro we can connect it to other workflows that require the same steps. Open up a new workflow and connect an input data source. Next, find the Macros tool palette (you may need to add the Macros tool palette by pressing the small “plus” icon to the right of the tool palette and selecting it).
Within the Macros tool palette, the macro we created is now on display just like all of the other Alteryx tools. In the image below, you can see some of the macros that I’ve created recently, along with our Employee Hours Macro.

To complete this example, we’ll connect another Time Sheets file. In the real world, this could represent another week’s or month’s worth of data. As long as it is structured in the same way, it will work with the Employee Hours Macro.

Because the Employee Hours Macro was made specifically to deal with the Time Sheets input data, we can simply connect some Browse or Output tools and call it a day. Of course, we can do more analysis based on the outputs generated by the macro as desired.
Next Steps
In this example, we built a highly specialized macro to deal with a specific case. Not all standard macros are like that, however. You can build a standard macro that performs some sort of calculation based on any input — look at Count Records or calculating a weighted average as two examples.
In the next post in this series, we will go over Batch Macros.
Do you have more questions about Alteryx? Talk to our expert consultants today and have all your questions answered!


