Snowflake and Alteryx are two of my favorite tools. Many organizations choose to authenticate to their roles with Snowflake using OAuth, which isn’t always immediately straightforward when connecting via Alteryx and some other tools. In this post, I’ll walk through how you can use OAuth to connect to Snowflake in Alteryx.
Install the Driver
Like with any database in Alteryx, you’ll need to install a driver in order to connect. A driver is basically just your local connector to a database that translates what you’re doing on your local machine to and from the system the database lives on.
You can get details on obtaining and installing the driver here.
Setting up the DSN
The simplest way to connect with Alteryx is setting up a DSN. To do this, search “odbc” in your applications and pull up the ODBC Data Source Administrator (64bit). Using either System (if this should be used across all users on the machine) or User DSNs, click “Add”.

When you click add, scroll to select your installed Snowflake driver and select “Finish” to get to the DSN configuration window.

Once in the DSN configuration window, you will find a several blank fields to fill in. Only 3 of these parameters are technically required for the DSN creation:
- Data Source: name of the DSN
- User: your login username/email
- Server: URL which you access Snowflake at
However, I would recommend also filling in a few others when you are planning on utilizing this with Alteryx:
- Role: which ever role you are hoping to connect with. If you do not fill this in, Alteryx will connect with your Default role. In this case, you may have multiple DSNs if you have access to multiple roles.
- Authentication: For OAuth, I recommend setting this as "externalbrowser" to authenticate in your default browser when connecting. This is, in my opinion, the easiest way to get connected.
- Warehouse: Name of the warehouse to connect to. This, along with role, will determine which tables show up to use in Alteryx.
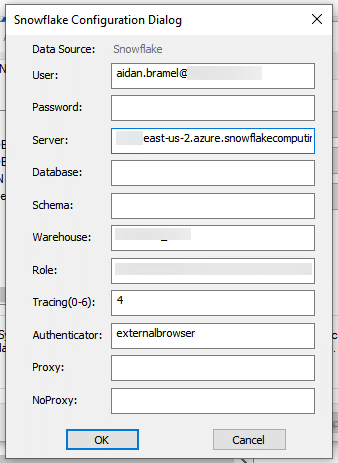
In this screenshot, I also have an entry for Tracing – this determines the level which the driver logs at. Depending on your Snowflake instance, you may also need details on the Proxy parameters. Please reach out to your Snowflake administrator for those details, if required.
For more details about all of the connection parameters available in a Snowflake connection string, see here.
Connecting in Alteryx
For the sake of simplicity, I’ll walk through this with the regular Input Data tool, but the configuration will be the same if you are connecting in-DB or outputting.
Drag your input tool on the canvas, and click the caret to bring up the connection screen. On the Data Sources tab, select Snowflake ODBC.

Select the DSN you just created. You do not need to put any details in for username and password when using OAuth. Click OK.

This will prompt a new window in your default browser. This screen will look different depending on your organization, but sign in as you are used to doing. This will propagate your credentials back into Alteryx. After doing this, it may take some time for your connection to load in Alteryx, but eventually you should get a prompt to choose your table or query, like below.

Note: If you are having issues with the browser prompt, it could be caused by your chosen default browser. When using OAuth, I recommend setting Chrome as the default browser to mitigate this issue.
Connecting to Views vs. Tables
If you are attempting to connect with to a View, rather than a table, you may notice that you cannot find the view (or schema, if it only contains views) in the Visual Query Builder. As of 2021.1, you are unable to see Views in the visual query builder. However, you can still access those by using a workaround detailed in this Community post.
Hope this helps with some questions you may have had if your organization chose OAuth, or another web browser such as OKTA.


