

There are times where you might need a quick image of a Tableau view, but you don’t want to spend time formatting it correctly. You might need multiple views with different parameters but can’t get it all in a consistent format. Or, let’s say you need to update these images every week and want to save yourself the hassle of updating the images manually. That’s where the Tableau Server Client library in Python comes in handy. Instead of taking the time to look for the view, correctly apply parameters, and format the image, Python automatically provides you with all of this.
What is the Tableau Server Client?
The Tableau Server Client (TSC) is a library used in Python that allows you to increase your productivity. This library helps you interact with the Tableau Rest API and work with most of the instances that the Rest API allows you to do without having to code it. In general, an API is a set of guidelines that determine how applications or devices can interact with each other. When you specifically look at a Rest API, it is a guideline you can use specifically for websites. Therefore, the Tableau Rest API allows you to publish workbooks and data sources, create users and groups, query projects, sites, etc. However, for this blog, we will be using Tableau Server Client library and specifically looking at querying views into an image.
Mainly, querying views into images is used when you want to pull a still picture from Tableau. The image can be pulled either from a workbook that you have created or one that is readily available to you. Whether it is to look at the view by itself or for automation purposes, querying views can be very helpful. There are many purposes for these images, so I will walk you through the steps to accomplish this.
Prerequisites for Tableau Server Client
Before you can start using Tableau Server Client in Python, you have to install it into your system. However, to do this, you must first verify that you have Python 3.5 installed. For the purposes of this tutorial, you can download anaconda and use the Spyder environment in that software. Download here.
Installing Tableau Server Client
The recommended way to install this library is through pip. Therefore, we will only use this way to install the library.
Run the command (in your anaconda command window):
Writing Program to get All Data Sources
To start anything within Tableau, you need to first sign in with your credentials. You will have to sign in every time you want to pull something using the library. There are two ways to do this:
1. Using Tableau Server Credentials:

‘USERNAME’ – the username you use to log into your Tableau Server
‘PASSWORD’ – the password you use to log into your Tableau Server
‘SITENAME’ – the site under: http://localhost/#/site/sales/views/profits
‘SERVER_URL’ – the http address for your server: http://localhost
* The use_server_version = True allows you to use the default server version you have access to.
2. Using Tableau Tokens (you will need to create one in your own Tableau Server under “My Account” settings page):

‘TOKEN_NAME’ – the personal access token name
‘TOKEN_VALUE’ – the personal access token value
‘SITENAME’ – the site under: http://localhost/#/site/sales/views/profits
‘SERVER_URL’ – the http address for your server: http://localhost
* The use_server_version = True allows you to use the default server version you have access to.
The second option is helpful when you need to share your code with others and don’t want them to see your credentials.
Getting View ID and View Image
Next, in order to get a specific view, you will need to get the view ID.

Here, you are signing in again with the token that you added above. Likewise, this prints out both the view names with their IDs together. Although your server might have a lot of ID’s, using this method will help you find the ID easier as it is automatically attached to the name. This ID will be useful in this next step.
Once you have the view ID that you want to obtain the image of, verify that it is the correct one. Do so by using:


With this code, you are signing in once again and then populating an image with the view that you are trying to get. Then, you are giving that image a name, keeping the data as it is written in the data file (definition for ‘wb’), and writing that into its own view image.
You can finish here, but what if you only need a portion/filtered view of the image? You can actually use the parameter within the view options to make this happen. However, your view will need to have the specified parameter that you are coding for. To do this, there are a couple of steps:
1. You will need to set Image Options:
Image resolution will help you set what type of resolution you want for the view image. Maxage is the maximum number of minutes the image will be cached on the server before being refreshed. It can only go up to 240 minutes and if you add in 0, it automatically reads as 1 minute.
2. Next, you will set a parameter to filter the view:
Here, the first input is the name of the parameter and the second input is the parameter value. Therefore, you will get a view of only furniture.
3. Lastly, you will get the filtered image of your view by using:

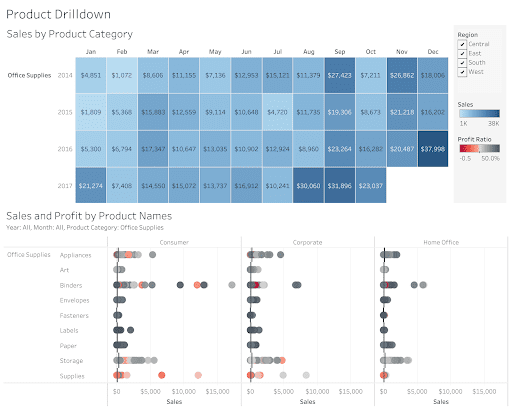
You should have a resulting view image that is focused on the parameter that you set. This image will be saved in the directory path that you have specified the script to go in. Below is an example image obtained by filtering a Superstore dashboard built by Nick Haylund, here at phData. You will notice that the view is filtered to only look at Office Supplies.
Tips and Final Words
Make sure you are always signing in when you’re trying to pull anything from Tableau Server. You will most likely get an error if you fail to do this step and having it will give you the authentication needed to look into your available views, workbooks, etc. Make sure that you have access to the views, filters, and parameters (if you are not the administrator for the Tableau Workbook). Lastly, if you want to change the parameter set for the image, you will have to rerun the image options (view_image_options) and then change the specified view parameter (view_image_options.vf).
This is a simplified version of getting query view images that is outlined in Tableau Server Client. There are many more things that you can do with this library and I recommend that you explore more with it. In the next post, we will be extracting a workbook and making modifications to it using Python.
If you are looking for more ways to learn Tableau, check out our website! There are many resources there that can help you find ways to build with Tableau.


