

Welcome to the 3rd post in a 5-part series on improving parameter design in Tableau. In our first post, we discussed how parameters haven’t improved and gave one possible design solution, and wrote a how-to on the topic. In the second post, we discussed the need for toggle buttons. In this post, we discuss the need for linked parameters–parameters that interact with each other and respond to each other’s values.
This type of parameter would be ideal for scenario planning–something where Tableau has the potential to be better than other business intelligence tools at with just a few more fixes. One way you can scenario plan in Tableau is by using parameters for inputs. The way I’ve often worked with scenario planning is there are multiple inputs but these inputs are constrained against each other.
For instance, if I were planning a promotion for a retail company, I would know how much I am going to be allocated for promotion dollars in a given week but I wouldn’t know what I am spending on–the media mix. I don’t need to plan total dollars, I need to plan the mix of spending: how much should I put toward digital media, social media, and print media? In this simple scenario, I need to spend 100% of my dollars on these three channels. If I increase one then at least one other must go down (if not both).
Right now Tableau doesn’t allow parameters to talk to each other but with parameter actions, you can make this happen. Take the simple example below:
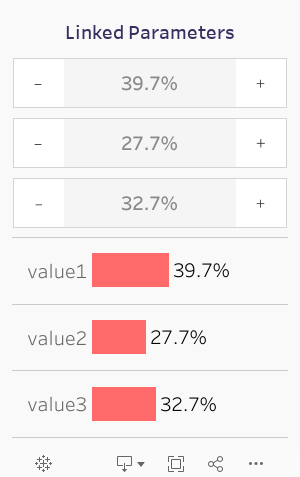
As we click the plus button on the top value, you’ll notice the value begins increasing while the other two values decrease. If we decrease the next parameter you’ll notice the other value increase. With this example, we now have linked parameters.
The subsequent section will discuss how to create linked parameters. Fair warning: there are several components to this visual so it will be a longer discussion.
Step 1: Create a string parameter
We could technically do this with three separate parameters, but by using a single parameter we can keep instructions a bit more concise.
Inside the string parameter, we’re going to write the following:

These values represent the currency of our three parameters displayed above. We have 300 total units to work with–each starting with one-third of the total. If we want to increase value #2 then we need to take values from the others.
In order to change these values we’ll need to build calculations that can change the values in this single parameter.
Step 2: Build a calculations to parse out the individual values
To parse out these values we’ll use the SPLIT() calculation as well as the INT() and ROUND() calculation. SPLIT() requires three inputs, a string–in this case the parameter we created, a value to split the string on–the “,” for us, and a positive integer specifying the split to return.
Here are the three calculations:
					// value 1
ROUND(FLOAT(SPLIT([string param], ",", 1)),0)/300

// value 2
ROUND(FLOAT(SPLIT([string param], ",", 2)),0)/300

// value 3
ROUND(FLOAT(SPLIT([string param], ",", 3)),0)/300
You’ll notice in each calculation we split out the value, then convert the value to an integer, then round the value. We need the round because 99% of the time the conversion works fine but occasionally things go awry and we need to control for when a potential decimal value would show up.
Step 3: Create three separate sheets each with its own value on text of the sheet
This is a very simple step. Just make sure the formatting is the same across all sheets.
Below is a screen shot of the sheet for [value 1]. Be sure to do the same for [value 2] and [value 3].

Step 4: Create the calculations to add values from our base string parameter
For our addition calculations we are going to add two units to one of the parameter values and subtract one unit from each of the other two values.
We’ll add some conditional logic for when theres only one unit to go. This makes the calculations a bit more complicated. Here is the addition calculation for the first value in the string parameter (we’ll call the calculation [+v1]).
					// +v1
IF [value1] = 1
THEN [string param]
ELSEIF INT([value1]*300) = 299 AND [value2] != 0
THEN STR(ROUND([value1]*300,0) + 1) + "," +
     STR(ROUND([value2]*300,0) - 1) + "," +
     STR(ROUND([value3]*300,0))
ELSEIF INT([value1]*300) = 299 AND [value2] == 0
THEN STR(ROUND([value1]*300,0) + 1) + "," +
     STR(ROUND([value2]*300,0)) + "," +
     STR(ROUND([value3]*300,0) - 1)
ELSE STR(ROUND([value1]*300,0) + 2) + "," +
     STR(ROUND([value2]*300,0) - 1) + "," +
     STR(ROUND([value3]*300,0) - 1)
END
In the calculation if value–the percentage of the total–not the units is equal to 1 or 100% then we just want to return the units. If our string parameter has 299 units and [value2] is not yet at zero we are going to add one unit to the first split and subtract it from the second split. If the first split is at 299 and the second split is at zero then we are subtracting one unit from the third split. For all other values we add two units to the first split and subtract one unit from the other two splits. For the other calculations we follow a similar approach. Here is calculation for value 2 ([+v2]):
					// +v2
IF [value2] = 1
THEN [string param]
ELSEIF INT([value2]*300) = 299 AND [value3] != 0
THEN STR(ROUND([value1]*300,0)) + "," +
     STR(ROUND([value2]*300,0) + 1) + "," +
     STR(ROUND([value3]*300,0) - 1)
ELSEIF INT([value2]*300) = 299 AND [value3] == 0
THEN STR(ROUND([value1]*300,0) - 1) + "," +
     STR(ROUND([value2]*300,0) + 1) + "," +
     STR(ROUND([value3]*300,0))
ELSE STR(ROUND([value1]*300,0) - 1) + "," +
     STR(ROUND([value2]*300,0) + 2) + "," +
     STR(ROUND([value3]*300,0) - 1)
END
And the calculation for value 3 ([+v3]):
					// +v3
IF [value3] = 1
THEN [string param]
ELSEIF INT([value3]*300) = 299 AND [value1] != 0
THEN STR(ROUND([value1]*300,0) - 1) + "," +
     STR(ROUND([value2]*300,0)) + "," +
     STR(ROUND([value3]*300,0) + 1)
ELSEIF INT([value3]*300) = 299 AND [value1] == 0
THEN STR(ROUND([value1]*300,0)) + "," +
     STR(ROUND([value2]*300,0) - 1) + "," +
     STR(ROUND([value3]*300,0) + 1)
ELSE STR(ROUND([value1]*300,0) - 1) + "," +
     STR(ROUND([value2]*300,0) - 1) + "," +
     STR(ROUND([value3]*300,0) + 2)
END
Step 5: Create three "+" sheets and add one of each of the calculations above to each sheet
Create three separate sheets with a “+” on text of each of the sheets. Add a plus calculation to each of the different “+” sheets. Here is the “+” sheet for the first value:

Repeat this for the second and third “+” sheets.
Step 6: Create the calculations to subtract values from our base string parameter
We’re going to create the opposite calculations in Step #4 where we are focused on subtracting from a particular value. These calculations are called [-v1], [-v2], and [-v3]. Here is the calculation for subtracting from value 1.
					// -v1
IF [value1] = 0
THEN [string param]
ELSEIF INT([value1]*300) = 1 AND [value2] != 0
THEN STR(ROUND([value1]*300,0) - 1) + "," +
     STR(ROUND([value2]*300,0) + 1) + "," +
     STR(ROUND([value3]*300,0))
ELSEIF INT([value1]*300) = 1 AND [value2] == 0
THEN STR(ROUND([value1]*300,0) - 1) + "," +
     STR(ROUND([value2]*300,0)) + "," +
     STR(ROUND([value3]*300,0) + 1)
ELSE STR(ROUND([value1]*300,0) - 2) + "," +
     STR(ROUND([value2]*300,0) + 1) + "," +
     STR(ROUND([value3]*300,0) + 1)
END
And the calculations from subtracting values from value #2 and value #3:
					// -v2
IF [value2] = 0
THEN [string param]
ELSEIF INT([value2]*300) = 1 AND [value3] != 0
THEN STR(ROUND([value1]*300,0)) + "," +
     STR(ROUND([value2]*300,0) - 1) + "," +
     STR(ROUND([value3]*300,0) + 1)
ELSEIF INT([value2]*300) = 1 AND [value3] == 0
THEN STR(ROUND([value1]*300,0) + 1) + "," +
     STR(ROUND([value2]*300,0) - 1) + "," +
     STR(ROUND([value3]*300,0))
ELSE STR(ROUND([value1]*300,0) + 1) + "," +
     STR(ROUND([value2]*300,0) - 2) + "," +
     STR(ROUND([value3]*300,0) + 1)
END
					// -v3
IF [value3] = 0
THEN [string param]
ELSEIF INT([value3]*300) = 1 AND [value1] != 0
THEN STR(ROUND([value1]*300,0) + 1) + "," +
     STR(ROUND([value2]*300,0)) + "," +
     STR(ROUND([value3]*300,0) - 1)
ELSEIF INT([value3]*300) = 1 AND [value1] == 0
THEN STR(ROUND([value1]*300,0)) + "," +
     STR(ROUND([value2]*300,0) + 1) + "," +
     STR(ROUND([value3]*300,0) - 1)
ELSE STR(ROUND([value1]*300,0) + 1) + "," +
     STR(ROUND([value2]*300,0) + 1) + "," +
     STR(ROUND([value3]*300,0) - 2)
END
Step 7: Create three "–" sheets and add one of each of the calculations above to each sheet
Like Step #5, create three sheets where “–” is on text. Add individual subtraction calculations to each of the sheets to that [-v1], [-v2], and [-v3] are all on detail of separate sheets. Below is what the sheet for value #1 will look like. Repeat for values #2 and #3.

Step 8: Build your visualizations that will utilize the linked calculations ([value1], [value2], and [value3])
For this example I built a very simple bar chart showing the values.

Step 9: Build your dashboard
For the interactive parameters, you’ll want to add three horizontal containers inside a vertical container. Inside the horizontal containers add a “–” sheet, a “+” sheet, and a label sheet. Make sure they are all for the same matching values. I personally set the height of the horizontal container to 50 pixels and the width of the “–” and “+” sheets to 50 pixels as well.

Step 10: Add parameter actions to your "+" and "–" sheets to change the base parameter
After you’ve added your sheets, add a dashboard action. Add a parameter action for the sheet that corresponds with [+v1] calculation on detail. Run the action on select for the target parameter of [string param]. Update the [string param] with [+v1] with an aggregation of none. Repeat for each of the “+” and “–” sheets that include [+v2], [+v3], [-v1], [-v2], and [-v3]. You will have six separate actions in total.

Step 11: Add a filter action to each "+" and "–" sheet to automatically deselect a sheet after a click
This is one of my favorite techniques for automatically deselecting text. You can read about it in detail here. To deselect sheets you need to create individual filter actions for each sheet–meaning you will have to do this six times.
First create two calculated fields. One called [TRUE] with the value of TRUE and the other calculation of [FALSE] with a value of FALSE. Add these calculations to every visualization.
Here is the example for the [-v3] sheet on the Linked Parameters dashboard. Add a filter action. Select the sheet for [-v3]. Select run on select. Select the target sheet of [-v3] (not the dashboard). Choose show all values when the selection is cleared. On the Target Filters section choose Selected Fields. Set the source field to [TRUE] and the destination field to [FALSE].

The final product is a single parameter that updates three values in a single click. This parameter links three separate values so that if one value increases the other two decrease.
Takeaways
This example shows how parameters could be linked for scenario planning or media mix analysis, or any number of challenges in business. This is not fixed to just three parameters that increase by 0.66%. We could change the values by any value if we wanted.
There are more examples we are going to continue to share in the next few weeks. Please check in later for Part #4 and #5.
Do you have more questions about Tableau? Talk to our expert consultants today and have all your questions answered!


