

Dataiku is an industry-leading Data Science and Machine Learning platform that allows business and technical experts to work together in a shared environment.
The platform accomplishes this by using a combination of no-code visual tools, for your code-averse analysts, and code-first options, for your seasoned ML practitioners.
If your company has invested in Dataiku, you will want to maximize the value you get from the tool by utilizing its full breadth of functionality. One way to do that is through the use of plugins, which open up the ability to do far more than what is possible with visual tools alone.
In this blog, we will cover what plugins are, why they are useful, and an example of how to develop one using the NeuralProphet Python package and Snowflake Data Cloud.
What is a Plugin in Dataiku, and Why are They Useful?
While Dataiku provides out-of-the-box solutions for a wide range of ML use cases, it’s possible that the nuances of your specific problem require extending the functionality of the platform. When that happens, plugins are often the solution.
Plugins wrap the custom code you’ve developed with a graphical user interface. This allows you to drag and drop your code into flows just like the classic visual components of Dataiku.
It also makes your custom code shareable within your organization so that others can reuse your work in their own projects. This saves time and makes it easy to manage code that implements frequently used business logic.
Dataiku provides dozens of already-built plugins through their plugin store that cover use cases ranging from Named Entity Recognition with spaCy to exporting a dataset to a stage within Snowflake.
If you find a plugin that suits your needs, it can be installed on your Dataiku instance by an administrator or user with the correct privileges. When you don’t find something that solves your problem, you can develop your own, which is what the remainder of the article will cover.
What are Facebook Prophet and NeuralProphet?
Prophet is a time-series forecasting algorithm developed by Facebook that is popular in the data science community because of its performance and ease of use. It is covered in great detail in a separate phData blog. Dataiku added Prophet as a built-in algorithm for time-series analysis in Dataiku 12, which was released in late May 2023.
NeuralProphet is built on Pytorch and inspired by Prophet and AR-Net. Many data scientists have become familiar with Prophet’s syntax, and NeuralProphet makes use of many of the same methods and attributes, which makes it easy to pick up.
This fact, combined with the fact that it is not built into Dataiku and does not have any plugins available in the plugin store, makes it a great example for developing our own custom plugin.
Plugin Development
Setting up my Project Flow and Training a NeuralProphet Model Using a Code Recipe
In order to develop a plugin, it’s incredibly helpful to have a working flow and some code to use as the foundation to build on, rather than trying to code my plugin with nothing to test on along the way.
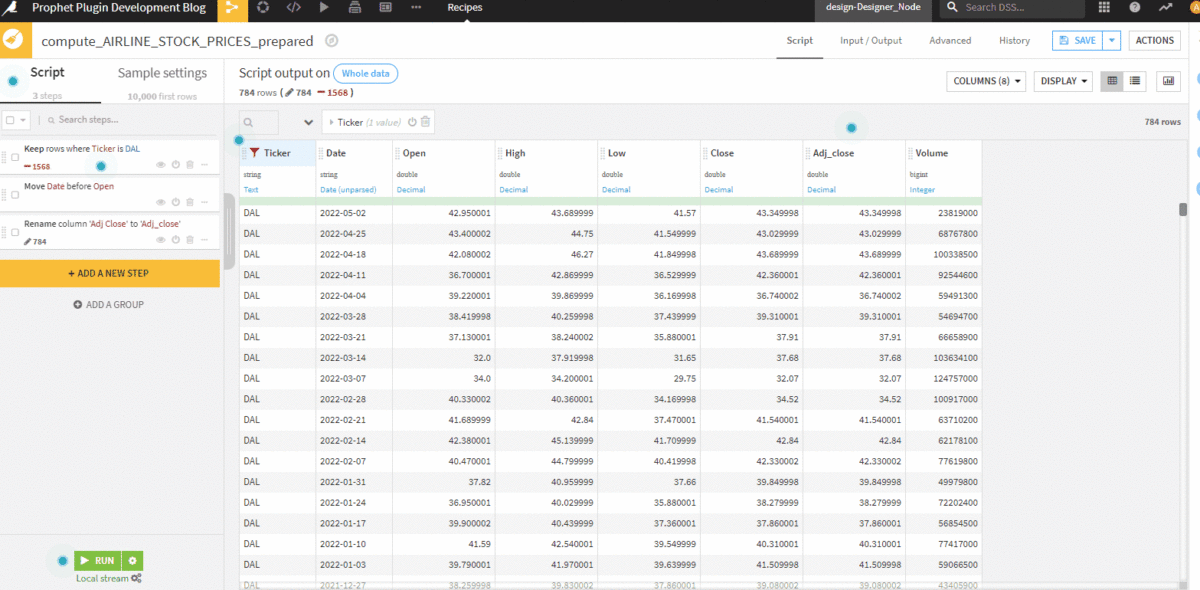
The first thing I’m going to do is connect to a time series dataset currently residing in Snowflake called Airline Stock Prices. You can find the same dataset in the Forecasting Time Series with Visual ML tutorial project provided by Dataiku.
Inspecting my dataset, I can see it contains weekly stock prices for Delta, American, and United Airlines from fall 2007 to spring 2022.

With any development task, it helps to start small, so you fail small. While eventually, I want my plugin to handle multiple time series, I’m going to start out with just one.
To accomplish this, I’m going to filter to only include Delta Airlines. I will also rename a column to remove whitespace and rearrange the dataset to order the columns more logically. I can do this within a Dataiku to prepare the recipe.
While this little bit of processing on a dataset of this size is trivial, I can still push my computation down into Snowflake.
This functionality comes in handy with more complex processing.
The next step in building my plugin is to write the Python code that trains a NeuralProphet model and outputs a dataset with the predictions. To do this, I will use a Python recipe component. After that is working and bug-free, I’ll convert it to a plugin.
I’ll start by configuring my recipe with one input (our prepared data) and two outputs (a dataset holding our predictions and a managed folder where we can store other modeling artifacts), as shown below.

After clicking “create recipe,” Dataiku will take me to the “code” tab of the recipe, where it will generate a starter script for me.
Using NeuralProphet requires selecting a code environment that has the package installed, as it is not included in the base Dataiku code environment. You can select an available environment by navigating to the “advanced” tab of the recipe.

If you don’t have an environment with NeuralProphet installed, it’s time to embark on a side quest to create a new code environment.

Code environments can be created from the administration section of Dataiku, assuming you have the correct privileges. Below are the important bits of the environment I used to get NeuralProphet up and running.

Now that our hero has returned from the side quest, I’ll blend Dataiku’s starter code with code for the most basic of NeuralProphet models straight from their Github ReadMe.
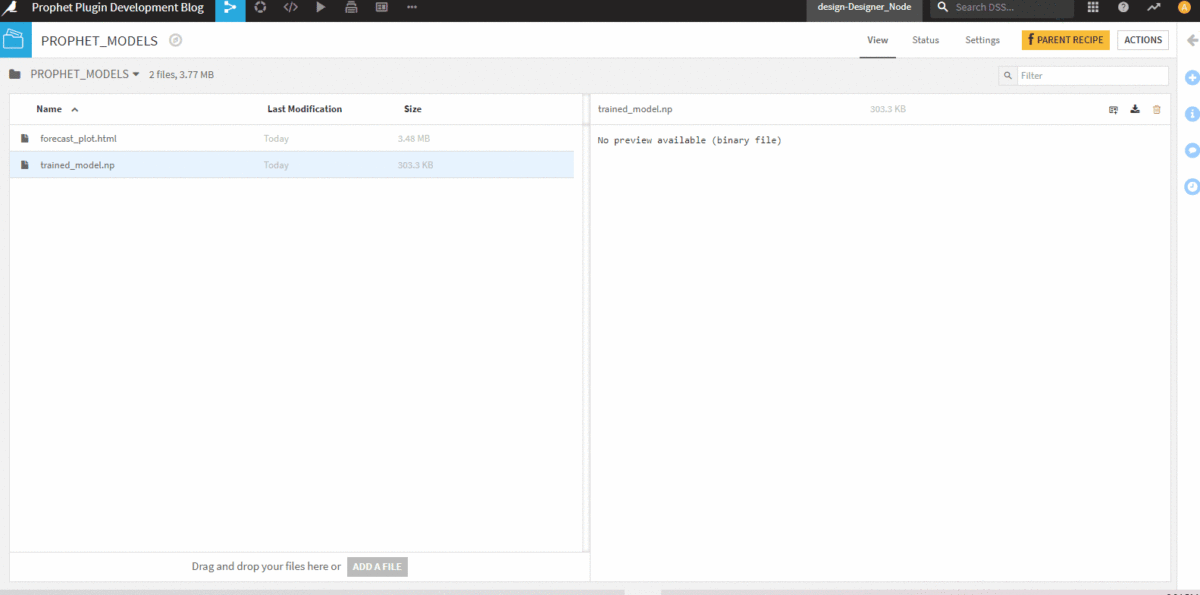
I’m going to train a model, generate some forecasts and a plot, and then save the plot and model to my managed folder, as well as output the forecasts to a new dataset in Dataiku.

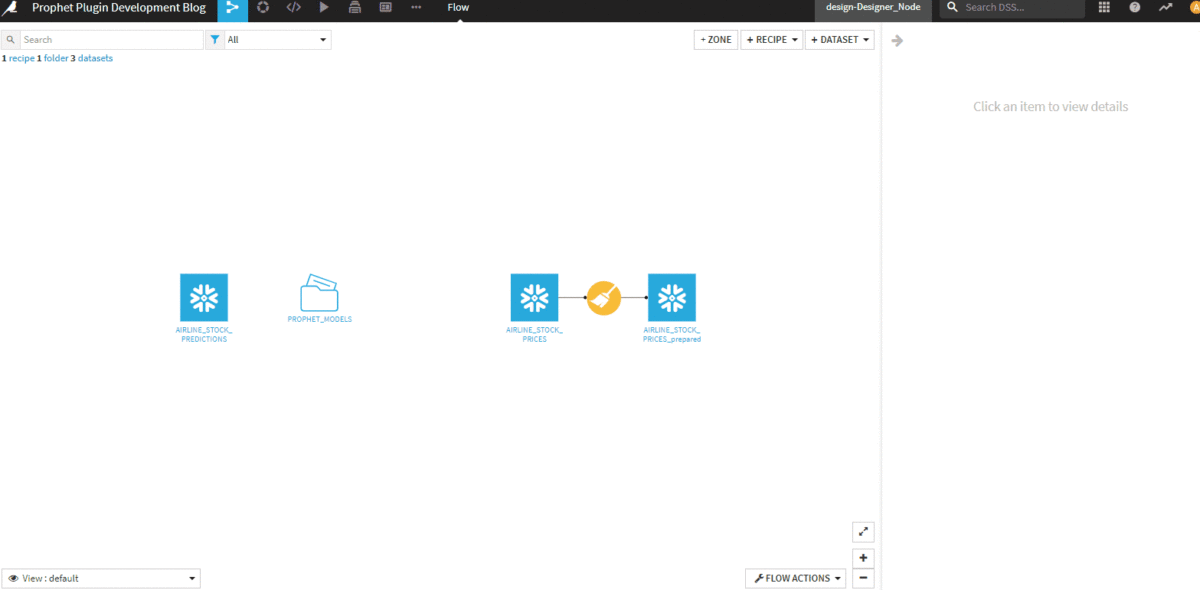
After running the recipe, the flow should now look like this.

Within the folder, I have a binary file with the model and an HTML file containing an interactive plot of the forecast.
In the predictions dataset, I have a datetime column, the actual stock closing price for dates that are in the past, my prediction for the stock closing price, and the trend and seasonality components of the forecast.

A Note on Optimizing Dataiku Flows with Snowflake
While our current example requires minimal preprocessing, your real data might require a series of joins, aggregations, filters, column creation, etc. Dataiku supports pushing the computation down to the database for these common operations, just like we did in our prepared recipe above.
What is unique about Snowflake with Dataiku is that it allows you to specify a role and warehouse for each recipe. That means a recipe with complex logic could utilize a larger-sized warehouse than a simpler recipe that doesn’t require the same computational power.
Additionally, about a dozen processors in the prepare recipe support Snowflake pushdown but not pushdown with other databases. This allows for in-database computation with Snowflake, right where the data lives, while other data sources will need to be streamed, leading to slower performance.
Converting my Code Recipe to a Simple Plugin
The code I wrote is useful but can’t be easily reused because all of the inputs, outputs, column names, and variables are hard-coded. Let’s fix that by converting it into a plugin and replacing some of the hard codings with objects our future users can configure.
From within our recipe, click “Actions” and then “Convert to Plugin.”

You’ll be prompted for a plugin id and recipe id. I’ll give mine the values of “prophet-forecasting” and “train-prophet-models,” then click the “convert” button.
Parts of a Plugin
Dataiku will take us to the plugin development page, where it has generated a folder tree to get us started. The structure looks like this.

The custom recipes folder is where we’ll spend most of our time. A plugin can have multiple recipes, but each recipe will have one “recipe.py” and “recipe.json” file associated with it. The recipe.json file will dictate the user interface for the recipe (think inputs, outputs, and settings).
The recipe.py file is your custom code that processes the inputs, outputs, and settings that the user selected. Each plugin has one “plugin.json” file. Not to be confused with the recipe.json file, the plugin.json file just dictates what information appears in the Plugin section of Dataiku.
Creating our Recipe.json File
Dataiku provides a starter file that includes helpful comments to help you get going, but I’ll walk through different portions of the file in more detail.
Starting at the top of our file, the “meta” object controls the icon’s appearance when users pull the plugin into their flow and what text they’ll see when they click it. The key-value pair of “kind”: “PYTHON” simply states this is a Python recipe.
The inclusion of “selectableFromDataset” means the plugin will be visible in the right-side panel of Dataiku when a dataset is clicked. The reason it is set to “training_data” will become apparent in the next section.

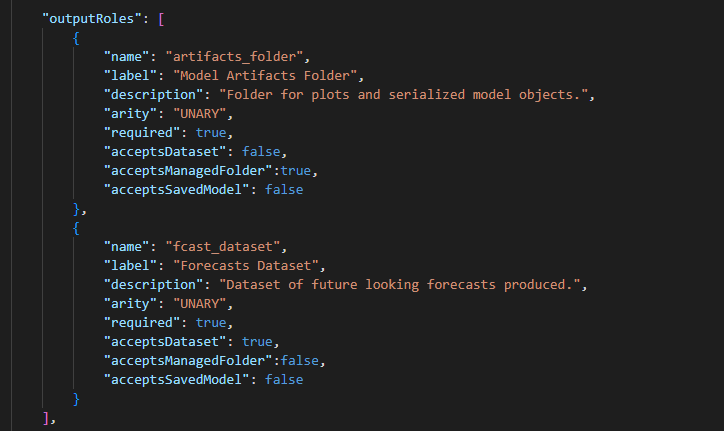
Moving further into our file, we reach the “inputRoles” section. The “inputRoles” key will take an array of objects containing the items we want as inputs to our recipe. For our example, there is just one dataset as an input. I’ve added the optional keys “acceptsDataset”, “acceptsManagedFolder,” and “acceptsSavedModel” to my file to decrease the likelihood of a user configuring things incorrectly and causing themselves unneeded headaches.
Any folders or models in the flow will not be selectable from the dropdown in the user interface this file produces. “arity” determines how many flow objects an input can accept. “Unary” is exactly one, and “Nary” is one or more. For our example, we’ll use “Unary” as it will accept exactly one dataset as input.

Moving further still into our file, “outputRoles” are configured exactly the same way as inputs. A plugin must have at least one output. For our example, we have two, the dataset of predictions and the folder containing our trained models and plots.
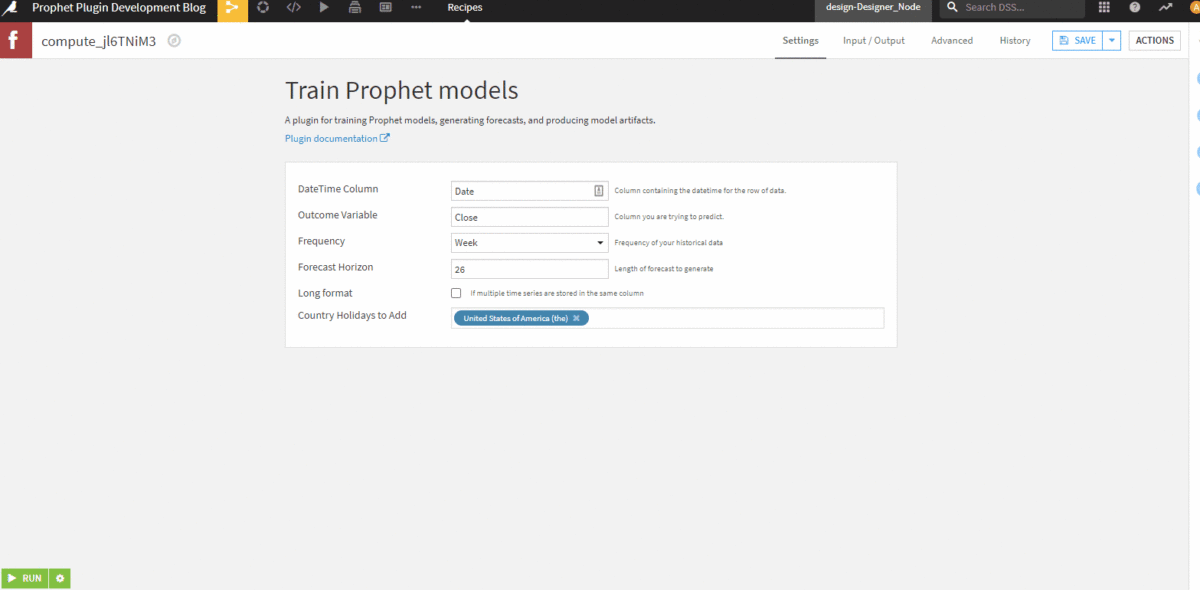
The next section of the recipe.json file is “params.” This section will show up as the “settings” tab when the end user is working with the plugin. There are a number of different options to give the end user, like the ability to select from a drop-down or enter free text. We’ll cover several examples in the remainder of this blog.
In our code, we hard-coded the names for the columns containing the DateTime value and stock closing price that we were trying to predict. I will make both of these values dynamically selectable from a drop-down with the code below.
Notice “columnRole” has a value of “training_data, ” one of our inputs. This is the dataset that column names will be pulled from for the drop-down.

We also hard-coded a weekly frequency for our series. In the future, someone may want to use this plugin for daily or monthly data. Here I want a single select of known values, so my “type” key has a value of “select.” The value for the “selectChoices” key is an array of all the possible labels and values I want.

…omitting some values for brevity

The forecast horizon will come next. Specifying a type of “INT” will allow my user to type a number as input. I’ll use this to remove the hard coding for how many future forecasts we want.

Finally, I’ll demonstrate using a Python function to generate drop-down choices. NeuralProphet has built-in holiday calendars for 120+ different countries, which is cool functionality, but far more options than I want to type out as I did above with options for series frequency.
I can create a Python function that returns a dictionary of all the choices instead. Outside of the params array in the JSON file, I’ll add the following.
I’ll then place my “get_holidays.py” file containing the function returning the dictionary of choices in a folder called resources. Dataiku expects this file location and also expects the name of your function within the file to be “do.”

Then in my recipe.json file, I add the key-value pair “getChoicesFromPython”: true.

We’ve finished the recipe.json file and are about 95% of the way to testing our plugin’s visual parts.
Creating our Plugin.json File
The plugin.json file is much less involved than the recipe.json. The keys are mostly self-explanatory. Tags are optional text values that help you navigate all the plugins installed on your DSS instance.

Testing the User Interface of our Plugin
At this point, our visual interface is done, and we can click around to ensure it works to our liking.
Updating the Recipe Code
Now that we have the visual portion of the plugin done, we need to rework our code to remove hard coding and accept all the inputs the user is selecting. In this first section of code, we see new imports from dataiku.customrecipe.
The get_input_names_for_role and get_output_names_for_role functions will allow us to work with our inputs and outputs from the recipe.json file, while the get_recipe_config function will allow us to access the params section of the file.
If you compare this code to our original code, you can see we’ve removed a hard-coded value for the dataset name, AIRLINE_STOCKS_prepared, and instead utilized the inputs.
Likewise, in the original code, we rename the column “close” to “y” and “Date” to “ds.” You can see in this code that “close” and “ds” have been replaced with references to the “y_variable” and “dt_column” parameters we created in our JSON file.

In the next section of code, we’ve added logic to include holiday regressors. The if-else statement and loop handle the fact that a user doesn’t have to select any countries to include holidays for but could include more than one. We can also see the removal of the hard-coded folder ID value in this section in favor of the folder input from the recipe.json file.

The final section is also nearly identical to the original code recipe, just removing AIRLINE_STOCK_PREDICTIONS and replacing it with the “fcast_dataset” output from the JSON file.

Creating a Dedicated Environment
The last item we need before being able to run the plugin is to associate a code environment to the plugin. I’ll add the following folders and files.

My desc.json file looks like this. If you’ve created a code environment in Dataiku through the user interface, all of these options will look familiar.

My requirements.txt file looks just like the “Requested packages” section of the user interface.

At this point, you should be able to run and test the plugin and produce predictions and a plot, just like we did with the code recipe.
Adding Multi-series Functionality to the Plugin
Earlier, we filtered our dataset to Delta Airlines so that we had just one series, but it makes sense for our plugin to be able to accept multiple time series so that we could generate forecasts for United and American Airlines as well. To do this, I’ll add two new parameters to my recipe.json file.
The first I’ll add has a type of “BOOLEAN.” In the user interface, this will translate to a check box. The second param I’ve added has a type of “COLUMNS.” This acts like the “COLUMN” type we used earlier but allows for multiple selections.
The other unique piece of this parameter is that I’ve used a visibility condition that references the boolean parameter above it. That means this will only show up if the user has checked the box.

Let’s save the file and take a look at our new user interface functionality.
Now let’s update our code to work with the new functionality we’ve added. It’s best practice to keep the “recipe.py” file relatively short, so to avoid it getting overly verbose, I will create a “helperfunctions.py” file to store a function I’m about to create.

In the file, I’m going to define a function that does my model training, forecasting, and plot generation for a singular time series. I’m adding an optional argument of “series_identifier.” If used, the argument will put my artifacts into subfolders within our managed folder to keep things tidy.

In my recipe.py file, I’ll add an import for my new function and then utilize it in an if-else block that will handle if the user selected no columns as a series identifier or if they selected one or more.

At this point, I can remove the Delta filter and re-run my recipes. When I examine my outputs, I’ll see that my predictions dataset now contains a series_id column and forecasts for all three airlines.

My managed folder now has subfolders for each airline.


What’s Next?
At this point, you have a functional NeuralProphet plugin that could be reused with different datasets and use cases, but you might want more functionality.
After reading this blog, you have the skills to add external features, cross-validation, a hyperparameter grid-search, performance metrics, more plotting, etc., but if that’s not something you want to tackle on your own, phData has a team of experts to help you not only with plugin development but with maximizing the value your organization gets from its investment in Dataiku.


