A great way to tie all of your Power BI reports together in your Power BI Service workspace is to create a great looking dashboard that can serve as a landing page either for a workspace or in an App. Although the standard options may be enough, I like to spice up my dashboards to make them a little more visually appealing. Keep reading to find out how I use PowerPoint to create Power BI dashboards using custom images and icons.
Step #1. Creating a Dashboard
First, let’s make sure that we are in alignment on what a dashboard in Power BI means. A dashboard in Power BI Service is a collection of different report elements found throughout the various reports published to your workspace. These report elements are chosen and then combined with images or text to create what we refer to as a dashboard. Lots of times this can be confusing as the term dashboard and report are often used interchangeably (although incorrectly when referring to Power BI).
Now, once you have created the desired reports in your workspace, click into the workspace where you want to create your dashboard. By default you will be shown which dashboards are available in your workspace. As you can see below I have already created a dashboard in this workspace. To create a new dashboard, click on the + Create button in the top right of the screen and select Dashboard.

This will take you to a blank screen. In order to add something to your dashboard, click on the + Add Tile button in your toolbar. This will give you a pop out selection of standard dashboard items (see below). You can then click on any of these items and add them to your dashboard. As you’ll see, some of the out of the box items are limited in their formatting and appearance, such as Images needing to be in a URL format. Later in this post I will show you how to get around this and create a more unique dashboard.

Lastly, go through the different reports that you might want to display on the dashboard and Pin those visuals. To do this, hover over the parts of the reports that you want included on the dashboard and click the pin icon. This will bring up the menu belong asking where you want to pin the section of the report to. In the example below, this ribbon chart would be pinned to my already exiting Spencer’s Dashboard. Whichever chart elements you choose will be added to your dashboard ready for you to format to your liking.

Once you have pinned all your desired content, format the sizing of each element to fit together in a nice neat dashboard. To resize a dashboard element, make sure to click on the bottom right hand corner and drag it to your desired size.
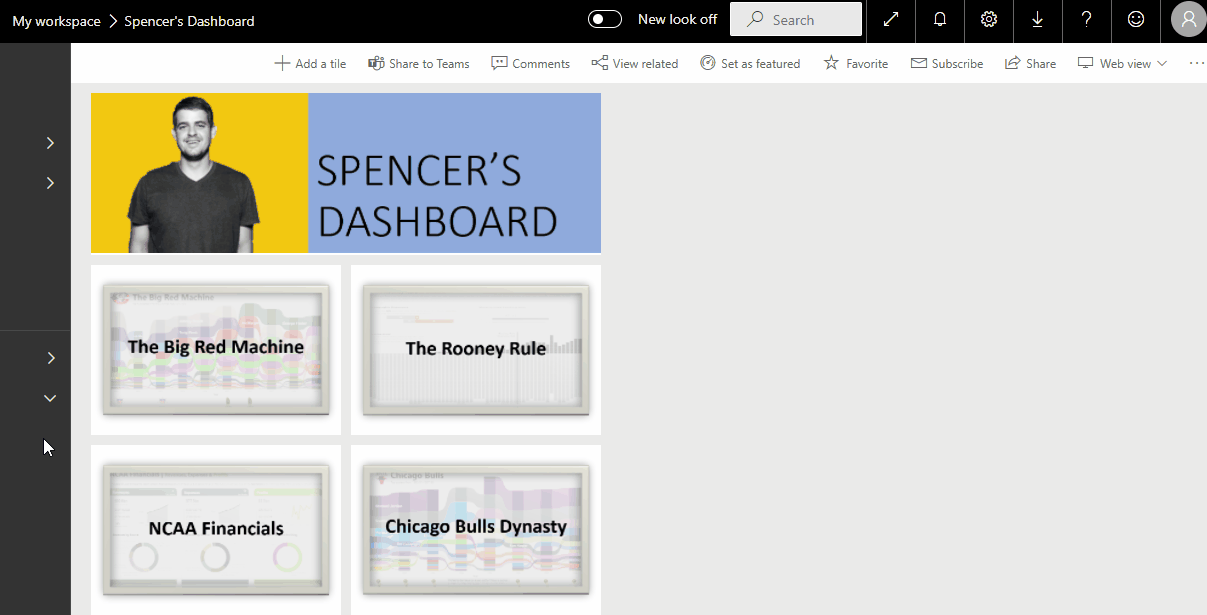
Step #2. Creating Dashboard Images
If you click on the Image icon when adding a dashboard tile you will quickly learn that the image needs to be in URL format in order to render in Power BI Service. Although this is not optimal, there is a way around this. Because we are using this dashboard as a landing page, we will be using custom images to navigate us to our other reports within the workspace or App.
To create the images that will be used to navigate to your reports, first open PowerPoint. Because you are creating these custom images, you have virtually infinite possibilities of what they’ll look like. In the screen shot below I created icons for four reports that will be featured on my landing page. In this instance, I used screenshots of the actual reports. If you have company branded icons or illustrations those could go nicely here.

To get these images in URL format you must save them to an external site of some sort where you can reference the images via URL. My go to site for this is imgbb.com. An account is free and retrieving your embedded URLs is easy. If you use this site, upload your image and then navigate to Embed Codes and then use the Direct Links.

Once you’ve created all of your custom images, including your title banner, go back to the dashboard in Power BI Service.
#3. Finalize Landing Page
For all the reports that you want accessible via your landing page, add the appropriate images into the dashboard using the URL links from your website. Images in Power BI dashboards allow navigation actions that will take you to your desired report upon clicking the image. In the edit details section for each tile make sure to click Set Custom Link and then choose Link to a dashboard or report in the current workspace. This is where you will be able to choose what report each image will take you to.

After you have assigned all of the landing page images appropriately, go back to your dashboard and test out the actions. To make interaction better, you can also add an action in those reports using images or shapes that will direct you back to the landing page dashboard link.