Let’s be real: your old-school SQL Server is probably holding your data hostage. In a world that runs on AI, machine learning, and real-time analytics, sticking with a legacy system is like trying to win a Formula 1 race with a tractor. It’s slow, expensive, and just can’t keep up with the demands of modern data processing. The operational overhead, licensing costs, and limited scalability of traditional on-premise SQL Server instances are becoming increasingly prohibitive. Migrating to a modern, cloud-native platform like Snowflake AI Data Cloud isn’t just an upgrade; it’s a strategic necessity for businesses looking to unlock the true potential of their data and maintain a competitive edge.
The game-changer here is Snowflake Openflow, a revolutionary native tool designed to simplify and accelerate the entire migration process. Openflow cuts out the complexity, the need for multiple third-party vendors, and the chaotic manual efforts often associated with database migrations. It provides a streamlined, end-to-end solution that minimizes risks, reduces downtime, and ensures data integrity.
In this blog, we’ll explore the compelling reasons why this migration is not only beneficial but also critical for your organization’s future. We’ll then provide a detailed, step-by-step guide on how to leverage Openflow to make this transition seamlessly, transforming what was once a daunting task into a manageable and efficient project.
Finally, we’ll equip you with phData’s invaluable pro tips and best practices, forged from extensive experience, to ensure your SQL Server to Snowflake migration is not only successful but also executed flawlessly and optimized for long-term performance.
What is Snowflake Openflow, and Why Does it Matter?
Think of Snowflake Openflow as Snowflake’s built-in, no-drama data mover. It’s a fully managed integration service, built on tech Snowflake picked up from Datavolo and powered by Apache NiFi under the hood, all living right inside the Snowflake ecosystem. The goal is simple: move data from point A (your old SQL Server) to point B (Snowflake) without the usual pain.
For years, a lot of companies have been stuck on legacy SQL Server setups that come with their own set of problems:
Performance Bottlenecks: SQL Server’s old-school model, where compute and storage are glued together, just can’t keep up with modern data workloads. As the data grows, everything slows down — fast.
Sky-High Costs: It’s not just the licensing that hurts. You’re also paying for hardware, power, cooling, and never-ending maintenance to keep an on-prem setup alive.
Scalability Nightmares: Need more power? That usually means expensive hardware upgrades, planned downtime, and way more pain than it should ever take.
This is where Snowflake flips the script. It’s cloud-native by design and built to fix exactly these problems. Storage and compute are decoupled, so you get crazy scalability and solid performance. On top of that, you get strong security, a pay-only-for-what-you-use pricing model that actually makes sense, and the freedom to run on any major cloud.
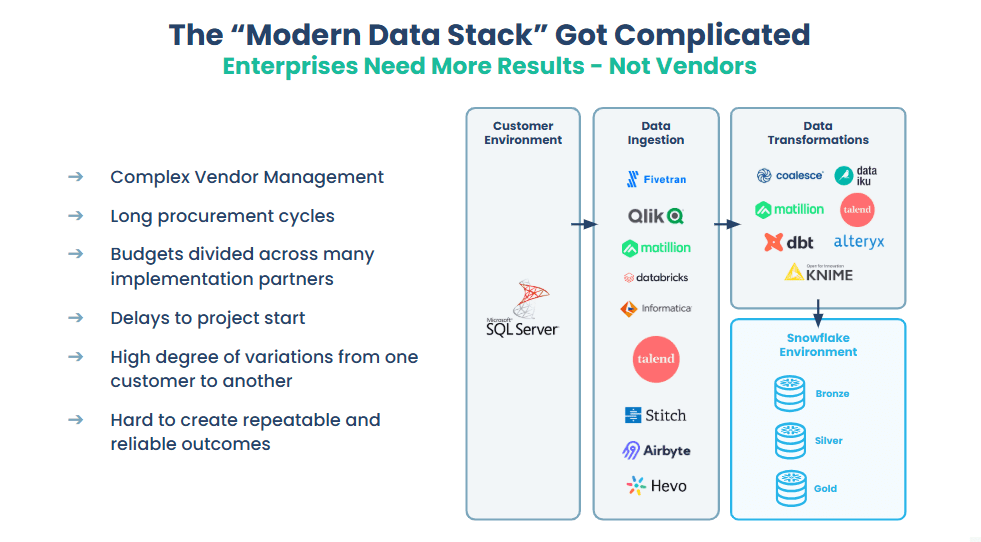
The so-called “modern data stack” tried to fix this, but ended up creating a new mess — a tangled web of third-party tools just to ingest and transform data. That vendor sprawl makes things harder to manage, slows projects down, and leads to flaky results.
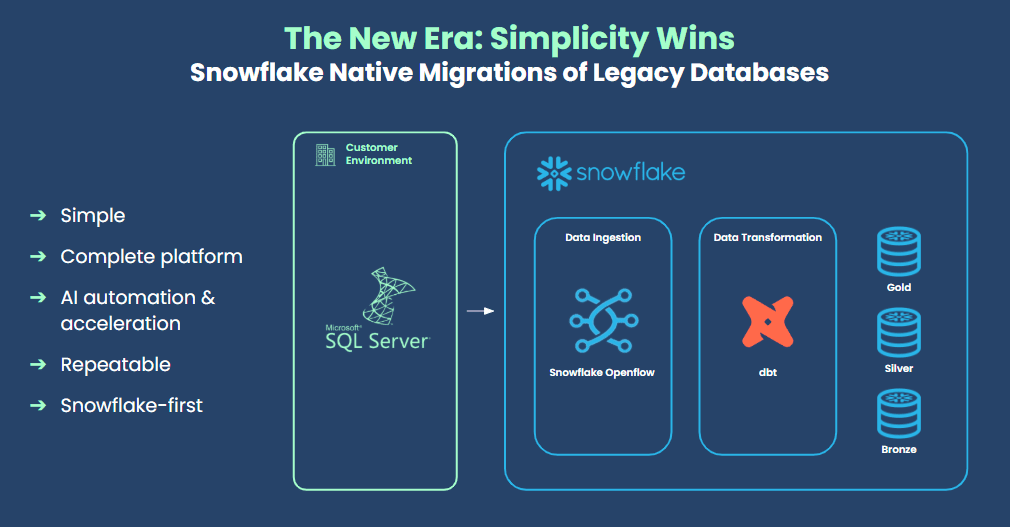
Openflow cuts through all that noise. It simplifies the setup by pulling data ingestion straight into Snowflake, giving you a clean, repeatable, and genuinely Snowflake-first platform.
Modern data stack architecture:
New Era data stack architecture:
Important Questions to Consider Before Migrating
How long do migrations typically take from SQL Server to Snowflake with Openflow?
A typical project can range from 3 to 12 months, depending on the complexity of your current setup. The biggest time-suck is usually rewriting all the old T-SQL code, not the data movement itself.
How long does it take with an expert like phData?
With an expert partner leveraging powerful automation, you can slash that timeline. We’ve streamlined migrations that would have taken years to complete manually, knocking them out in a matter of months. For one regional bank, we translated over 1,400 ancient stored procedures and redesigned their architecture in just six months, a timeline that would have been impossible without our automation toolkit.
Are there any prerequisites I should know before migrating?
Absolutely. On the SQL Server side, Change Tracking has to be enabled at the database level and on every table you want to replicate — there’s no workaround here if you want OpenFlow’s real-time sync to work. You’ll also need a dedicated SQL user with the right permissions.
On the Snowflake side, you just set up a destination database, a warehouse, and a service user using key-pair authentication so OpenFlow can connect securely.
How to Migrate from SQL Server to Snowflake Using Openflow
Here’s the playbook for getting your data flowing. We’re focusing on the core data migration using Openflow’s Change Data Capture (CDC) connector.
Step 1: Assess and Prepare the SQL Server Source
Before you touch Openflow, you must prepare your source SQL Server.
We have a SQL Server hosted in AWS RDS, with a Database called “AdventureWorksDW” and a schema called “Medical”. We will create tables in this schema and populate them with some values.
					-- 1. Create Patients table (ADD CONSTRAINTS)
CREATE TABLE Medical.Patients (
    PatientID      INT IDENTITY(1,1),
    Name           VARCHAR(100),
    DateOfBirth    DATE,
    PostalCode     VARCHAR(20)
);
GO

-- 2. Create Appointments table (ADD CONSTRAINTS)
CREATE TABLE Medical.Appointments (
    AppointmentID   INT IDENTITY(1,1),
    PatientID       INT,
    AppointmentDate DATE,
    AppointmentTime TIME
);

-- 3. Inserting values into the tables
INSERT INTO Medical.Patients (Name, DateOfBirth, PostalCode)
VALUES
('Emily Johnson',   '1992-03-10', '55401'),
('Rajesh Patel',    '1983-07-18', '55111'),
('Sophia Williams', '2000-11-25', '55344'),
('Carlos Martinez', '1975-02-14', '55016'),
('Meena Reddy',     '1988-06-30', '55455'),
('David Brown',     '1969-01-05', '55121'),
('Fatima Noor',     '1995-10-11', '55454'),
('Akash Verma',     '1998-08-19', '55303'),
('Grace Lee',       '1987-05-07', '55604'),
('Omar Abdullah',   '1993-12-20', '55792');

INSERT INTO Medical.Appointments (PatientID, AppointmentDate, AppointmentTime)
VALUES
(1, '2025-11-20', '09:00'),
(2, '2025-11-20', '10:30'),
(3, '2025-11-20', '14:15'),
(4, '2025-11-21', '11:00'),
(5, '2025-11-21', '15:45'),
(6, '2025-11-21', '16:30'),
(7, '2025-11-22', '12:45'),
(8, '2025-11-22', '09:30'),
(9, '2025-11-22', '10:15'),
(10, '2025-11-23', '14:00');
Inventory and Identity: First, identify exactly which tables you need to replicate (In this Migration, we are using these tables:
Medical.Patients,Medical.Appointments).Enable Change Tracking: The SQL Server Openflow connector relies on Change Tracking (CT), not the native SQL Server CDC feature. You must enable this at both the database and table levels.
					-- Enable Change Tracking at the database level (with 2 days retention for example)
ALTER DATABASE AdventureWorksDW
SET CHANGE_TRACKING = ON
(CHANGE_RETENTION = 2 DAYS, AUTO_CLEANUP = ON);

-- Enable Change Tracking on the specific table(s) you want to replicate
ALTER TABLE Medical.Patients
ENABLE CHANGE_TRACKING
WITH (TRACK_COLUMNS_UPDATED = ON);

ALTER TABLE Medical.appointments
ENABLE CHANGE_TRACKING
WITH (TRACK_COLUMNS_UPDATED = ON);
Note: Run these commands on the source SQL Server to enable Change Tracking. This allows OpenFlow to capture inserts, updates, and deletes on the Patients and Appointments tables for CDC.
For SQL Server, we need to enable Change Tracking.
For MySQL, we need to enable Bin Log.
For PostgreSQL we need to enable Logical replication.
Create a Service User: For security, create a dedicated, low-privilege SQL user for Openflow. This user needs
SELECTpermission on the tables andVIEW CHANGE TRACKINGpermission.
					-- Step 1: Create a dedicated SQL Server login for OpenFlow.
-- This ensures replication does not use an admin or elevated account.
CREATE LOGIN OpenFlowUser WITH PASSWORD = 'StrongPasswordHere!';


-- Step 2: Switch to the target database where the medical tables exist.
USE AdventureWorksDW;

-- Step 3: Create a corresponding database user mapped to the login.
-- Without this, the login cannot access objects inside the database.
CREATE USER OpenFlowUser FOR LOGIN OpenFlowUser;


-- Step 4: Grant required permissions on the Patients table.
-- SELECT allows OpenFlow to read data.
-- VIEW CHANGE TRACKING is required for incremental CDC-based replication.
GRANT SELECT ON Medical.Patients TO OpenFlowUser;
GRANT VIEW CHANGE TRACKING ON Medical.Patients TO OpenFlowUser;


-- Step 5: Grant the same permissions on the Appointments table.
-- Only the minimum privileges needed for replication are provided.
GRANT SELECT ON Medical.Appointments TO OpenFlowUser;
GRANT VIEW CHANGE TRACKING ON Medical.Appointments TO OpenFlowUser;
Step 2: Prepare the Snowflake Target Environment
Next, set up the landing zone in Snowflake.
Create Objects: Create a dedicated database for your replicated data (e.g.,
SQL_SERVER_CDC) and a warehouse (e.g.,OPENFLOW_WH) that the connector will use to merge data.Create Service User & Role: Best practice is to create a specific service user and role for Openflow.
					-- Use the admin role to create all required OpenFlow objects
USE ROLE ACCOUNTADMIN;

-- Create the destination database (replace with your own Database_Name)
CREATE DATABASE IF NOT EXISTS Database_Name;

-- Create a warehouse that the connector will use for CDC operations
CREATE WAREHOUSE IF NOT EXISTS MEDICAL_CDC_WH
    WITH WAREHOUSE_SIZE = 'SMALL'
    AUTO_SUSPEND = 60
    AUTO_RESUME = TRUE;

-- Create a dedicated role for the OpenFlow CDC agent
CREATE ROLE MEDICAL_CDC_AGENT;

-- Create a service user that OpenFlow will use for authentication
CREATE USER MEDICAL_CDC_AGENT
    PASSWORD = 'Notused'
    TYPE = SERVICE
    COMMENT = 'Service user for OpenFlow connector';

-- Assign the role to the service user
GRANT ROLE MEDICAL_CDC_AGENT TO USER MEDICAL_CDC_AGENT;

-- Grant the role access to the target database you provided above
GRANT USAGE ON DATABASE Database_Name TO ROLE MEDICAL_CDC_AGENT;
GRANT CREATE SCHEMA ON DATABASE Database_Name TO ROLE MEDICAL_CDC_AGENT;

-- Allow the connector role to use and operate the warehouse
GRANT USAGE, OPERATE ON WAREHOUSE MEDICAL_CDC_WH TO ROLE MEDICAL_CDC_AGENT;
Set Up Key-Pair Authentication: Openflow connects using a secure key pair, not a password. Generate an RSA key pair, assign the public key to your new service user, and keep the private key handy.
					-- Generate keys (e.g., via OpenSSL), then apply the public key
ALTER USER MEDICAL_CDC_AGENT
  SET RSA_PUBLIC_KEY = '-----BEGIN PUBLIC KEY...';
Most importantly, we need to create a network rule and an external access integration. When creating the runtime in Openflow, we must attach this EAI to it; otherwise, we may encounter a connection error.
					-- Create an egress network rule (replace with your own names/values)
CREATE OR REPLACE NETWORK RULE <YOUR_DATABASE>.<YOUR_SCHEMA>.ALLOW_OPENFLOW_EGRESS
    MODE = EGRESS
    TYPE = HOST_PORT
    VALUE_LIST = ('0.0.0.0')   -- placeholder for allowed outbound hosts
    COMMENT = 'Allows OpenFlow to reach external data sources';

-- Create an External Access Integration using the network rule
CREATE EXTERNAL ACCESS INTEGRATION OPENFLOW_EAI
    ALLOWED_NETWORK_RULES = (<YOUR_DATABASE>.<YOUR_SCHEMA>.ALLOW_OPENFLOW_EGRESS)
    ENABLED = TRUE;

-- View available External Access Integrations
SHOW EXTERNAL ACCESS INTEGRATIONS;

-- Update the network rule with actual endpoints
ALTER NETWORK RULE <YOUR_DATABASE>.<YOUR_SCHEMA>.ALLOW_OPENFLOW_EGRESS
    SET VALUE_LIST = (
        '0.0.0.0',
        '<your-database-endpoint>:1433'
    );
Step 3: Deploy and Execute the Openflow Connector
Now for the main event—deploying and running the SQL Server → Snowflake pipeline using Openflow.
Launch OpenFlow in Snowflake
In Snowflake, navigate to Ingestion > Openflow to open the Openflow canvas.
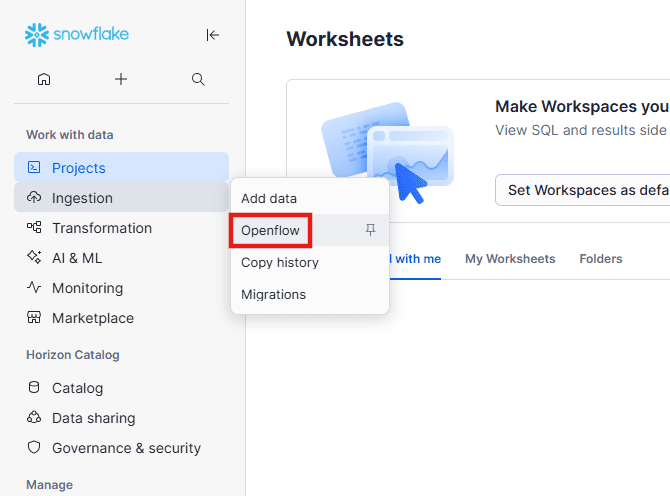
Click Launch Openflow.
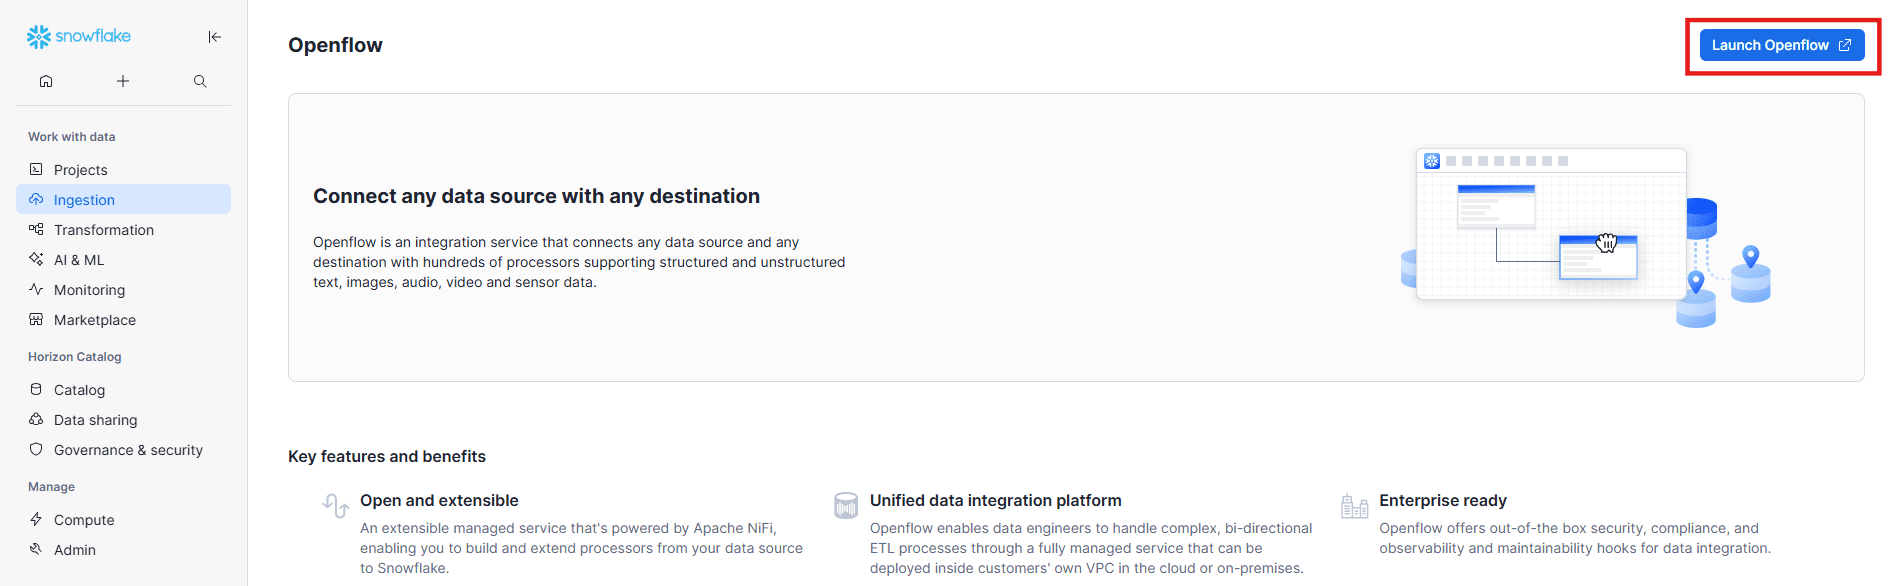
Once clicked, you’ll be redirected to the Openflow control plane.
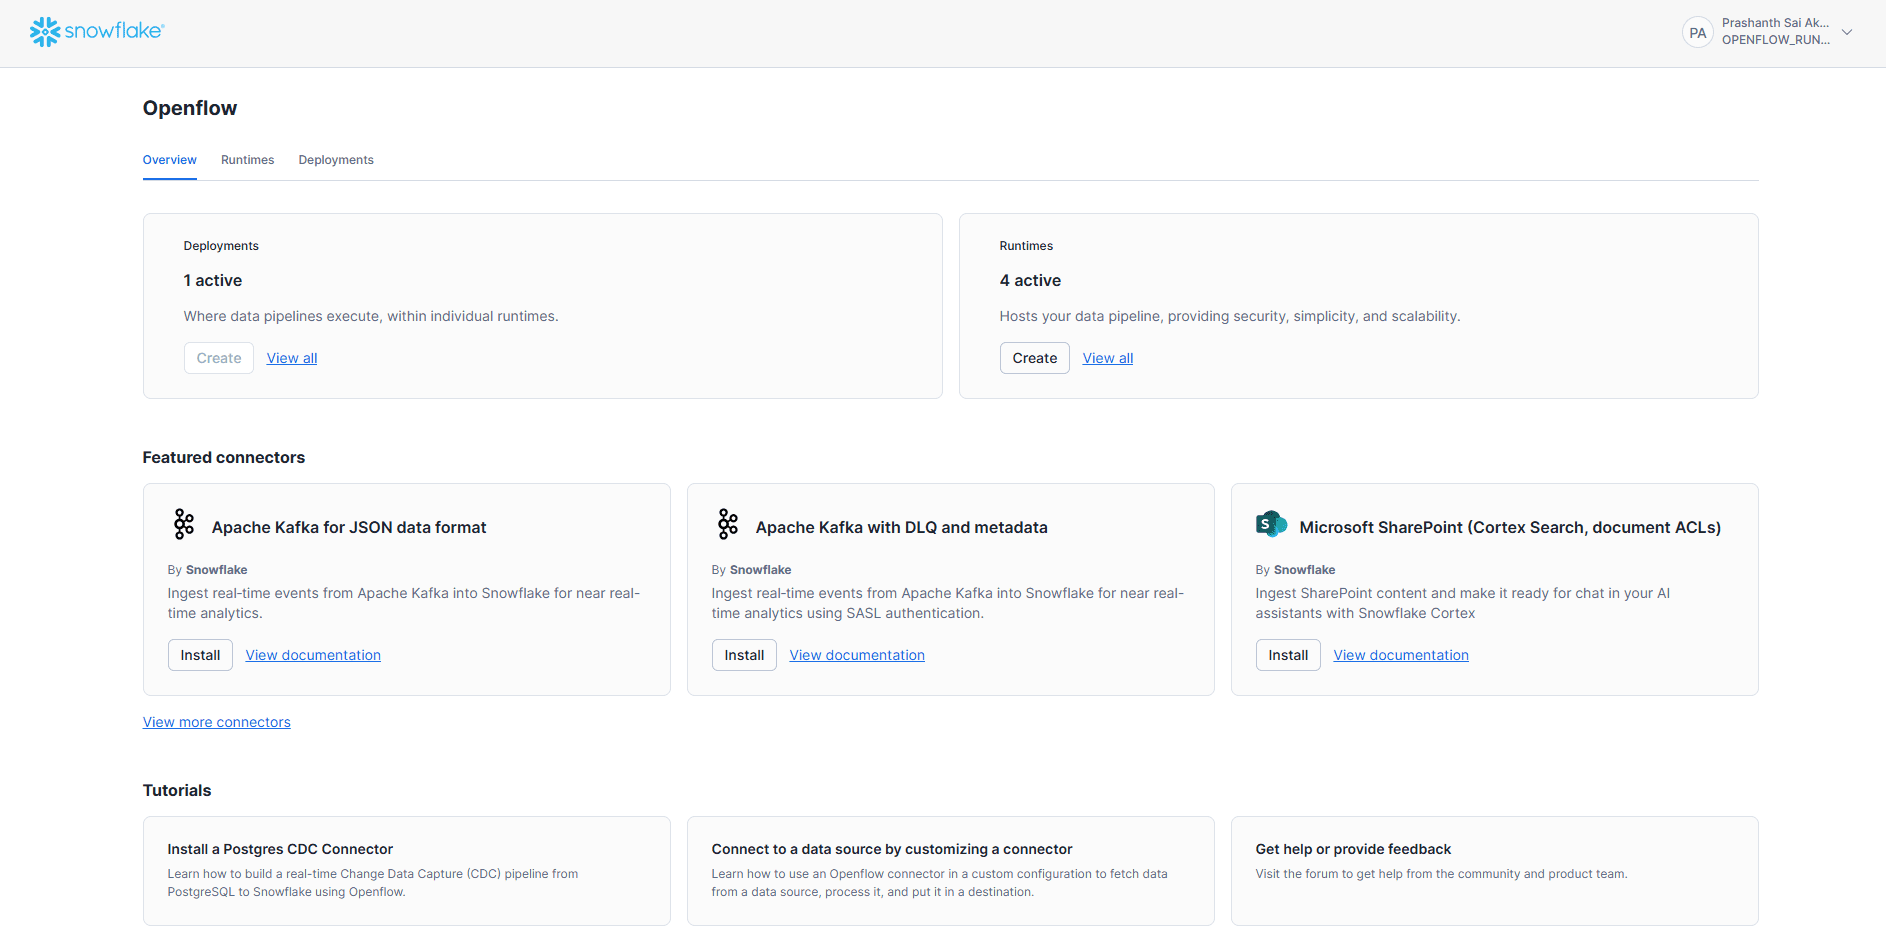
Before proceeding, ensure you already have a deployment and a runtime set up in Openflow. If you don’t, you can create them from the Openflow control plane:
Go to Deployments in the Openflow control plane.
Click Create Deployment.
Give it a name and select Snowflake as the destination.
Save the deployment.
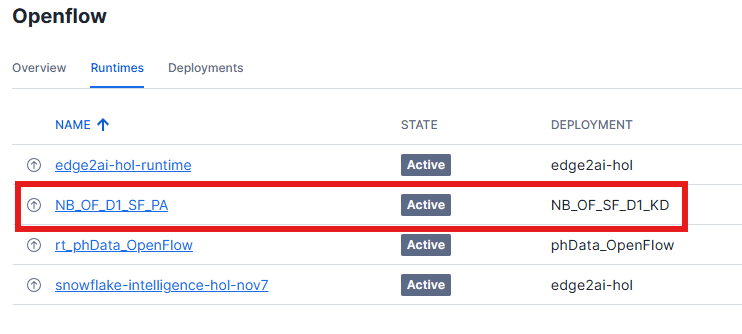
Navigate to Runtimes.
Click Create Runtime.
Assign the deployment you created.
Provide a friendly name and confirm creation.
Provide the external access information for Snowflake Openflow deployment.
Snowflake’s Openflow deploy-mode requires you to explicitly allow external domains so connectors can communicate securely.
This involves creating a
NETWORK RULE(withTYPE = HOST_PORT,MODE = EGRESS) listing allowed domains/ports.Then you associate that rule with an
EXTERNAL ACCESS INTEGRATION, enabling the specified runtime to use those domains.
After these steps, your runtime will appear as available for connector installations.
For this guide, I’m using an existing runtime and deployment.
Add the SQL Server Connector to Your Runtime
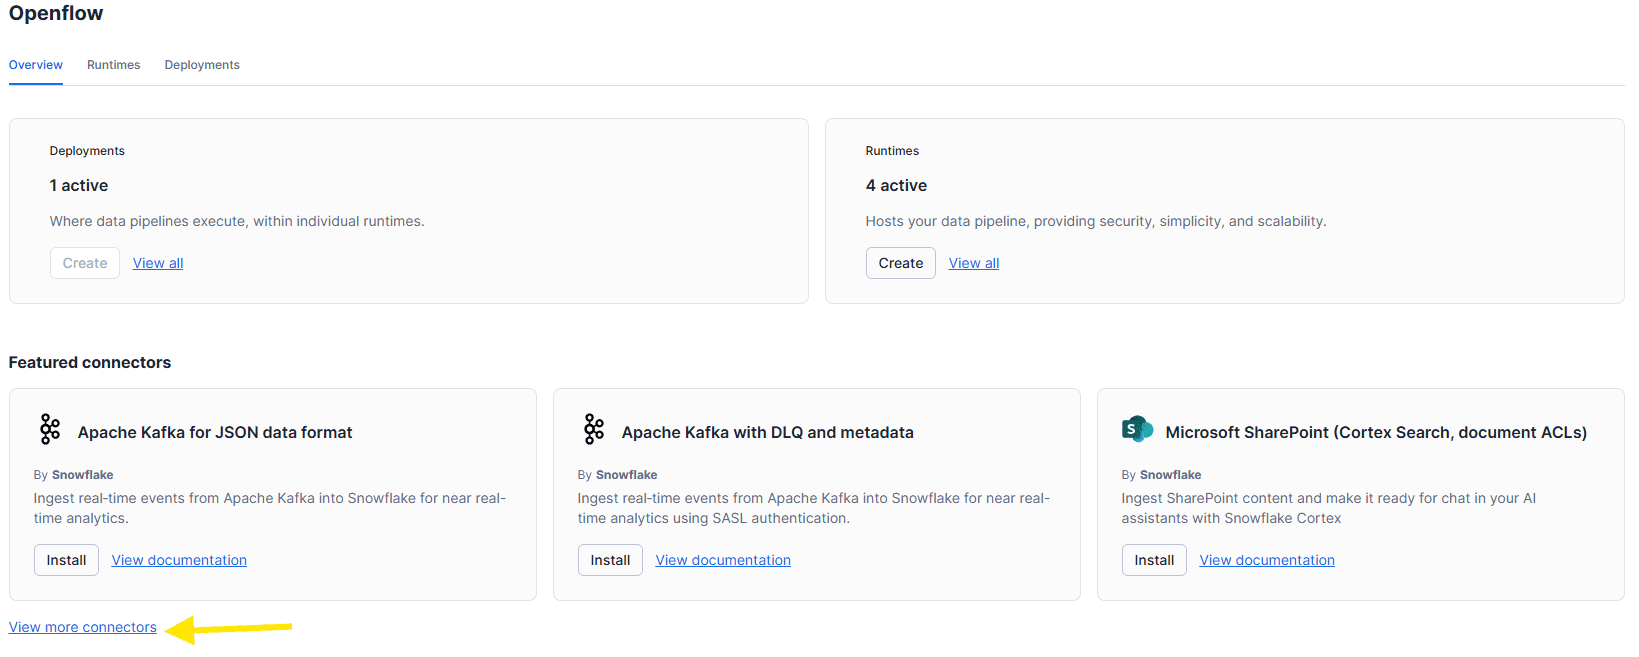
From the Openflow overview page, click View more connectors to open the full catalog.
Select Openflow connector for SQL Server,
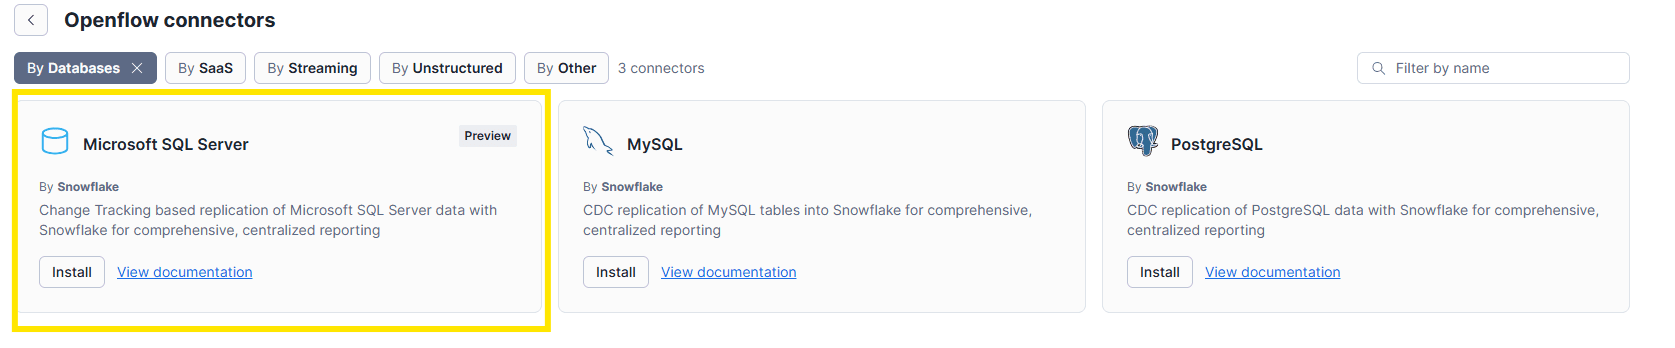
Click Add to runtime, choose your runtime, and confirm.
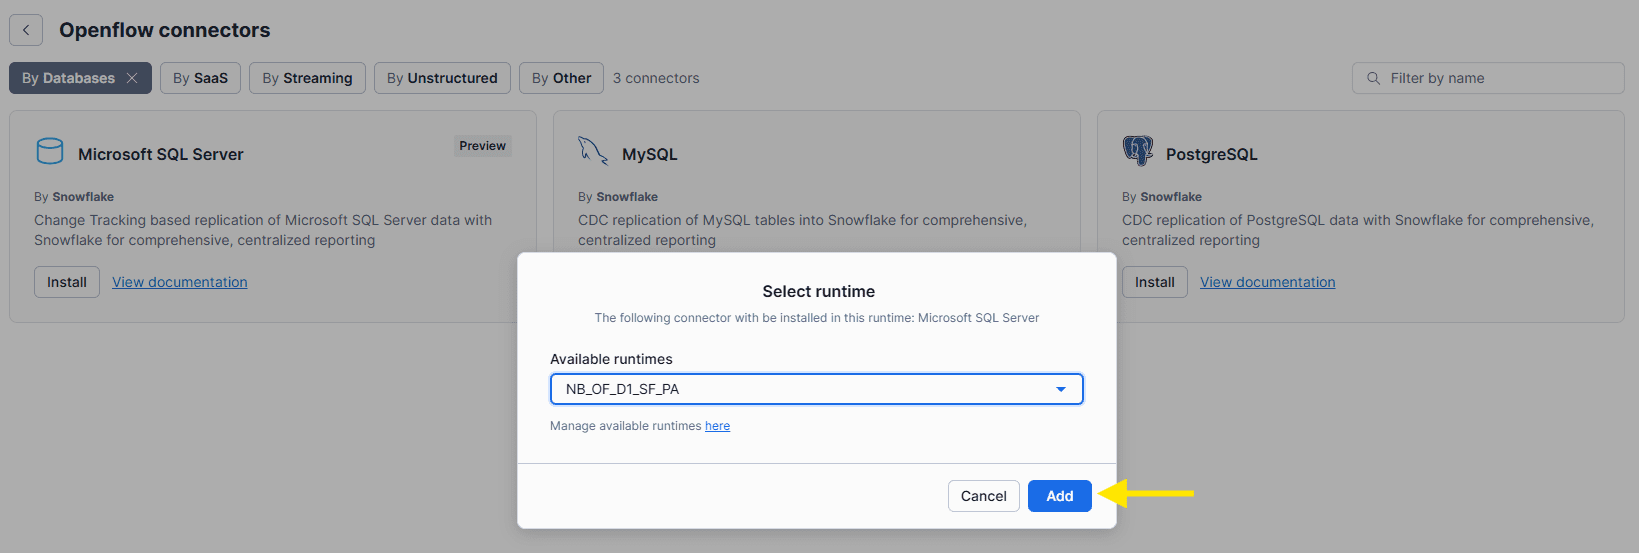
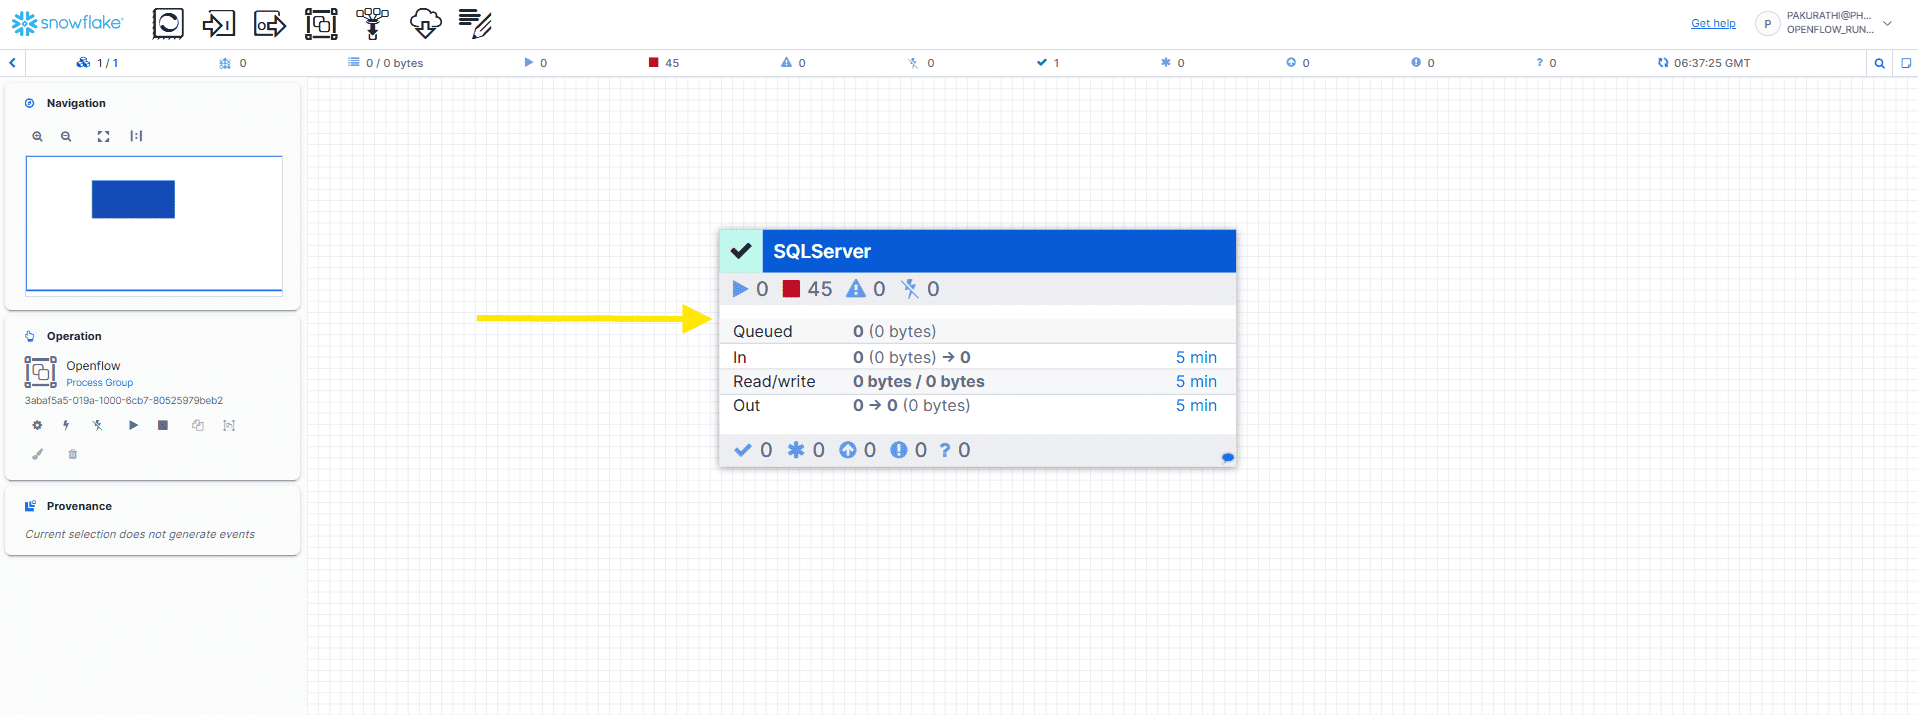
Openflow will now deploy the connector template into your runtime.
This may take a minute, and you may see a loading indicator.
Once deployed, you’ll see a new process group on the canvas; this is the packaged SQL Server to Snowflake connector.
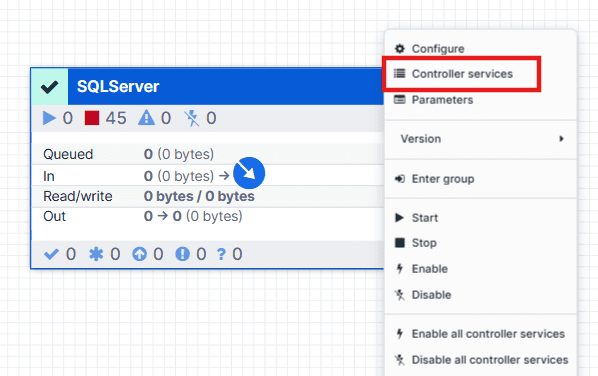
Configure Connector Parameters
Right-click the Connector Process Group and select Parameters.
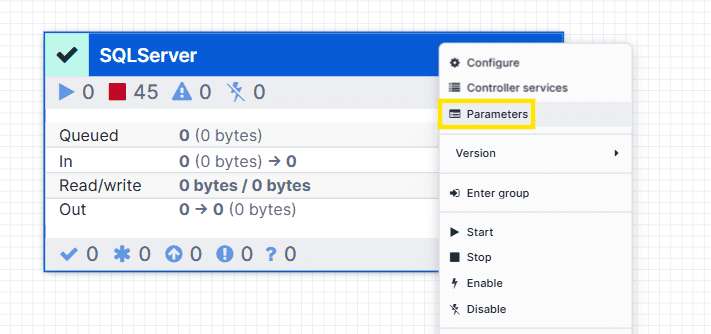
There will be multiple sections you need to fill out.

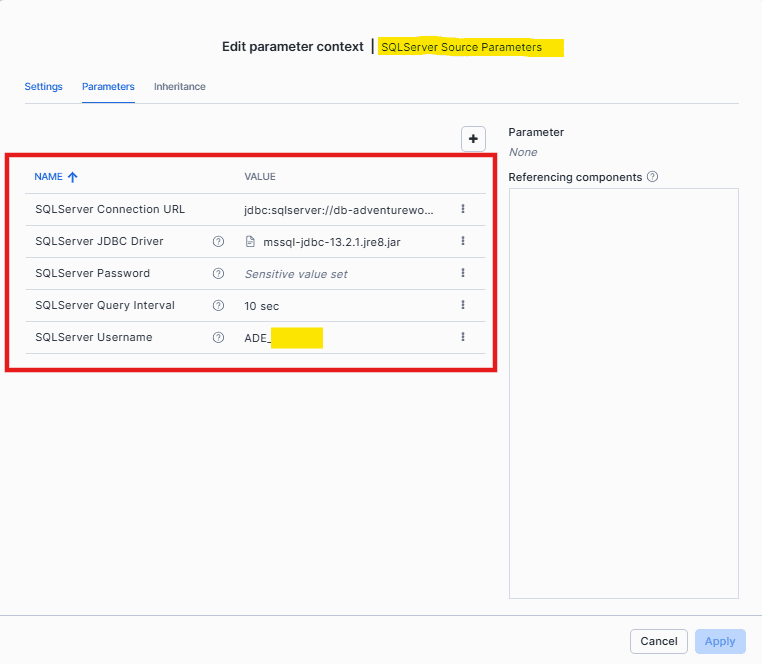
1. SQL Server Source Parameters
Provide your SQL Server connection details:
SQL Server Connection URL
The JDBC connection string to your SQL Server.
Example:
jdbc:sqlserver://<hostname>:1433;databaseName=<YourDB>;encrypt=true;
SQL Server JDBC Driver
Upload the SQL Server JDBC driver JAR if it isn’t already available.
In Openflow, you can simply enable the Reference assets option and upload the driver file directly.
Link to the latest JDBC Driver file.
SQL Server Username & Password
Use the SQL service user you created earlier in Step 1.
Provide the Details here and click Apply:
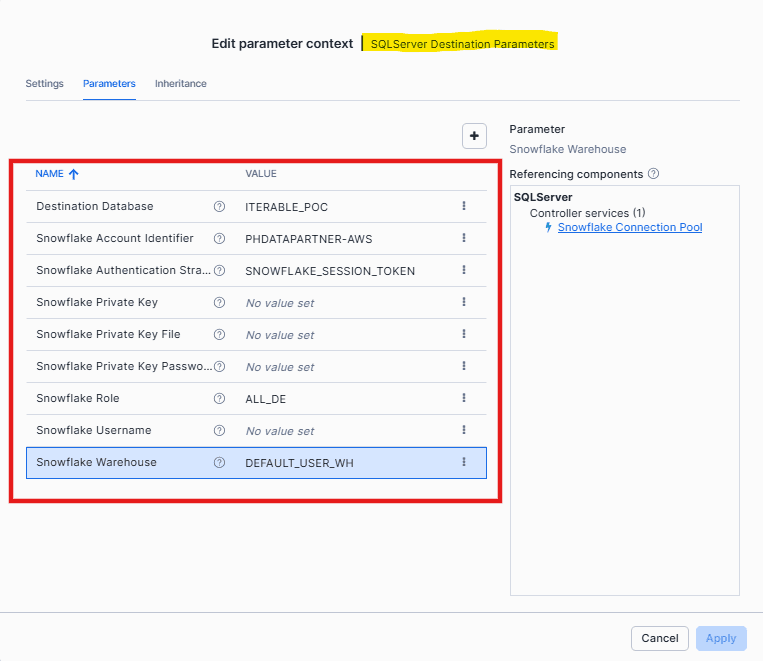
2. Snowflake Destination Parameters
Define how data will be written to Snowflake
Snowflake Account Identifier
Example placeholder:<your-account-identifier>Snowflake Authentication Strategy
We are usingSnowflake Session Tokenas the authentication method.Snowflake Username & Role
Example placeholder:<your-service-user>/<your-role>Snowflake Warehouse
Example placeholder:<your-warehouse>Destination Database
Example placeholder:<your-target-database>
Provide the details and click Apply:
3. Snowflake Ingestion Parameters
-
Included Table Names: Provide a comma-separated list of fully qualified tables you want to replicate (e.g.,
Medical.patients). -
Included Table Regex: Use a regular expression to match tables for replication (e.g.,
Medical.*to capture all tables in theMedicalschema). -
Filter JSON: Provide a JSON array that defines which columns should be included during replication.
-
Merge Task Schedule CRON: Specify the
CRONexpression that controls when merge operations run. For continuous merges, use* * * * * ?.
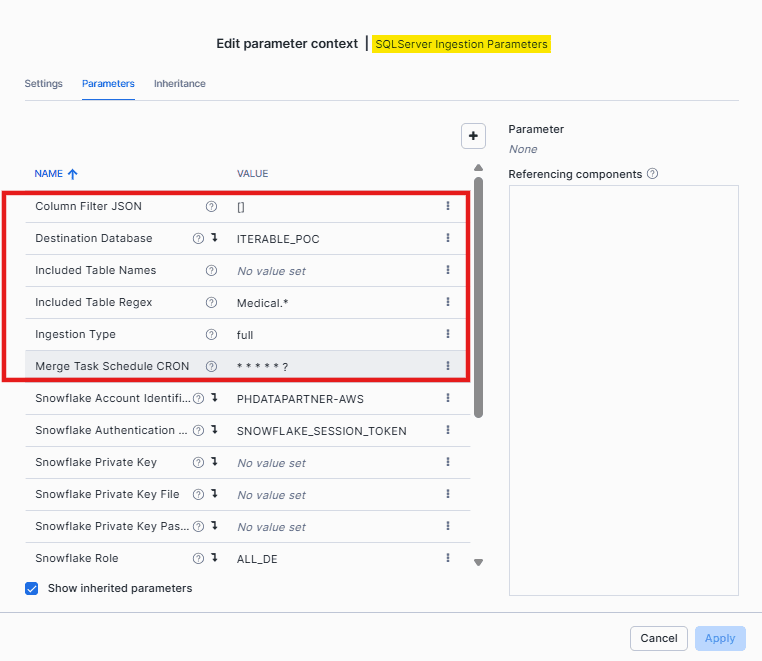
Once you have filled in all the required parameters, click Apply. The connector now has everything it needs to talk to both the source and the target. However, it still won’t start pulling data until you specify which tables to replicate. After you add that, the connector knows it needs to sync the Medical table.
Verify Connection Pools
For Verifying the Source and Destination connections:
Go to Canvas and right-click on SQL Server Process Group, then select Controller Services.
1. SQL Server Connection Pool
Navigate to SQL Server Connection Pool, click on View configuration.
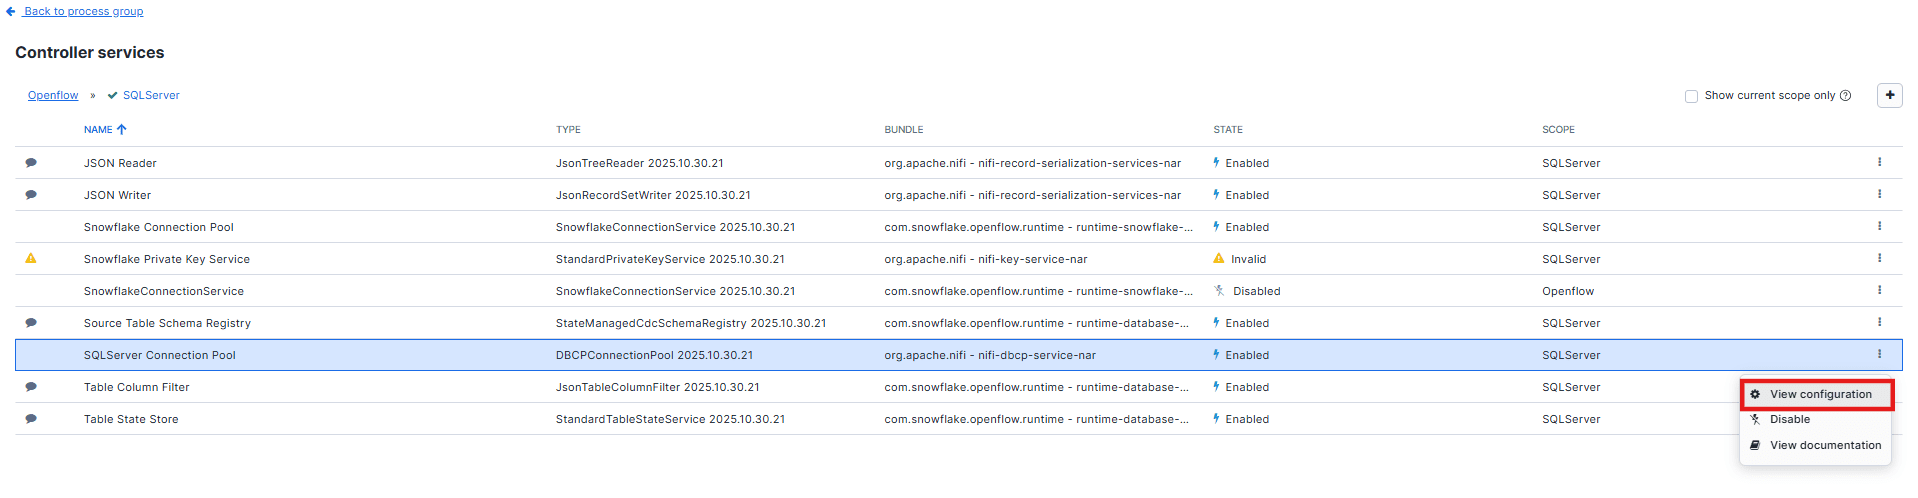
On the Properties tab, you’ll see a Verification checkmark; use it to validate that the connection is working. (Need to disable this service before verification.)
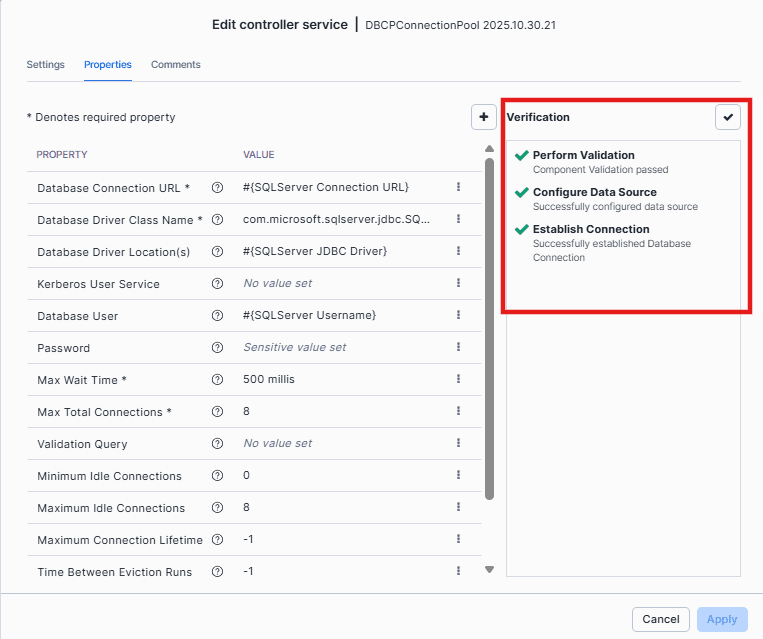
After verification, you’ll see that the connection is successful.
2. Snowflake Connection Pool
Similarly to the SQL Server Connection pool, navigate to Snowflake Connection Pool, and click on Edit configuration.
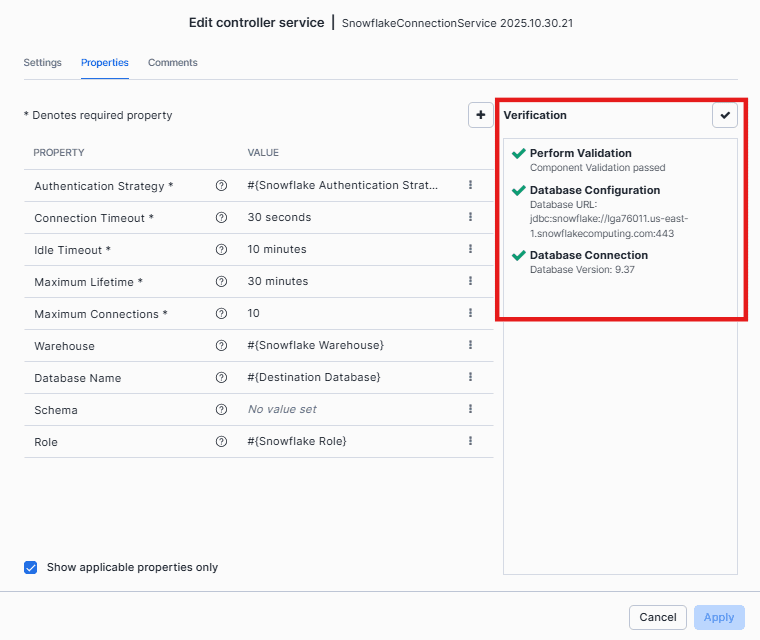
After verification, you’ll see that the connection is successful.
Now we’ve confirmed that both the source and destination connections are successfully established.
Run the Connector
Once all the parameters are configured, right-click the Resource Group and proceed with the next action.
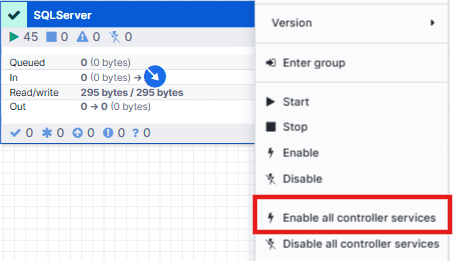
1. Enable All Controller Services
Before the flow can function, Openflow requires its underlying controller services, such as JDBC connection pools or Snowflake integrations, to be active. Right-click anywhere on the canvas background and select the Enable all controller services option. This ensures that all required services are initialized and ready for use.
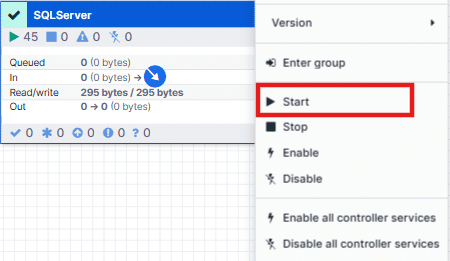
2. Start the Connector
Next, start the SQL Server connector itself. Right-click the SQL Server Connector Process Group and choose Start. This action activates the full pipeline, allowing the connector to establish communication with both SQL Server and Snowflake and begin its replication workflow.
3. Inspect the Running Connector
Double-click the Connector Process Group to view its internal components. You will notice three sub–process groups, each indicated with a green play icon to confirm that their processors are running. By drilling into these groups, you can observe every stage of the pipeline, from data extraction to transformation to loading, providing full visibility into how records move from the source system to Snowflake.
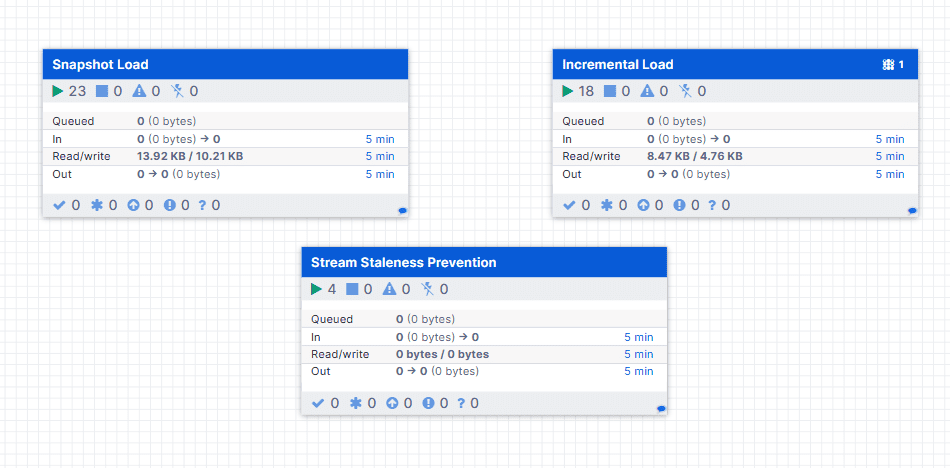
Snapshot Load:
The connector copies all data available in the source table into the destination table. The connector pulls everything from the source table and dumps it into the destination table. If this step fails, replication straight-up stops. Once it’s done successfully, the source data is fully available in the destination table.Incremental Load:
The connector tracks changes in the source table and applies those changes to the destination table. This process continues until the table is removed from replication. Failure at this stage permanently stops replication of the source table, until the issue is resolved.Stream Staleness Prevention: It is an automated maintenance feature that keeps Snowflake change-tracking streams active. It ensures the incremental pipelines remain active and healthy.
Step 4: Validate the Live Data Flow
The connector performs an initial load on the first run, which copies all existing data into Snowflake and automatically creates the schema and tables, and then transitions to continuous sync using SQL Server Change Tracking.
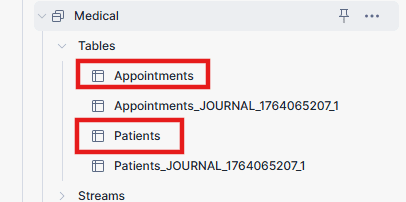
In Snowflake, you’ll see both the main target table and a system-generated journal table. Whenever there is change in the source tables, these changes are first recorded in journal tables, and the connector then applies merges or deletes operations to the final table.
These journal tables and streams are fully managed by Openflow and are required for reliable CDC. Do not modify or remove them.
The connector will perform an initial load of your tables. Once that’s done, it will continuously poll for changes.
You can test it in seconds:
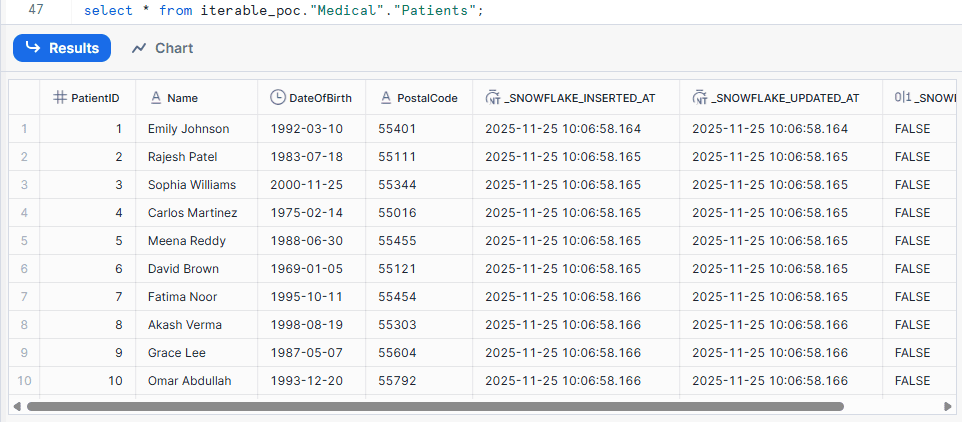
This is the data in Snowflake before performing the insert statement to test the CDC replication
Make a Change in the Source: In the source SQL Server, insert a new row into the
Medical.Patientstable or update an existing row’s amount.For Example:
					INSERT INTO Medical.Patients (Name, DateOfBirth, PostalCode)
VALUES
('John Carter', '1992-03-10', '55401');
This change will be captured and replicated to Snowflake in a short period of time.
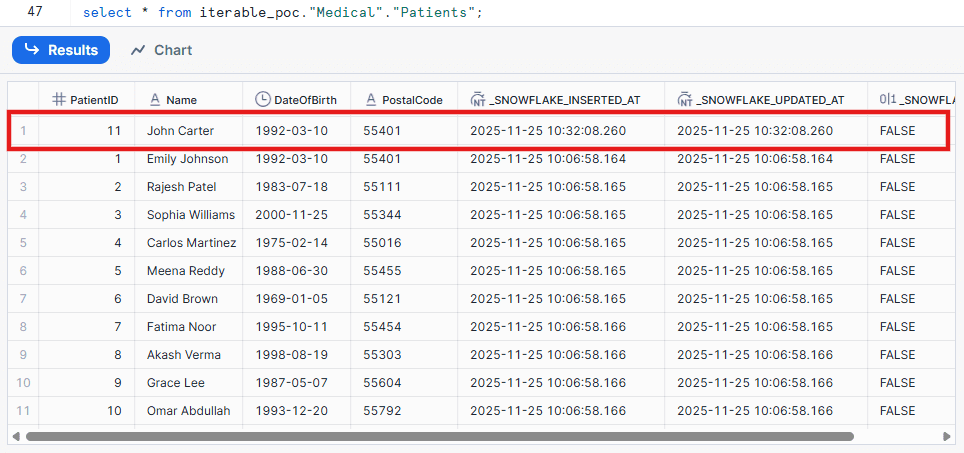
Verify in Snowflake: Query the target Medical tables in Snowflake. Within a minute (based on your CRON schedule), the inserted record will appear in the patient’s journal table inside the Medical schema.

You’ll also see the same record reflected in the main Patients table, confirming that the merge operation completed successfully.
That’s it. You now have a live, real-time data pipeline streaming from your on-prem SQL Server directly into Snowflake, all managed natively.
Best Practices
-
Security is Non-Negotiable: As shown, never use your
ACCOUNTADMINcredentials. Always create minimal-privilege service users on both the SQL Server and Snowflake sides. Always use key-pair authentication for Snowflake. -
Tune Your Merge Schedule for Cost: Running the merge CRON schedule continuously (
* * * * * ?) gives you near-real-time data but will keep your Snowflake warehouse active. If you only need data refreshed hourly or daily, adjust the schedule (e.g.,0 * * * ?for hourly) to save significant credits. - Embrace Automation (The phData Way): Openflow is fantastic for ingestion, but enterprise migrations are complex. This is where the phData Toolkit shines. It provides the automation and observability layer on top of your Snowflake environment to help manage, monitor, and scale your new pipelines, ensuring your migration is not just a one-time project but a long-term success.
Closing
Don’t let your legacy SQL Server dictate the pace of your business. Migrating to Snowflake is the single best move you can make for your data strategy, and SQL Server Openflow has removed the traditional complexity of getting it done. You can build a robust, real-time, and native pipeline in hours, not months.

Ready to stop wrestling with old tech and start innovating?
phData’s experts are here to help. We encourage readers to attend one of our free SQL Server Workshop sessions to get started.
FAQs
Can Snowflake Openflow connect to an on-premise SQL Server database?
Yes. Openflow isn’t just for cloud sources. It can connect to your on-premise SQL Server as long as there is a network path. This typically involves configuring your firewall to permit a secure connection from the Openflow service or utilizing a secure gateway.
What's the difference between SQL Server Change Tracking (CT) and Change Data Capture (CDC)?
This is a crucial distinction. The pre-built SQL Server Openflow connector specifically uses Change Tracking. CT is a lightweight feature that simply indicates which rows have changed (Insert, Update, Delete). Native SQL Server CDC is a heavier, more complex feature that captures the full history of row changes in separate change tables. For this connector, you only need to enable Change Tracking.