Automation is increasingly used in modern applications and is applied to a wide range of tools and services, enabling solutions we have never seen before. When technologies interact seamlessly, they expand the possibilities for creating sophisticated environments where teams can focus on value-added tasks while technology handles the heavy and repetitive work. With this in mind, Microsoft offers the Power Automate application to design optimized and automated workflows to enhance efficiency and drive productivity.
By integrating Power Automate workflows with your Power BI report, you can develop robust business solutions and automate processes such as updating data, sending data driven alerts, requesting approvals, and more.
In this blog, we will walk you through how to integrate Power Automate workflows with Power BI.
What is the difference between Power BI and Power Automate?
Power BI and Power Automate are part of the Microsoft Power Platform, Power Apps, Power Pages, and Copilot Studio. While each serves a specific purpose, they are all designed to simplify the development of technological solutions.
In this blog, we’ll focus on Power BI and Power Automate. To clarify their roles:
Power BI is a business intelligence tool for analyzing and visualizing data. It allows users to create reports and dashboards from various data sources.
Power Automate, on the other hand, is designed for workflow automation. It helps users automate repetitive tasks across different apps and services, making processes easier and faster. Automated workflows are called Flows, and to create one, the user defines what action should happen when a specific event occurs.
While Power BI helps organizations understand their data, Power Automate increases efficiency by automating manual tasks.
Why integrate Power Automate with Power BI?
Integrating Power Automate with Power BI enhances process efficiency by automating repetitive tasks, allowing more time for value-added business activities. With this integration, users can benefit from being empowered to trigger business actions and create more dynamic and efficient processes based on the data provided. Additionally, data presented in the dashboard can be shared and enriched, allowing for more informed and timely decision-making.
We can connect Power Automate with Power BI from both platforms.
In Power Automate, different triggers can be set—such as a specific day or time, receiving an email or Teams message, and more—to initiate the flow, which can then connect to your published Power BI report to act.
In Power BI, users can start a flow manually by using a button within the report, triggering on-demand actions such as sending reports or initiating workflows.
There are three types of flows in Power Automate, each defined by how they are triggered:
Automated Flows: Triggered automatically by specific events, such as receiving an email, updating a file in SharePoint, or when a Power BI alert is activated.
Instant Flows: Manually triggered by the user, often through a button on a platform. For example, sending a filtered report in Power BI to a manager with a single click.
Scheduled Flows: Run at specified times or intervals, such as sending a report summary to your team at the end of each week.
On the Power Automate website, you can explore various pre-built templates for all flows that integrate Power Automate with Power BI and many other connectors. Below are some of the most commonly used Power BI workflows, but many others can be found or built from scratch:
Trigger a flow with a Power BI data-driven alert;
Send an email to any audience when a Power BI data alert is triggered;
Add rows to a dataset in Power BI after approval on Microsoft Form submission;
Update Power BI dataset when a SharePoint file is updated;
Update an Excel table from Power BI;
Send a Teams message from Power BI;
Create an item for a SharePoint list from Power BI;
Save a Power BI paginated report to OneDrive for Business;
Save a Power BI paginated report to a SharePoint Online folder;
Trigger a Power BI button with a custom action.
By integrating these two tools, users can:
Send alerts and notifications when specific data conditions are met in the Power BI service.
Trigger workflows based on Power BI data.
Use Power BI buttons to initiate actions like sending emails or updating datasets.
Automate dataset refreshes at specific intervals.
Export Power BI data to other platforms like SharePoint or OneDrive.
Automate report distribution across teams.
With more possibilities to optimize, automate, orchestrate, and scale solutions, users can simplify processes across the organization, saving time and focusing on what matters.
These end-to-end solutions can also be achieved using over 300 Microsoft and third-party connectors, such as SharePoint, Outlook, Teams, and many others, all of which can connect with Power Automate and Power BI.
How to Integrate Power Automate with Power BI
In our example, we’ll start our workflow from Power BI, where the trigger will always be a button within the Power BI report.
We will use an Expense Report as an example to demonstrate how to send customized approval request emails to department managers by integrating Power Automate with Power BI. Below are the steps to create a Power Automate workflow.
1. Include Power Automate for Power BI view in the report
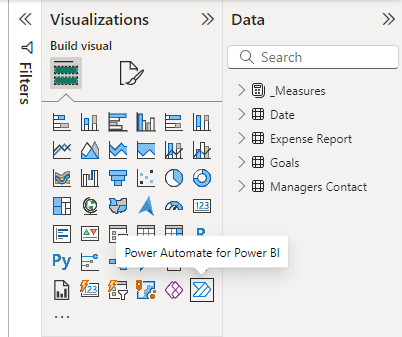
With the Expense Report open in the Power BI desktop, select Power Automate for the Power BI icon in the Visualization panel.
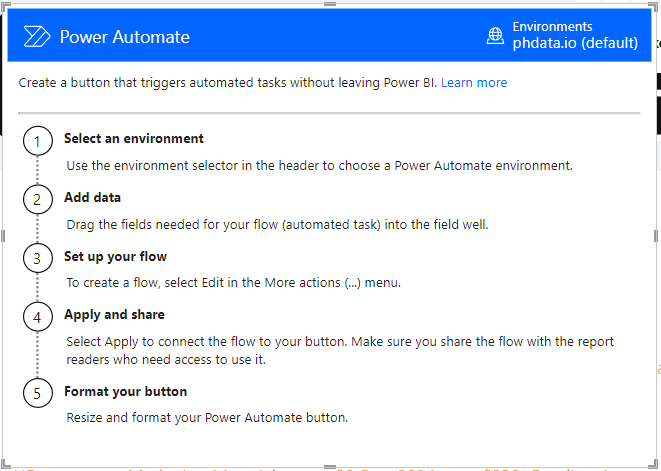
In the open visualization, you will find the following steps. Below, you can see how this will appear in our example
2. Add data
In this example, we want each manager to receive only the information for their department. We’ll use a column from the Manager Contact table, the Manager Email. The Managers Contact table should have a relationship with the fact table to allow filtered results.
Additionally, we will include fields to compose the rest of the email, which can be either columns or measures. In our case, we are selecting Department, Request Description, Value Amount, Goal for the Current Month, and Expenses for the Current Month.
Drag and drop all the fields needed to compose our email into the Build visual section.
3. Set up your flow
Click on the three dots above the visual and select Edit.
To create your flow, you can either use one of the Power BI templates on the page or create a new one from scratch. In our example, we are using the latter.
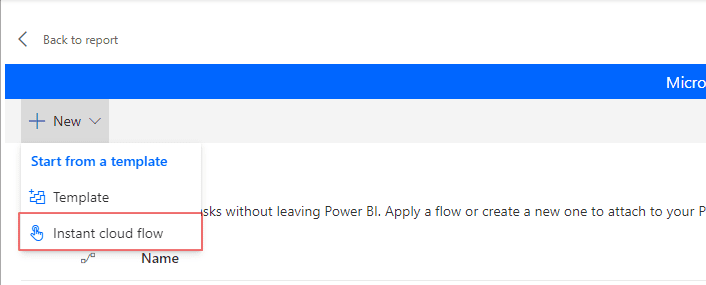
Click on + New and then Instant Cloud Flow.
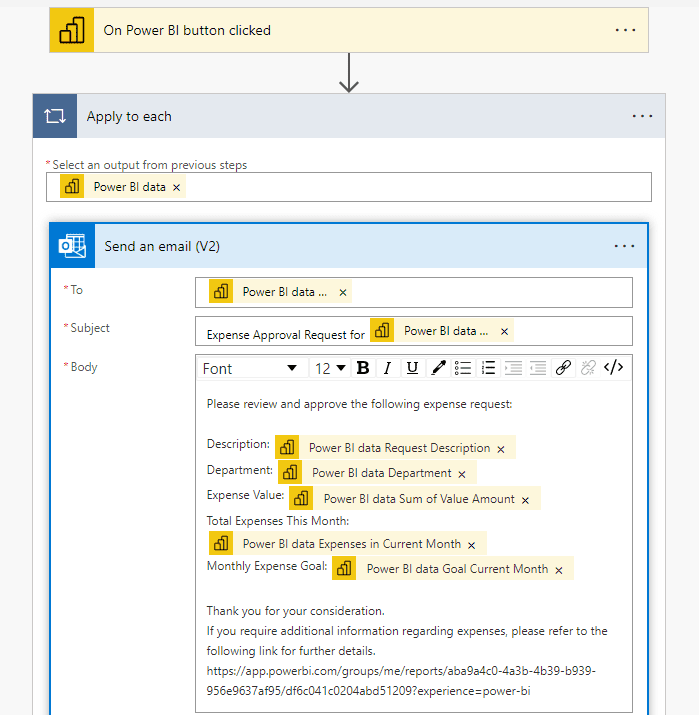
The default trigger is when the Power BI button is clicked.
To include the next action, select the + New step, search for the email, and click on it.
You may be required to log in to your Microsoft account if you haven’t already done so.
Fill in all the requested fields.
Once you include a column with contact email information for several departments, it automatically creates an Apply to each condition.
In the requested fields, you can include variables in both the subject and the body of the email.
4. Apply and share
After filling in the fields, click on Save and Apply.
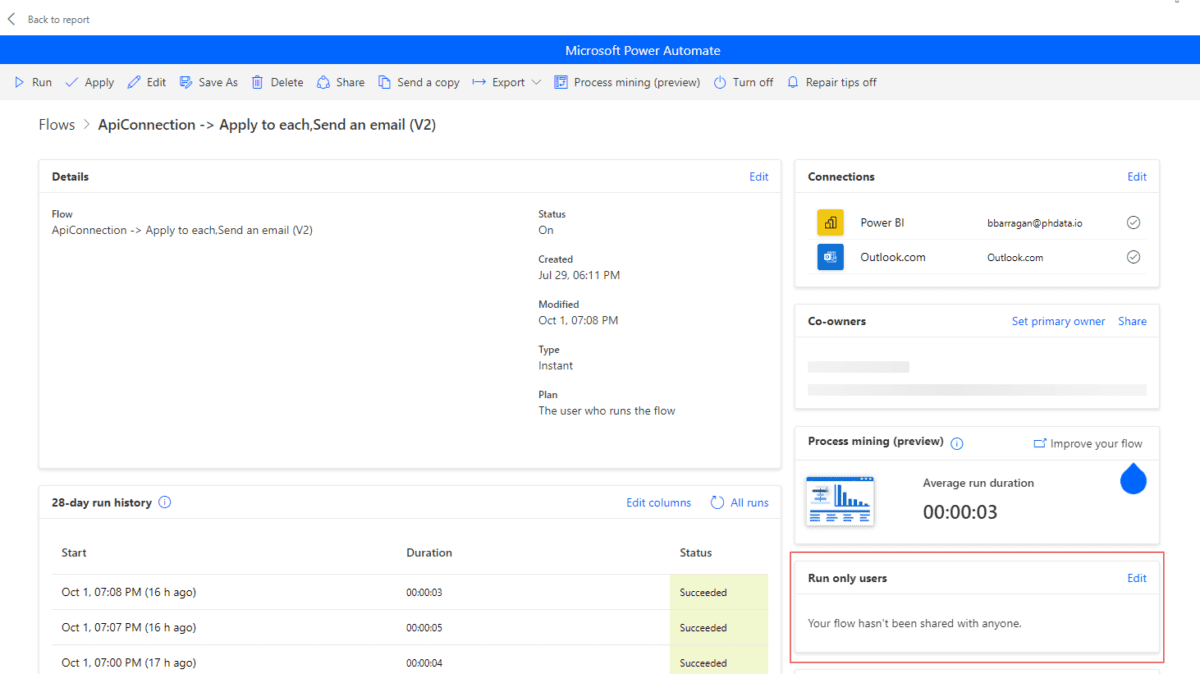
If you need more people to use the button you just created once the report is published, you’ll need to add their email addresses to the Run-only users list.
Click on Back to report.
5. Format your button
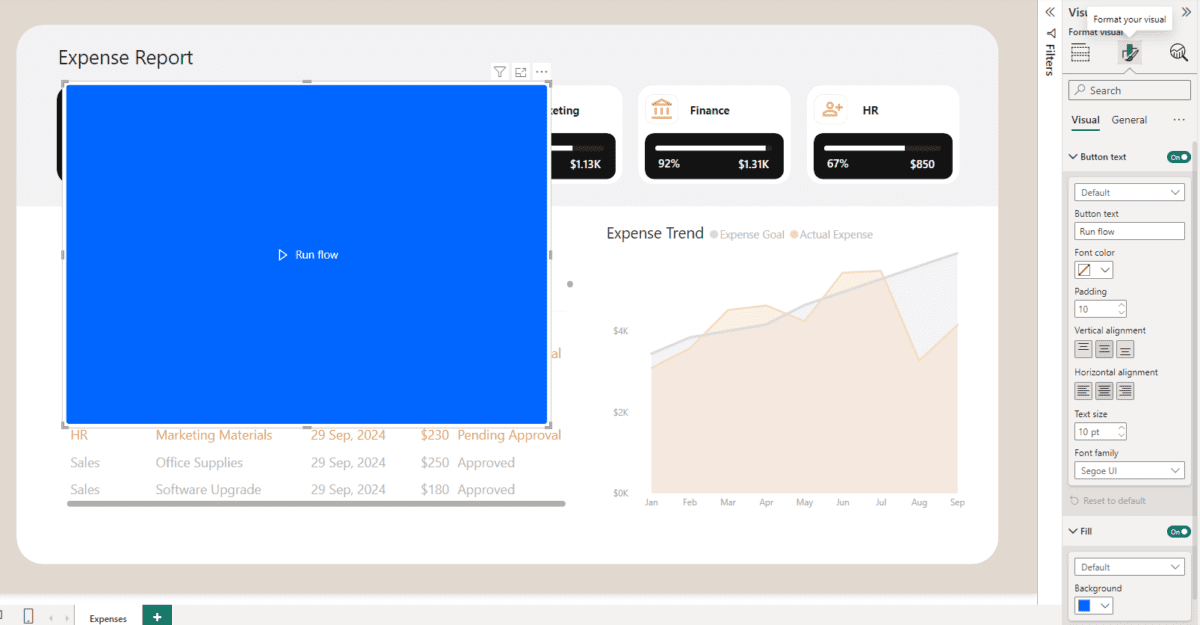
It will create a button in the view format that was opened previously.
On the Format visual section of the Visualization panel, you can format your Power Automate button just like any other button created in Power BI.
It is best practice to format all Fill options of the button, which are Default, Hover, and Selected, making it easier for the user to recognize that the new visual is a button and to see whether it has been selected.
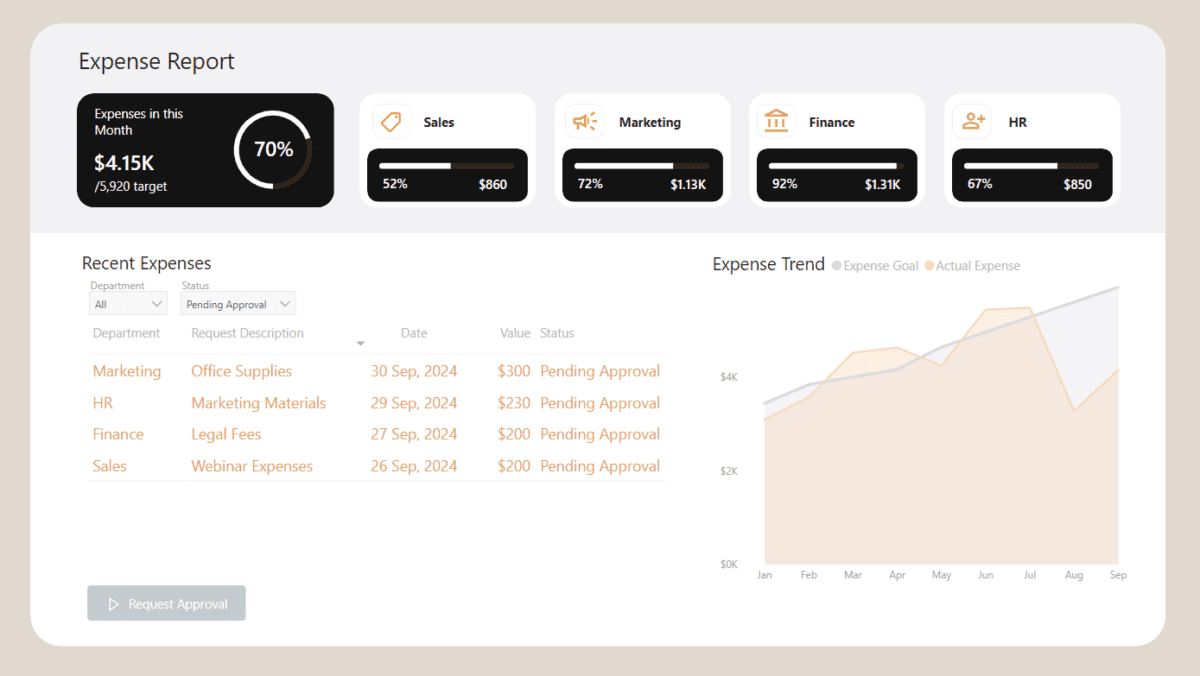
Once you are satisfied with your button, you can position it on the dashboard.
One great advantage of connecting Power Automate with Power BI is that it allows you to filter only the relevant data for your use case.
In our example, we want to send only the Pending Approvals of each department to the corresponding manager. We can filter both Department and Status filters above our table before clicking the Request Approval button. Also, if you do not select filters, it will email all the departments and Statuses listed in your source.
6. Check results
When filtering Status to select only the Pending Approval option, we have found expenses for all the Departments.
Click on the Request Approval Create button.
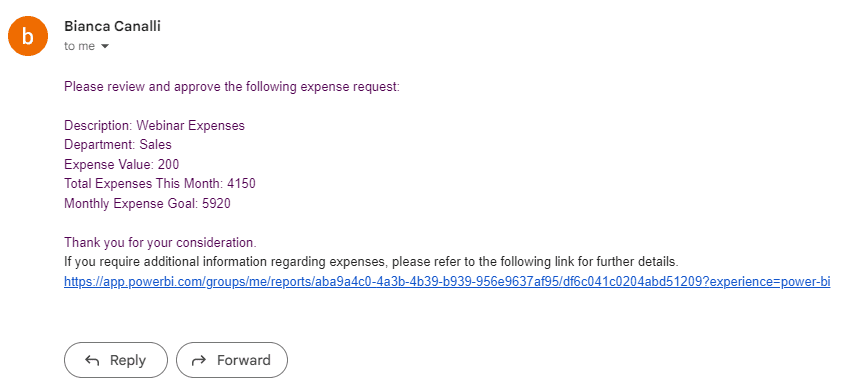
Wait a few seconds, and each manager will receive only the corresponding request from their department.
In this example, you can see the email that received requests from the Sales team. Below, you can see how it appears in the inbox and when opened.
In this example, additional steps could include sending Teams messages to notify that an expense has been submitted or incorporating it into the company’s approval flow.
Closing
Integrating Power Automate with Power BI empowers users to create business scenarios where they can act quickly and efficiently. There are endless opportunities to optimize and enhance daily activities, freeing up time for deeper analysis and strategic initiatives that drive company growth. Users can design workflows, integrate services, and share these automated processes across the company with just a few steps, expanding solutions organization-wide.
By embracing this powerful integration, companies can accelerate decision-making, improve productivity, and create a data-driven environment that supports long-term success.
If you have any additional questions or need assistance integrating Power Automate and Power BI, please contact our team at phData.
FAQs
What is the difference between Power BI and Power Automate?
Power BI analyzes and visualizes data, allowing users to create reports and dashboards from different data sources. Power Automate helps automate workflows, making it easier to handle repetitive tasks across various apps and services.
Can I use Power Automate for free?
Yes, Power Automate offers a free version, but this version has limitations on the number of runs, available connectors, and workflow complexity. Microsoft 365 subscriptions provide access to more advanced features and higher usage limits within Power Automate. Therefore, to fully utilize Power Automate’s capabilities, including access to all connectors and enhanced features, users may need to purchase a premium license or subscription beyond the standard Microsoft 365 plan.
